

1156 years before Christ was born, a rich civilization embedded in the
Valley of Kings was embraced by the Gods. Unfortunately even then life
wasn't all that pleasant. Tombs are being ransacked and people being are
being disgraced. Determined to earn the favor of the Gods, you take up
your task to find out who is tempting the revenge of the Gods and clear
your father's name. May the Gods have mercy upon your soul and shed some
light on your task!
Note: In the hallway before the shaft, drawings on the wall can be examined. Two of these drawings are about the Tit-knot and the Djed-pillar. Examining them will add information about them to your inventory. Might be useful later in the game!
Take a look at the first pillar to your left and examine it. Use the document on the pillar to add the first clue of Ptah. Now return to the center of the room and walk straight forward into the other room. Get the cain that behind the last right pillar. Go back to the picture of Ptah and descent the stairs to the left of it. Keep walking till you reach a large room with six pillars and more light then you are used to. Turn right and enter the small chamber. Use the cain on the cobra that's on the floor. After you killed it, pick up the amulet.
Enter the large room again and walk forward till you hear two men discuss the excavations and ransacking. Those men are Inherkhaoe and Imennakht. Talk to them for some information. Then go to the stone rubble behind them and pick up three rocks to reveal an Ostracon. Examine it to find out it's some rock carving. Show the Ostracon to the men. Then show them the amulet. It must be of one of the workers. Imennakht will give you a ring which gives you access to the village of the workers.
Exit the tomb and talk to Montoemes. Ask him to take you to the Square of Truth. Meet the workers and receive a checklist of men with Hori's name missing. He's the one you're after!
Turn to the left and walk on till you find a small dead-end alley to
your left. Enter it, turn around and find a ladder. Take it and leave the
alley. Turn left and turn right at the end. Walk towards the dame with
the funny hair-do and talk to her. Don't get tempted by her ideas! Use
the ladder on the wall left of the door. The girl will cry out for help
as she wants people to think Hori's being robbed. As if! Give her the ring
to silence her. As she vanishes, use the ladder again and enter Hori's
house.
In the third room of the house, the one with all the broken vases,
open the large basket and find half an amulet. Place the half you found
in it and the amulet is complete. In the back of the room is a small altar
from which you can take a silver vase which is probably lute from the tomb!
Remove the mattress and enter the cellar. Find a very dead Hori who holds
a papyrus. Get it and leave the house. Turn right and take to steps.
Turn left and look at the door of Tschaï's house. Get the pen from
above the door and use it to open the door's lock. Pulling the yellow and
pink ropes, you will be able to open the door and enter. In this first
room you'll find a lamp. Get it and walk forward to the dark room. Use
the tow on the lamp in your inventory and they will shed some light on
this matter. Look around and see a casket which belongs to Oushebtis. Examine
it and see a dagger too. Take the casket and leave the room and the house.
Find the 'main street', the long one with all those doors, and enter the
side street (not the dead- end one!) and take two steps. Turn left and
enter another house. There are two guys here and one of them is Imennakht.
Talk to them and they'll tell you they need prove. Show them Oushebtis'
casket. You'll get new orders to visit the embalmer's. Now get some rest
on the mattress, enjoy your dream while time passes.
When he tells you to follow him, go through the double wooden doors and turn left. Meet him again. Now he wants to be sure you're one of them so it's time for a little test.
First part of the test is to pick the four items of Seth's crimes. Choose wisely; Oudjat-eye, Small Column, Tit Knot and Djed Pillar. Put them all in your inventory.
Now it's time for a riddle. "That which is broken bears that which has been wounded. Beneath the belt of the widow is found the body of the victim." Not so hard to figure out those descriptions when you know you have to put the items like this from your inventory in the four-square-board in the upper left corner of the screen:
1. Upper left = Oudjat-eye,
2. Upper right = Tit-knot,
3. Lower left = Small Column,
4. Lower right = Djed-pillar.
Go to the next room and examine the large sarcophagi. It has drawings on the side and when you place your document on it, the third clue of Heri will be added. Now leave the house and follow the procession.
Note: There's a golden vase near the sarcophagi which is part
of the lute. Don't take it. If you do, you'll be caught as a common thief
when you're leaving the house. Leave it alone and you can leave the house
safely and have information about the tomb raiders you're after!
This painting guy isn't much of a help but scanning those paintings might help. The useful hint here is the cat with an earring. Remember that one!
Now go outside and meet an older woman. She wants you to solve a riddle
which she will reward with the name of one of the thugs involved in the
crimes being investigated. To do so, you have to examine three things;
your document, the inscriptions on the wall to your right and the inscriptions
on the wall panel near the woman.
Look at the document, especially the square drawing with the stones,
round and square-edged, on it. Now take a look at the wall to your right.
There's a similar drawing on it but with one important difference: on the
upper room, third square from the right, an extra playing stone is added!
This marks the spot! Now go back to the wall near the old woman and see
another fine example of this board. Click on the third square from the
right of the upper row. This is the symbol you're looking for. Use the
document on this sign and collect the fourth clue. Then use the
document on the woman. When you've collected all four clues, she'll tell
you Panehesy is one of the bad guys and he should be the one you have to
investigate. Much obliged and leave!
Maybe you missed a clue? Here's a checklist:
1st clue; level 1, chamber next to the pit, clue of Ptah.
2nd clue; level 2, first house in the village, clue of Pedjet.
3rd clue; level 3, embalmer's house, sarcophagi room, clue of Heri.
4th clue; level 4, outside the nobleman's tomb, final clue.
No go to the front door and look to the right. You see another door
leading into the garden. Go through it and wait till two arrows are fired
at you. The assassin should be killed by you with your boomerang. Select
it from your inventory. In front of you is a tree. Aim the boomerang just
to the right of it. The icon will invert it's color and clicking will throw
the boomerang. You can't see the attacker, by the way! When you throw right,
the thug will be killed.
Now go left and left again and enter the house. Inside are a lot of
room from which you should collect stuff. The map of the first level of
the house will help you in this matter.
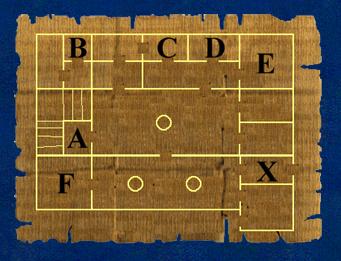 You enter the
house in the room marked with the X. Now go to the room with the A. In
here you find a bowl of milk. Get it. Now go to the room F and turn around
till you here a cat. Put down the bowl of milk and the cat will enter.
Look at the cat and take it's earring. Now look up and see a carving in
the wall, like in the nobleman's tomb. Use the earring on it and it will
reveal a secret place. Get the letter and the Senet piece from it.
You enter the
house in the room marked with the X. Now go to the room with the A. In
here you find a bowl of milk. Get it. Now go to the room F and turn around
till you here a cat. Put down the bowl of milk and the cat will enter.
Look at the cat and take it's earring. Now look up and see a carving in
the wall, like in the nobleman's tomb. Use the earring on it and it will
reveal a secret place. Get the letter and the Senet piece from it.
Now go to room E to get the necklace and the wig and then on to room
C to get the tunic. Then go to room D and get the kohl make-up. Use the
mirror in this same room (or in room B) and wear the wig and use the kohl.
Go to the servant near the stairs and talk to her. Then show her the
necklace. She tells you this will complete your outfit. Then use the stairs
to get upstairs and join the party!
Once you are on the second floor, you can talk to the noblemen in the
back and join them in drinking. Five glasses of booze won't kill you, the
sixth will! But then again, it won't help you. You can also talk to the
noble Lady but, again, nothing is gained here. Go to the terrace which
can be reached by going to one of the curtains. Examine the game of Senet
on the table and place the Senet piece you found on the empty square. Now
get the document from your inventory and put it on the questionmark in
your inventory. Look at the document and then put the icon of it back in
your inventory. The document itself can still be examined. Move the cursor
around till you get the explanation text, saying Heri, Pedjet, Ptah,
Nefer. This is a code. Now click away the document and look at the
Senet game again. All four names are on the board. Click on it in the order
mentioned above and a secret compartment will open.
Important! After this the game of Senet will have to be played.
As you are not known with the game, you best save the game here!
Now click on the secret compartment and get the map of the temple. Now automatically the game of Senet will start. As the description of the game and it's rules in the booklet is very good, I won't explain it to you again. Just use the booklet. One hint though; read it very carefully, especially about those special fields used in the game. The best advice here is to play the game over and over again till you can beat your opponent. It's not a very difficult game, just needs some lick and expertise. Just do it.
When you've won the game, Panehesy won't let you go! He's a bad loser
so head for the balcony and jump down to escape.
On the roof, talk to the standing priest. You must do some stargazing. Click on the sitting priest with the new required item and aim at the biggest and brightest star. It's right above the priest. Capture the star in the triangle shaped hole and click. Then enter the staircase again and go back to the wooden door. Enter and talk to the priest. Tell him the star is exactly above the priest. After that, click on the basin and then click 'away' again. Talk to the priest and tell him the water shows you the 9th hour. Then the priest vanishes. After that, get the small dish from the floor. Look at the basin again and click on it with the small dish. The water disappears and use the knife on the marks on the bottom. They will reveal two elements of the stolen stuff. Then look at the map of the temple found during the Senet sequence which shows you the location of the other part of it and go down the stairs.
This part might be a bit difficult as all locations look the same. Once you see the pillars again, don't move but turn to the right. Then take on step forward and walk towards the end and take one turn to the right. At last take one step forward. The pillar to you right and front is the one you should examine. There's a piece of stone missing. Look at it and get the second piece. Now go back to the temple entrance and show both pieces to the girl. The game will shift to another location.
The movie clip shows you the rituals and finally your conversation with
To. Tell him the story so far, Then tear Ptahnefer's tunic of and reveal
a necklace. Place both items you found in the temple on the necklace and
don't mind his accusations. When the second piece is in place, he'll be
found guilty and taken away. The glory and the treasury is yours. The Gods
have been with you and you've successfully completed the game.
This walkthrough is exclusively licensed to The Spoiler Center on https://the-spoiler.com/. Make sure you check out this site for this walkthrough to get the latest updates!
Version 1.1 - Copyright April 1998 by Fugazi - Last update: August 20th, 1998

Questions, suggestions, remarks or additional information? Just want to let me know what you think of this walkthrough? But please mention the name of the game (and episode) because I'm often left guessing this...
Title bar © 1997 by Fugazi. Original images (except ruler) on courtesy
of Cryo Interactive Entertainment.