BREAKING NEWS: ALL COINS
FROM THE MUSEUM OF THE HISTORY OF CYPRIOT COINAGE HAVE BEEN
STOLEN!
A
substantial reward is offered for the recovery of the stolen 100 coins. As the
curator of the museum talks about which coins have been taken, the television
starts to get static and shuts down. You are in the apartment of someone that
plays the guitar, basketball and has an interest in electronics. Turn around and
click on the big cabinet doors to enter a secret passageway. You see a secret
laboratory filled with strange machines. Turn to your right and flip the
switch.
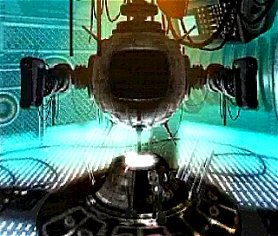
This lowers the time machine. On the front of the machine is a
large screen. Click on the machine and it turns around. Click at the back of the
machine and it stops. Open the door and see a link to the WWW. Pull out and
click the large screen in front. Enter the time machine. You are now inside the
time machine. You see vortexes that allow access to different points in time and
places. Click on the star in the upper left of the screen to bring down the
menu. You don't have to go to the different locations in any particular order.
Clicking on disengage brings you back to the main laboratory. Museum plan gives
the layout of the museum’s different exhibits, the number of the display case
and the information about the display. This information is also seen when you
click on the coin slots in front of the screen. Click on any of the little boxes
or any of the vortexes to start.
Shall we
start?
TOMB:
Salamis –Evelthon 500 – 400
BC
Upon getting into the time
machine and coming out in a bare landscape, pan right and see a triangular
structure. Enter.
Take a close look at the chair and
notice that the knobs are clickable. Turn around and get a hotspot outside. Take
a closer look and see a drawing similar to the chair knobs inside the tomb. The
drawing shows knob #4 to knob #7 to knob #5. Go back to the chair and
push knobs 4, 7 and 5. A
Cyprosyllabic script is seen.
Upon reading the history of this time
in Display 2 of the museum, take note that most of the early coins minted are
inscribed with Cyprosyllabic script of the name of Evelthon as Euveletone. Turn
left and see 3 statues with script at the bottom of the statues. Translate EU VE LE TO NE to Cyprosyllabic script using the scroll
from the chair puzzle and turn the statues to highlight the
scripts.
Move out of close up and a
sliding sound is heard. Turn around and at the opposite side of the room, the
recessed tomb is now open. Pick up 2 Coins.
To the
left of the chair, a sealed recessed tomb is seen on the floor. Look up on the
painted ceiling above the sealed tomb, a circled
pattern is seen lopsided. Look closer and click on it. A sliding sound is heard.
Look down at the opened, recessed stone box and pick up the 3
coins.
TEMPLE:
Salamis – Eyagoras 400-300
BC
A temple in
a desert like clearing is seen. Still outside, look at the right side of the
temple. The drawing shows an arrow from the temple. The one at the center under
the roofline is a depiction of military men. The lower hotspot shows stairs
flanking columns.Click on the right stairs depicted on the wall
carving. A stairs going doing down under temple is revealed. Enter. Turn right, forward and then left. Forward
to a room with circles in a V formation is seen on the right wall and a triangle
with pointed downwards on the left wall. Look down and pick up the 5 coins at
the center of the floor. Go forward once, turn left, forward, turn right,
forward to a room with similar inscriptions on the wall similar to the first
room with the addition of a sun on the middle wall. Look down and pick up the 5
coins.
Enter the temple and see a Temple Statue standing guard. Click on him and listen. “The Goddess is depicted on the coins of the
successors of King Pnytagoras the First. 5 letters of her name make up part of
the clue.” At the back wall of the temple, a stone script laden circle with
rings is seen.Each ring can be rotated.
Arrange the circle script to form the name of the
King of Salamis, PNYTAGORAS horizontally. The
script-laden circle swings open and a coin is revealed. Pick it
up.
THEATRE:
Kition 500-300
BC
An
Amphitheater with mountains in the backdrop is seen. Look to the right and see 3
columns. Look closer and notethe markings. The bottom circle shows
a circle with a diagonal line slashing through it and an arrow pointing to the
upper left. Go to the center of the amphitheater floor facing the seats and see
a mask on the upper left tier. Click on the mask with eye and the view pans to a
seat with markings on the riser. Click back to the center of the amphitheater
floor and click forward to the center of the seats. Pan to the right and see a
piece of paper. Back to the center of the amphitheater floor and pan right and
see a mirror. Click on the mirror. Turn the mirror as
far left as possible until light is reflected on the seat riser. A smiling face is revealed. Click on
the face. A paper is seen close to the face.Study the paper. Click on the face and the
tongue protrudes out as well as a shadow is seen on the right side of the
screen. Click on the shadow. A block of stone with 3 buttons pulled away from the section
produced the shadow. No need to do anything with the buttons. Click on the top back of the stone’s hotspot. Push the button
revealed. An entryway is revealed at the aisle close
to the mirror.
Enter the revealed entryway. Looking
around the columns of light, note that there are 4 in a row. Remembering the
paper by the face, there are columns of dots, four in a row. One of the dots is
circled clear.At the second row of lights
from the right of the entryway, there is one column of light missing. Look for a
hotspot on the ceiling behind the first column of light. Click on the hotspot on the ceiling to unblock the covered
light.A shower
of rocks clears the light hole and looking down on the light on the floor shows
coins. Pick the coins up.
SEIGE
SCHEMATICS:
Hellenistic Period 332-30
BC
Since there
is a battle going on, the time machine will not go to this area, but gives a
schematic view only. The object is to use the resources and blueprints from
General Headquarters to get over to the fortified city and find the coins. You
can read about the Hellenistic Period (332-30 BC) in display 9 of the
museum.
From the
General Headquarters, where decisions are made about utilizing the
resources, put the axes with the lumbermen. Place the
lumbermen on the trees, to get some logs. Put the logs in the mill. Place saws
in the mill and then put the blueprints for the bridge in the mill.Move the bridge to connect with the little
island. Place the woodcutters on both sets of trees on that island. Put the woodpiles in the mill. Put the blueprints for the ship in the
mill. Put hammers and the blueprints for the battling ram on the ship. Place the
ship near the iron ore mine. Put hammers, then the blueprints for battling ram
in the iron ore mine. Pick up the battling ram and place on boat. Bring ship
back to the mainland and place the battling ram on the land. Put the ship back
in the mill. Put the blueprints for the tower in the mill. Place
the battling ram and soldiers inside the tower. With the bridge between the
mainland and island, place the tower on the island. Move the bridge to connect
the island with the fortified city. Place the tower on the land just outside the
walls of the fortified city. The soldiers will use
the battering ram to break a hole in the wall. Now you will be able to retrieve
16 coins.
VILLA
Roman Period 30 BC – AD
330
Starting
this section, you will be in the main room. In front of you will be a table with
a round dish and to the left of that you will see a bench and past that a
statue. Get a close up of the bench and look at the scroll. Back off and turn
all the way around to your left. Go through the doorway and you will come to
another doorway that will enter into a reddish room. Upon entering this
room you will see a peacock painted on the wall above another long bench. Turn
around and notice the tile floor. There is a tile that resembles the picture on
the scroll. Your cursor will change when you find
that tile and you will be able to click on it. The
tile will change color. Turn around and open the door of the
birdcage. As you open the cage door the peacock picture will fade away. Open the
cage door all the way and leave the room.
When you
are back in the main room where you started, turn to your right this time about
90 degrees and go through this opposite doorway. Go forward through another
doorway and you will be in a room with some large shelves that look like bunk
beds. There is a little alcove near the floor with 12 holes in a row above it.
Back away and turn to the wall with the peacock. Go closer and you will notice a
basket of grain, plate, and a lever. Put 12 grains on
the plate and pull the lever, which will empty the
grains into the bird's mouth. Back off and go toward that little alcove area
again. This time you will notice the holes are filled. From left to right, click on each hole.
The little alcove will open automatically after you finish clicking on the
holes. Go through it and collect your coins!
CHURCH
Byzantine Period 330 –1191
AD
Enter the
Church and look around at all the beautiful wall pictures. There are 2
candlesticks on each side of the altar. The one on the right has an unlit
candle. Click on that candle to light it. Get close to the altar and you will
see an offering plate with some coins. Be careful and don't take those or you
might get thrown out of the church. Look at the book or picture on the altar.
When you get close to it your cursor changes into a hand. Make the sign of the
cross on that picture, clicking 4 times, from top to
bottom and from right to left. Each time you click
the picture will glow. The last time you click on it, the back of the altar will
open up and you may go forward and collect more
coins.
CITY
MAZE
Medieval Kingdom of Cyprus
1191-1571
You come
into this age facing an entrance to a walled city surrounded by the sea. On top
of the entry is a framed stone carving Look close at the carving, a lion is
seen. Enter the city.Lets take a tour and
start searching for coins.
Turn right towards the columns. Look in the jug and pick up a
coin. Turn left into the city and forward until the end. Turn left, forward
across the fountain until the end and turn right. Forward until the dry
fountain. Look closer on the dry fountain and pick up 5 coins. Take the upper
right road, left on next road and then right. Enter brown house. Turn around and
look inside one of the wooden cask by the door and pick up 4 coins. Take the
upper left road and turn left. Take second road toward the city and get a close
look at the camel. Check one of the jugs and pick up a coin. Go to the lower
left road towards the wall of the city and go south. Take the first road towards
the city proper and then the first left. Look at the palm tree. Pick up the coin
inside the jug. Take the left road until you see the 3 horses. Pick up 2 coins
from the saddlebag. Go back out of the city towards
the wall enclosure and circle the perimeter until you reach the right wall
enclosure. Take the second road from the corner tower and turn left and get a
closer look at the church.
Checking
the information on display 17 of the Museum, a legend was described about that
for a brief period after midnight the lion opens its mouth and those daring to
thrust their hand down its throat maybe lucky enough to secure a valuable
treasure.Look close at the lion.
Change your computer clock to 12 midnight. Wait
for 15-20 minutes. It took me exactly 20
minutes.The lion’s eyes will flash.Another flash of light will come out when the
lion opens his mouth. Take the coin from the mouth.
WOW!
MANSION
Ottoman Rule 1571
–1878
Arriving outside in the middle of a clear night, with stars
twinkling bright in the night sky, turn around and enter the mansion. Based on
the information from Display 18 of the museum, this must be the mansion of the
famous Dragoman (interpreter) of Cyprus. You are in a courtyard, moon above and
rooms on the left and right side. The rooms that can be entered on the left side
are the green room, blue room, orange room and a yellow room. Each of these
rooms has a cabinet and other furniture. The orange room has a picture of a man
holding a paper. The yellow room has a clock with a picture of a girl. On the
other side of the courtyard, there is the red room and the white room. Outside
the rooms is a table with a telescope, compass and a star map. Looking through
the telescope, you will see the night sky as it is seen from the naked eye while
standing at the center of the courtyard. Standing at the center of the
courtyard, look above the entrance to the mansion and see a white cross at the
intersection of 4 blocks of stone. Remembering the information from Display 18
in the museum, “in this mansion, the cross symbol with the abbreviated religious
sign IC XC NI KA is found inscribed in various places.” Look down on the block
of stones paving the courtyard and see 2 orange stones. A hotspot to the right and also below the left orange stone is
seen. Click on both the hotspots. One is KA (above the stone) and the other XC
(below). Click on them to light
them up. Turning exactly 180 degrees from that spot and facing the left rooms,
with the fourth arch from the end in the foreground, a hotspot is found on one
of the stones close to the bottom of the screen. Click on it and click again on
IC. Pan right and with the stairs at the center of the frame, look for a hotspot
close to the bottom of the screen. Light up NI. Look at the 4 block of stones above
the entryway and see that the inscription is now visible. Arrange the
inscriptions to IC and XC on top and NI and KA at the bottom.The center white cross turns
blue.
Go to the blue room. The
cabinet is now open. Enter and look around the dungeon. Pick 4 coins from the
skeleton’s hand.
SCHOOL LIBRARY
British Administration 1878 –
1960
You will
start this section on the street with sounds of gunshots in the background. Turn
to your left and find the hotspot below the Wanted poster. Pick up the matchbox
and turn it over. Looks like a combination. Write it down since it may come in
handy later. (35-25- 60-75) Turn and enter the library. Go up the stairs and
look at the notebook on the table. Use the pencil over that note to make it
readable. The note tells you to identify yourself by transmitting your leader’s
alias to H.Q. then the correct order for the combination will be sent to you.
How do you find your leader's alias? Check in the museum. Go to the museum
plan and read about the British Administration 1878-1960 in Display 19. It
mentions the struggle Cyprus went through to become an independent republic and
also gives the name George Givas (alias DI GENIS) as the leader. Go back to the
game, turn about 90 degrees look up the stairs to the bookcases on the top
level. Click on the hotspot and move the yellowish book to the right. Enter the secret room and you will find a telegraph machine and code.
Type in the name DI GENIS using the code on the wall.
As soon as you do that you will get the order of the
combination (2 left, 3 right, 1 left, 4 right).
Exit this
secret room and go down the stairs out to the main hallway. At the bottom of the
stairs go forward into that first room where you will find a safe. With the
numbers from the match box and the correct order from the telegraph message you
will get 25 left, 60 right, 35 left, and 75 right.
This is not the
combination, but the number of spaces you need to move the dial. There are a
total of 100 spaces or numbers around the dial but 20 clicks, so each click is 5
numbers or spaces. With this the actual combination becomes 75 left, 35 right, 0 left, and 75 right. Open the safe with the handle and destroy the papers with the
matches in the safe. Now you can collect your
coins!
APARTMENT
Republic of Cyprus 1960 – present
day
At anytime
during the game you can exit the time machine and try to leave your apartment,
but you can't get very far because the gate is locked and out of order. Look
through the keyhole of apartment #011. Interesting! Enter apartment #012 and
notice all the piggybanks. Look through the telescope.
Turn to the left and
click on that big freestanding closet. Bang away at it quickly with your fist
until it moves all the way over to the left and stays there. Now you can enter
apartment #011. You will see a table with laser lights positioned around it.
When you try to move closer a huge crate will come down and cover
it.
Turn around and solve that puzzle on the wall panel to raise the
crate.The object of the puzzle is to
select an icon (circles with lines) from #1 that when laid over the icon on side
#2 at the same position produces an icon that will negate lines inside the
circle. The end product should be a circle with no
lines.
Go back to
that table and you will be able to see 9 coins under a sealed cover.
The object of the next puzzle is to light up all 9
lights to open that seal.
Here, we
leave until you or we or somebody else solves this last puzzle. We hope that we
have given you a head start so that the Museum of the History of Cypriot Coinage
will have back the magnificent collection of coins that connects us to the early
days of monetary history of a grand country.
GOOD
LUCK!
_______________________________________________________________________________________
This document
may not be distributed without express written permission of the
authors MaGtRoorNORMA The context may not be
altered in any way and all reference/links must be provided to this
site: GameBoomers
For Questions or Comments on
this Walkthrough, Please write to: MaGtRoorNORMA
 This lowers the time machine. On the front of the machine is a
large screen. Click on the machine and it turns around. Click at the back of the
machine and it stops. Open the door and see a link to the WWW. Pull out and
click the large screen in front. Enter the time machine. You are now inside the
time machine. You see vortexes that allow access to different points in time and
places. Click on the star in the upper left of the screen to bring down the
menu. You don't have to go to the different locations in any particular order.
Clicking on disengage brings you back to the main laboratory. Museum plan gives
the layout of the museum’s different exhibits, the number of the display case
and the information about the display. This information is also seen when you
click on the coin slots in front of the screen. Click on any of the little boxes
or any of the vortexes to start.
This lowers the time machine. On the front of the machine is a
large screen. Click on the machine and it turns around. Click at the back of the
machine and it stops. Open the door and see a link to the WWW. Pull out and
click the large screen in front. Enter the time machine. You are now inside the
time machine. You see vortexes that allow access to different points in time and
places. Click on the star in the upper left of the screen to bring down the
menu. You don't have to go to the different locations in any particular order.
Clicking on disengage brings you back to the main laboratory. Museum plan gives
the layout of the museum’s different exhibits, the number of the display case
and the information about the display. This information is also seen when you
click on the coin slots in front of the screen. Click on any of the little boxes
or any of the vortexes to start. Take a close look at the chair and
notice that the knobs are clickable. Turn around and get a hotspot outside. Take
a closer look and see a drawing similar to the chair knobs inside the tomb. The
drawing shows knob #4 to knob #7 to knob #5. Go back to the chair and
push knobs 4, 7 and 5. A
Cyprosyllabic script is seen.
Take a close look at the chair and
notice that the knobs are clickable. Turn around and get a hotspot outside. Take
a closer look and see a drawing similar to the chair knobs inside the tomb. The
drawing shows knob #4 to knob #7 to knob #5. Go back to the chair and
push knobs 4, 7 and 5. A
Cyprosyllabic script is seen. 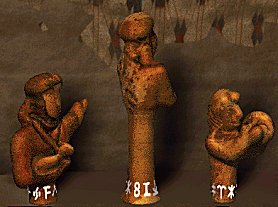 Upon reading the history of this time
in Display 2 of the museum, take note that most of the early coins minted are
inscribed with Cyprosyllabic script of the name of Evelthon as Euveletone. Turn
left and see 3 statues with script at the bottom of the statues. Translate EU VE LE TO NE to Cyprosyllabic script using the scroll
from the chair puzzle and turn the statues to highlight the
scripts.
Upon reading the history of this time
in Display 2 of the museum, take note that most of the early coins minted are
inscribed with Cyprosyllabic script of the name of Evelthon as Euveletone. Turn
left and see 3 statues with script at the bottom of the statues. Translate EU VE LE TO NE to Cyprosyllabic script using the scroll
from the chair puzzle and turn the statues to highlight the
scripts.  Turn right, forward and then left. Forward
to a room with circles in a V formation is seen on the right wall and a triangle
with pointed downwards on the left wall. Look down and pick up the 5 coins at
the center of the floor. Go forward once, turn left, forward, turn right,
forward to a room with similar inscriptions on the wall similar to the first
room with the addition of a sun on the middle wall. Look down and pick up the 5
coins.
Turn right, forward and then left. Forward
to a room with circles in a V formation is seen on the right wall and a triangle
with pointed downwards on the left wall. Look down and pick up the 5 coins at
the center of the floor. Go forward once, turn left, forward, turn right,
forward to a room with similar inscriptions on the wall similar to the first
room with the addition of a sun on the middle wall. Look down and pick up the 5
coins.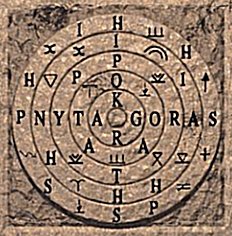 Click on him and listen. “The Goddess is depicted on the coins of the
successors of King Pnytagoras the First. 5 letters of her name make up part of
the clue.” At the back wall of the temple, a stone script laden circle with
rings is seen.Each ring can be rotated.
Arrange the circle script to form the name of the
King of Salamis, PNYTAGORAS horizontally. The
script-laden circle swings open and a coin is revealed. Pick it
up.
Click on him and listen. “The Goddess is depicted on the coins of the
successors of King Pnytagoras the First. 5 letters of her name make up part of
the clue.” At the back wall of the temple, a stone script laden circle with
rings is seen.Each ring can be rotated.
Arrange the circle script to form the name of the
King of Salamis, PNYTAGORAS horizontally. The
script-laden circle swings open and a coin is revealed. Pick it
up.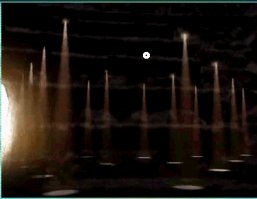 Enter the revealed entryway. Looking
around the columns of light, note that there are 4 in a row. Remembering the
paper by the face, there are columns of dots, four in a row. One of the dots is
circled clear.At the second row of lights
from the right of the entryway, there is one column of light missing. Look for a
hotspot on the ceiling behind the first column of light. Click on the hotspot on the ceiling to unblock the covered
light.A shower
of rocks clears the light hole and looking down on the light on the floor shows
coins. Pick the coins up.
Enter the revealed entryway. Looking
around the columns of light, note that there are 4 in a row. Remembering the
paper by the face, there are columns of dots, four in a row. One of the dots is
circled clear.At the second row of lights
from the right of the entryway, there is one column of light missing. Look for a
hotspot on the ceiling behind the first column of light. Click on the hotspot on the ceiling to unblock the covered
light.A shower
of rocks clears the light hole and looking down on the light on the floor shows
coins. Pick the coins up.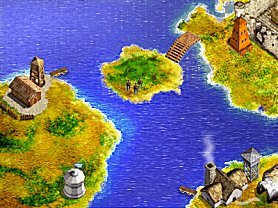 Put the woodpiles in the mill. Put the blueprints for the ship in the
mill. Put hammers and the blueprints for the battling ram on the ship. Place the
ship near the iron ore mine. Put hammers, then the blueprints for battling ram
in the iron ore mine. Pick up the battling ram and place on boat. Bring ship
back to the mainland and place the battling ram on the land. Put the ship back
in the mill. Put the blueprints for the tower in the mill.
Put the woodpiles in the mill. Put the blueprints for the ship in the
mill. Put hammers and the blueprints for the battling ram on the ship. Place the
ship near the iron ore mine. Put hammers, then the blueprints for battling ram
in the iron ore mine. Pick up the battling ram and place on boat. Bring ship
back to the mainland and place the battling ram on the land. Put the ship back
in the mill. Put the blueprints for the tower in the mill.  Upon entering this
room you will see a peacock painted on the wall above another long bench. Turn
around and notice the tile floor. There is a tile that resembles the picture on
the scroll. Your cursor will change when you find
that tile and you will be able to click on it. The
tile will change color.
Upon entering this
room you will see a peacock painted on the wall above another long bench. Turn
around and notice the tile floor. There is a tile that resembles the picture on
the scroll. Your cursor will change when you find
that tile and you will be able to click on it. The
tile will change color.  Click on that candle to light it. Get close to the altar and you will
see an offering plate with some coins. Be careful and don't take those or you
might get thrown out of the church. Look at the book or picture on the altar.
When you get close to it your cursor changes into a hand. Make the sign of the
cross on that picture, clicking 4 times, from top to
bottom and from right to left. Each time you click
the picture will glow. The last time you click on it, the back of the altar will
open up and you may go forward and collect more
coins.
Click on that candle to light it. Get close to the altar and you will
see an offering plate with some coins. Be careful and don't take those or you
might get thrown out of the church. Look at the book or picture on the altar.
When you get close to it your cursor changes into a hand. Make the sign of the
cross on that picture, clicking 4 times, from top to
bottom and from right to left. Each time you click
the picture will glow. The last time you click on it, the back of the altar will
open up and you may go forward and collect more
coins. Turn right towards the columns. Look in the jug and pick up a
coin. Turn left into the city and forward until the end. Turn left, forward
across the fountain until the end and turn right. Forward until the dry
fountain. Look closer on the dry fountain and pick up 5 coins. Take the upper
right road, left on next road and then right. Enter brown house. Turn around and
look inside one of the wooden cask by the door and pick up 4 coins. Take the
upper left road and turn left. Take second road toward the city and get a close
look at the camel. Check one of the jugs and pick up a coin. Go to the lower
left road towards the wall of the city and go south. Take the first road towards
the city proper and then the first left. Look at the palm tree. Pick up the coin
inside the jug. Take the left road until you see the 3 horses. Pick up 2 coins
from the saddlebag. Go back out of the city towards
the wall enclosure and circle the perimeter until you reach the right wall
enclosure. Take the second road from the corner tower and turn left and get a
closer look at the church.
Turn right towards the columns. Look in the jug and pick up a
coin. Turn left into the city and forward until the end. Turn left, forward
across the fountain until the end and turn right. Forward until the dry
fountain. Look closer on the dry fountain and pick up 5 coins. Take the upper
right road, left on next road and then right. Enter brown house. Turn around and
look inside one of the wooden cask by the door and pick up 4 coins. Take the
upper left road and turn left. Take second road toward the city and get a close
look at the camel. Check one of the jugs and pick up a coin. Go to the lower
left road towards the wall of the city and go south. Take the first road towards
the city proper and then the first left. Look at the palm tree. Pick up the coin
inside the jug. Take the left road until you see the 3 horses. Pick up 2 coins
from the saddlebag. Go back out of the city towards
the wall enclosure and circle the perimeter until you reach the right wall
enclosure. Take the second road from the corner tower and turn left and get a
closer look at the church.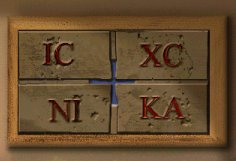 Click on them to light
them up. Turning exactly 180 degrees from that spot and facing the left rooms,
with the fourth arch from the end in the foreground, a hotspot is found on one
of the stones close to the bottom of the screen. Click on it and click again on
IC. Pan right and with the stairs at the center of the frame, look for a hotspot
close to the bottom of the screen. Light up NI. Look at the 4 block of stones above
the entryway and see that the inscription is now visible. Arrange the
inscriptions to IC and XC on top and NI and KA at the bottom.The center white cross turns
blue.
Click on them to light
them up. Turning exactly 180 degrees from that spot and facing the left rooms,
with the fourth arch from the end in the foreground, a hotspot is found on one
of the stones close to the bottom of the screen. Click on it and click again on
IC. Pan right and with the stairs at the center of the frame, look for a hotspot
close to the bottom of the screen. Light up NI. Look at the 4 block of stones above
the entryway and see that the inscription is now visible. Arrange the
inscriptions to IC and XC on top and NI and KA at the bottom.The center white cross turns
blue. 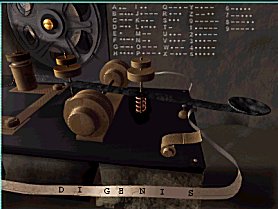 Go to the museum
plan and read about the British Administration 1878-1960 in Display 19. It
mentions the struggle Cyprus went through to become an independent republic and
also gives the name George Givas (alias DI GENIS) as the leader. Go back to the
game, turn about 90 degrees look up the stairs to the bookcases on the top
level. Click on the hotspot and move the yellowish book to the right.
Go to the museum
plan and read about the British Administration 1878-1960 in Display 19. It
mentions the struggle Cyprus went through to become an independent republic and
also gives the name George Givas (alias DI GENIS) as the leader. Go back to the
game, turn about 90 degrees look up the stairs to the bookcases on the top
level. Click on the hotspot and move the yellowish book to the right.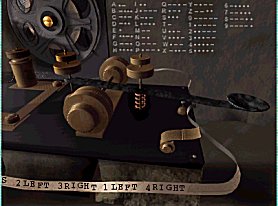 Enter the secret room and you will find a telegraph machine and code.
Type in the name DI GENIS using the code on the wall.
As soon as you do that you will get the order of the
combination (2 left, 3 right, 1 left, 4 right).
Enter the secret room and you will find a telegraph machine and code.
Type in the name DI GENIS using the code on the wall.
As soon as you do that you will get the order of the
combination (2 left, 3 right, 1 left, 4 right).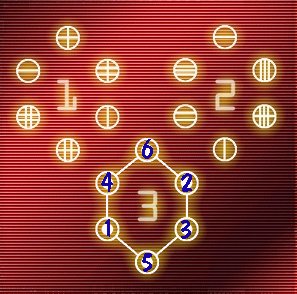 Turn around and solve that puzzle on the wall panel to raise the
crate.The object of the puzzle is to
select an icon (circles with lines) from #1 that when laid over the icon on side
#2 at the same position produces an icon that will negate lines inside the
circle. The end product should be a circle with no
lines.
Turn around and solve that puzzle on the wall panel to raise the
crate.The object of the puzzle is to
select an icon (circles with lines) from #1 that when laid over the icon on side
#2 at the same position produces an icon that will negate lines inside the
circle. The end product should be a circle with no
lines.