| ||||||||||||||||||||||||||||||||||||||
| From the first cave, walk up the hill to find the second one. The fire in the cave can be re-kindled by fetching a third lot of lit branches from the first cave. | ||||||||||||||||||||||||||||||||||||||
CAVE LABYRINTH | ||||||||||||||||||||||||||||||||||||||
| Each of the four entrances lead into a labyrinth of caves. Note that the markings painted at these cave entrances are the same as those on the signature stone. | ||||||||||||||||||||||||||||||||||||||
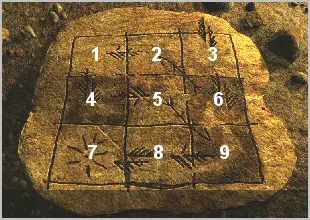
| The symbols drawn on the large flat rock in the cave illustrate how to navigate through the labyrinth. | ||||||||||||||||||||||||||||||||||||||
| ||||||||||||||||||||||||||||||||||||||
| First, identify each square on the rock with a corresponding marking on the signature stone. The three 'dark' squares numbered 4, 6 and 9 must be the 'black' markings. Next, note that the arrow on square 3 begins outside the diagram. Square number 7 has a 'sun' painted on it that clearly represents 'the light at the end of the tunnel'. To get from square 3 to square 7 simply follow the arrows. The correct sequence is 3 - 6 - 2 - 1 - 4 - 5 - 9 - 8 - 7. Correlate this sequence with the stone markings to get the 'colour' sequence: | ||||||||||||||||||||||||||||||||||||||
BROWN - BLACK - CLEAR - BROWN - BLACK - BROWN - BLACK - BROWN - RED | ||||||||||||||||||||||||||||||||||||||
| Before entering the labyrinth you need light. Pick up all three torches scattered around the cave and light one of them with the fire. | ||||||||||||||||||||||||||||||||||||||
| There are two important aspects to navigating the labyrinth. You must click twice to enter another cave and the flame on each torch only lasts long enough to allow you to move through three caves. To overcome the flame problem, light another torch with the currently lit one before moving to a 'fourth' cave. | ||||||||||||||||||||||||||||||||||||||
| Begin by entering the cave with a 'brown' marking and follow the sequence shown above. Don't forget to light another torch in every third cave you enter. | ||||||||||||||||||||||||||||||||||||||
PAINTED HANDS | ||||||||||||||||||||||||||||||||||||||
| Experiment with the hands and 'asterisk controls' (along the side and bottom) to understand the reaction of the hands and to look for a pattern. The idea is obviously to find a way from the bottom to the red hand at the very top. | ||||||||||||||||||||||||||||||||||||||
| Clicking an asterisk at the bottom rotates that entire column of hands in a clockwise direction. Similarly, the asterisks along the side rotate an entire row in a clockwise direction. The partial asterisk in the extreme bottom right is used to exit from the puzzle. Also, the actual hands in the bottom row can also be clicked. | ||||||||||||||||||||||||||||||||||||||
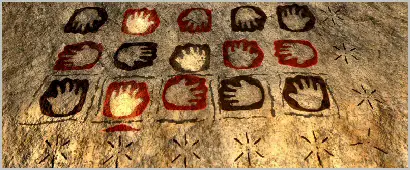
| If the 1st hand in the bottom row is clicked it will light up. If the 2nd hand is clicked then both it and the 3rd hand in the 2nd row light up. Clicking the 5th hand will cause it and the 4th hand in the 2nd row to light up. By rotating the columns and rows additional hands may light up or 'switch off'. For example, start by clicking the 2nd hand, then rotate the 3rd row from the bottom three times. You should see the following: | ||||||||||||||||||||||||||||||||||||||
| ||||||||||||||||||||||||||||||||||||||
| Study the actual hands and the sequence of how they light up carefully. You will notice that some are 'left' hands while others are 'right' hands. A hand only lights up if the fingers point upwards. Also, adjacent hands (next to or diagonally across) only light up if they are different hands (left and right) of opposite colours. | ||||||||||||||||||||||||||||||||||||||
| The secret is to start at the top (where you need to get to) and work down from there. The top hand is a red left hand, so it will react to an adjacent black right hand, which previously reacted from a lit up adjacent red left hand, and so on. The pattern alternates between red left hands (RLH) and black right hands (BRH). | ||||||||||||||||||||||||||||||||||||||
| The only BRH adjacent to the top hand (RLH) is the 2nd hand in the top row. Rotate the top row 3X so that the fingers of the BRH point upwards. Continue working your way down to a hand in the bottom row, which can be 'switched' on. | ||||||||||||||||||||||||||||||||||||||
COMPLETE SOLUTION | ||||||||||||||||||||||||||||||||||||||
| ||||||||||||||||||||||||||||||||||||||
| ||||||||||||||||||||||||||||||||||||||