| ||||||||||||||||||||||||||||||||||||
| You won't be able to do anything until you speak to Tika, who tells you about the custom of illustrating your story. | ||||||||||||||||||||||||||||||||||||
STORY SYMBOLS | ||||||||||||||||||||||||||||||||||||
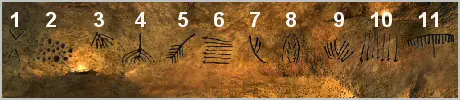
| Each of the eleven symbols painted on the recessed wall relates to a part of your adventure to this point. Once you've figured out how to interact with the symbols, they must be arranged into chronological order. Click on a symbol (when the 'talk' icon is active) to listen to that part of your story, after which the 'action' icon appears. Now select the position you want to move the symbol to, then click the symbol currently in that position to swap them around. If you don't want to move a particular symbol after 'listening' to it, click that same symbol again when the 'action' icon is active. | ||||||||||||||||||||||||||||||||||||
| ||||||||||||||||||||||||||||||||||||
The symbols, and the various parts of your adventure they relate to, are as follows: | ||||||||||||||||||||||||||||||||||||
| ||||||||||||||||||||||||||||||||||||
To put the story in the correct chronological order the symbols must be arranged as follows: | ||||||||||||||||||||||||||||||||||||
| ||||||||||||||||||||||||||||||||||||
STORY OBJECTS | ||||||||||||||||||||||||||||||||||||
| To complete the story puzzle an inventory item associated with each symbol (part of the story) must be placed below that symbol. You've already got some of the items needed and the others can be found in Tika's dwelling. | ||||||||||||||||||||||||||||||||||||
| Fortunately the game does not allow you to place an incorrect item under a symbol, so where more than one item can be associated with a part of the story, some trial-and-error is required. | ||||||||||||||||||||||||||||||||||||
The correct items, and where they can be found, are as follows: | ||||||||||||||||||||||||||||||||||||
| ||||||||||||||||||||||||||||||||||||
| After completing the story puzzle talk to Tika. She tells you about the painting in the deepest part of the dwelling that's been worn away. She suggests that you find the broken tablets which may have been the inspiration for the painting. | ||||||||||||||||||||||||||||||||||||
BROKEN TABLETS | ||||||||||||||||||||||||||||||||||||
| At the furthest point of the dwelling is a curtain with two large antlers in front of it. Move the antlers to either side of the curtain and enter the ceremonial hall. | ||||||||||||||||||||||||||||||||||||
| The large rock slab must be moved, but it only wobbles when you try. Get the animal fat (from the second alcove) and use it to lubricate the slab at the left and right edges. Now slide the slab away to reveal the broken tablets. | ||||||||||||||||||||||||||||||||||||
| Study the tablet pieces carefully noting that some are light grey in colour, while others are more brown. All the pieces except for two (one grey and one brown) can be picked up and moved. Note that pieces can also be put on the black rock in the centre, near the top. | ||||||||||||||||||||||||||||||||||||
| Using the two fixed pieces (grey on the left and brown on the right) as starting points, arrange the pieces to form two complete tablets. It's not always possible to tell from the shape of a piece (or the markings on it) where it fits, and this may need some trial-and-error. Obviously you need only try grey pieces on the left tablet and brown ones on the right. You may not be able to add a piece if another one is in the way. To overcome this, move the obstructing piece to the black rock. | ||||||||||||||||||||||||||||||||||||
| When trying to fit pieces, move them slowly and carefully as the 'action' hotspots are fairly pixel-sensitive. | ||||||||||||||||||||||||||||||||||||
| ||||||||||||||||||||||||||||||||||||
| After assembling both tablets return to Tika and talk to her about the missing piece for the one tablet. She tells you to glue the tablet pieces together with melted resin. Get the resin (on the rock next to the tablets) and put it in the broken piece of clay in front of the fire (in the second alcove) to melt it. Use the melted resin to glue the two tablets together. | ||||||||||||||||||||||||||||||||||||
| If you again speak to Tika she tells you to look at the painting differently and that the empty space will reveal the spirit of the painting. Pick up the brown tablet and pan round until the tablet is positioned over the worn painting on the wall. Note that the tablets can be turned over, but the brown tablet must have the original side facing you when doing this. | ||||||||||||||||||||||||||||||||||||
| Take note of the way the stag appears when viewed with the tablet over it, as this is what you need to reproduce. | ||||||||||||||||||||||||||||||||||||
PAINTING THE STAG | ||||||||||||||||||||||||||||||||||||
| Speak to Tika and select all possible dialog topics. She tells you to begin by cleaning the wall and that everything you need is either in the ceremonial hall or near the spring. You may have to talk to her twice to get to this topic. | ||||||||||||||||||||||||||||||||||||
| Take the piece of skin from the rock next to the tablets. Note that the skin has paint marks on it, this is important later. Go down to the valley and wet the skin in the spring flowing at the cave entrance to Tika's dwelling. | ||||||||||||||||||||||||||||||||||||
| Use the moist piece of skin to clean the wall by clicking the 'action' hotspots. Continue clicking the hotspots until Arok says it's clean enough. Note that if you accidentally dip the piece of skin in the pigment before you've used it to clean the wall, go back to the spring and wet it again. | ||||||||||||||||||||||||||||||||||||
| ||||||||||||||||||||||||||||||||||||
| From the marks on the skin you know it was previously used to paint with. Dip it in the pigment on the rock next to the tablets, then paint by clicking the three 'action' hotspots shown in the graphic above. The fresco should now resemble what you saw when the tablet was held over the worn painting. The 'hand' symbol briefly flashes in the top right corner indicating an update in Arok's journal. The latest entry in the journal refers to the fresco being incomplete, but looking closely at the tablets and talking to Tika will help you find what's missing. | ||||||||||||||||||||||||||||||||||||
| Tika tells you to bring her a reed so that she can show you something. Logically, the only place to find a reed is along the bank of the river. Go down to the valley again, fetch a reed (location 3 on the map) and give it to Tika. | ||||||||||||||||||||||||||||||||||||
| ||||||||||||||||||||||||||||||||||||
| Tika tells you to wait for her in the ceremonial hall. If you haven't yet made a waterskin, she also tells you do so as it's needed for the journey. | ||||||||||||||||||||||||||||||||||||
WATERSKIN | ||||||||||||||||||||||||||||||||||||
| The waterskin is constructed on the 'combining rock' in the second alcove. First put the skin (from the railing opposite the entrance to the ceremonial hall) on the rock, then place the bladder (from the ground in front of the railing) on top of it and put the vetebra (from the alcove where Tika is) on the neck of the bladder. Now thread the strap (next to the rock) through the needle (already on the rock) and sew the waterskin together. | ||||||||||||||||||||||||||||||||||||
COMPLETING THE PAINTING | ||||||||||||||||||||||||||||||||||||
| Tika meets you in the ceremonial hall and hands you a blowgun she made from the reed. If you took the pigment from the rock next to tablets the blowgun is automatically ready to use. If not, take the pigment now and the blowgun fills up when the pigment is added to your inventory. | ||||||||||||||||||||||||||||||||||||
| Examine the reverse sides of the two tablets, noting that there are thirteen dots on the left one and a rectangle on the right one. At the bottom of the stag painting there are only eight dots and two lines of the rectangle. First use the filled blowgun to add another five dots, three on the left and two on the right. After Tika returns your knife, use it to complete the rectangle. | ||||||||||||||||||||||||||||||||||||
CROSSING THE RIVER | ||||||||||||||||||||||||||||||||||||
| You don't have anything capable of chopping down the tree. Fortunately Toar is still sitting at the fire, and will give you an axe when you speak to him. Three heafty blows with the axe fells the tree, allowing you and Tika to cross the river. | ||||||||||||||||||||||||||||||||||||
| ||||||||||||||||||||||||||||||||||||