
All images are property of L.K. Avalon
All images are property of L.K. Avalon
Written by Bert Jamin (www.gamesover.com)
August 2001
©Bert Jamin (www.gamesover.com)
This walkthrough may not be sold and may not be used for any commercial
purposes. Neither is it permitted to publish this walkthrough in any way without
the written permission of the author. Feel free to place this walkthrough on
your web site or on your home page, on condition that no part of this
walkthrough is changed and that the name of the author (Bert Jamin), the URL of
the authors home page ( www.gamesover.com
) and his E-mailaddress ( [email protected]
) are mentioned unchanged. For the most up to date walkthroughs always visit
www.gamesover.com.
If you have any suggestions to improve this walkthrough, let me know by sending me an email: [email protected] .
Click at one of the images to go directly to that part of the
walkthrough.


Or click at the image of Hannah and Sam at the bottom of this page to go to
the next part.
Important:
This walkthrough is about the dvd-version of the game. If you play the
cd-version, all mission logs are wiped. This won't effect the game play. You'll
only miss some clues that some of the missing scientists have left behind
in the mission logs. In the cd-version you also don't have to solve a very tough
puzzle, the telescope puzzle. In that case, just go on with the game...
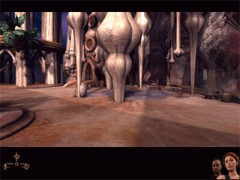
The Floating Island
Hannah:
Look around and you'll see only one path between the two benches. So that makes things easy. Follow that path until Hannah arrives at the first platform and sends her coordinates to Sam. Keep walking straight ahead. When you arrive at the next platform, you can go to the left and to the right. The path to the right is just leading into the ocean, so that won't get you any further.
Step on the path leading to the left . Go forward two times. Turn to the right and climb up the path. At the next platform Hannah sees some sort of strange optical effect. Turn to the right and climb up the path until you reach the next platform. Look around and you'll see some kind of fountain. At the right of the fountain you'll see three benches in the distance. Walk toward those benches. Turn to the right and zoom in on the table.
Three benches in the distance
You'll see a mission log lying on the table. Zoom in on the mission log and switch it on. It seems that there are two entries left. You'll get a serious message from one of the missing scientists, Tomlin. His messages doesn't sound very good! Zoom out.
Turn around and walk towards the building at the right of the fountain. Just walk into the elevator shaft to call the elevator. When you entered the elevator look around and push the up button.
When you arrive upstairs turn around and exit the elevator near the green plant. Turn to the right and you'll see some sort of control panel. Walk towards the control panel. Don't use it yet! Just remember it's there...
Turn to the left and walk towards the green plant near the elevator. Turn to the right and walk forward. Now Hannah wonders where all the people have gone. Turn to the right to see another elevator. Don't enter it yet, just remember it's there also...
Turn back to the left and walk forward to another path leading up. When you are standing in front of that path, look to the footbridge at your right. Zoom in on the bridge and discover that the first parts of the bottom of the bridge are missing. Zoom out and turn to the left to climb up the path.
When you arrive at the next level, look around and you'll see lots of bees flying around. You can only go into one direction. So... go into that direction. Zoom in on the strange pear shaped device.
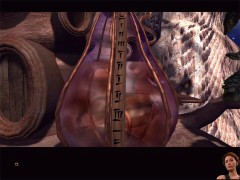
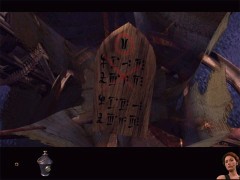
Note these signs
You'll see a plank with strange signs in the device. Make a note of these signs and number them from top to bottom number 0 up to and including number 10. Notice that the liquid inside the device is pointing to number 5. Zoom in on the little shelf at the right of the device. You'll see a blue bottle attached to the device and an image of a bee. Zoom out.
Turn around and climb down the path to the previous level. When you arrive at the previous level, go one time forward to the right side of the elevator. Turn to the left and enter the elevator. Look around and push the up button. Turn around and exit the elevator through the door with the bars. Look around and you'll see lots of bees again. Look around and you'll see a little well filled with green water. Turn to the right and head into that direction.
At your right you'll see another suspension bridge and a path leading up to the right. The suspension bridge will take you all the way to the part of the suspension bridge with the missing parts. You're going to climb the path leading up to the later on. So ignore them for now. Just keep going straight ahead. Go around the building and you'll see a strange rock formation. At the left you'll see a pedestal with some kind of urn.
When you push the lid, three tentacles in the rock are moving. Pick up the urn. Turn around and walk to the next path leading up. Turn to the left and climb up the path until you reach the next level. Hannah will give some comment to Sam again.
In the distance you'll see another bench with a mission log. Walk to the bench, turn to the right and zoom in on the mission log. The messages of this log seem to be wiped. Zoom out and turn to the left. Walk to the next path leading up. Go all the way up.
You get another close encounter with one of the missing scientists, Tomlin. Turn to the right and walk towards the fountain. Turn to the right and zoom in on the tulips. The first tulip is empty for now. But you are going to change that.
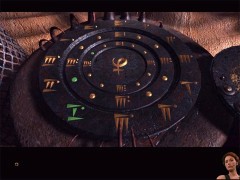
Zoom out, turn around and walk to the spiral stairs. Climb the stairs until you reach an oblong control panel. Zoom in on the control panel. All the way down you see the row of tulips.
On the control panel you'll see five circles. Number them from the left to the right as number 1, 2, 3, 4, and 5. In the very last tulip there's a wooden tablet with coordinates. Your goal is to move that tablet to the first tulip by pushing the correct circles. Push them in the next order: 3, 1, 4, 2 and 5. You'll see the tablet being thrown from one to another tulip and finally it will land into the first tulip.
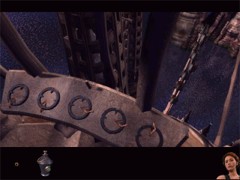
Look at the tulips all the way down...
Zoom out, turn to the right and climb the stairs all the way up. Turn to the right and zoom in on the wooden planks which are lying on the floor. You'll find a wooden tablet with the same kind of signs you have seen on the pear shaped device. The upper signs are crossed out with a red mark. I wonder if these are the old coordinates this scientist was speaking of. And if the ones which aren't crossed out may be the new coordinates. Make a note of these coordinates!
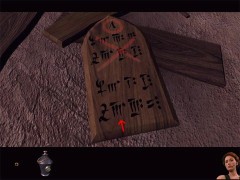
The first tablet with coordinates
Notice that there's one sign on the tablet that isn't on the plank in the pear shaped device. It's the sign marked (by me!) with the red arrow. According to the other signs on the plank, this one fits in best after the sixth sign from top on the plank, so it should be number 6. Now re-number the signs on the plank in the pear shaped device from number 1 up to 11. Now translate the signs on this tablet into real numbers. From the top to the bottom, you'll find:
The old coordinates with the
red cross:
3 6 2
6 8 7
and the new ones:
3 4 7
6 9 11
Now you may think So what? Well believe me you'll find out... Zoom out, turn around and climb down the stairs all the way. When you arrive downstairs, you'll have another brief encounter with that scientist Tomlin. He's telling you that you're doing well.
Walk passed the fountain and zoom in on the tulips again. Now you'll find the wooden tablet that was hidden in the last tulip! Make a note of these coordinates as well.
The second tablet with coordinates
Now translate the signs on this tablet as well into real numbers. From the top to the bottom, you'll find:
the old coordinates with the
red cross:
7 10 5
9 1 5
and the new ones:
7 8 10
9 2 9
You'll need these two new coordinates in a few moments to set sail to a new destination. And not only that. In chapter four you have to calculate new coordinates yourself based on these ones...
Zoom out and walk down the path to the previous level. At that level find and climb down the path down to the previous level.
At that level, walk forward one time, turn to the left and enter the elevator. Look around and push the down button. When it stops, exit the elevator. Turn to the left and walk towards the other elevator (the one next to green plant). Don't enter this elevator now.
In stead of that, turn to the left and walk to the control panel. Push the button to call the gondola. You'll get a free ride to another part of the structure.
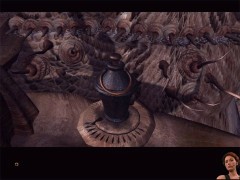
When the gondola has stopped, turn to the right and walk towards the path leading up. Climb up the path. Zoom in on the rock formation. Doesn't that look familiar? Yep it looks exactly as the rocks where you picked up the urn. Zoom out and turn to the right.
Climb up the path with the horn shaped rocks. Zoom in on the rocks and you'll see an empty pedestal with a kind of dial. Beneath the dial you'll see lots of marks. Place the urn on the pedestal. As you have seen before, you can move the tentacles in the rocks by pushing the lid of the urn. Your goal is to get all the tentacles sticking out the rocks by moving the dial and pushing the lid.
When all the tentacles are sticking out, an electric force field will be created which you can walk to the other site of the rocks. Every time you moved the dial into the correct position, you have to push the lid of the urn. Number the marks on the pedestal from the left to the right as number 1 up to and including 14. This is the correct order to turn the dial and to push the lid of the urn every time after you moved the dial to the next mark:
13, 12, 11, 10, 8, 5, 4, 3, and 2.
Don't forget to push the lid every time after you move the dial
Zoom out, turn around and walk one step ahead. Turn to the right and walk toward the tentacles sticking out of the rocks. You'll be taken to the next part of the structure.
Zoom in on the big stretched vine in front of you. Use the device that's hanging from the vine. This gives you another free ride. At the end of your ride, look around. You'll see some kind of control panel but you can't reach it yet. Turn to the right and go down the path.
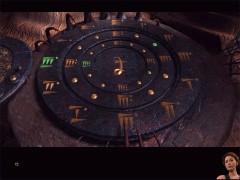
Walk into the elevator and push the up button. Turn to the left and exit the elevator. Walk to the two big wheels you'll see in this room. Zoom in on the wheels and you'll see familiar signs. Your goal is to highlight the correct new coordinates on both wheels which will take you to another part of the structure. Because you don't have all signs to all coordinates you can use some dots instead of that signs. Just imagine the wheels as a big clock.
Notice that there's an outer rim, a second rim and an inner rim. Just like an ordinary clock you can divide the clock into hours (the outer rim), minutes (the second rim) and seconds (the inner rim). The only difference to an ordinary clock is that one hour hasn't got 60 minutes, but only 12. This clock also hasn't got 60 seconds, but only 12. You'll need this knowledge further to calculate new coordinates...
A few moments ago you found out the new coordinates to use at this device this time. These were:
7 8 10
9 2 9
The first set of coordinates has to be used at the wheel to the left. The second set is for the wheel to the right.
Zoom in on the left wheel.
On the outer rim, push the sign at 7 o'clock
on the second rim, push the dot at 8 o'clock
on the inner rim, push the dot at 10 o'clock
The correct sign and dots on the left wheel
Zoom out and zoom in on the wheel at the right.
On the outer rim, push the sign at 9 o'clock
on the second rim, push the dot at 2 o'clock
on the inner rim, push the sign at 9 o'clock
The correct signs and dot on the right wheel
Zoom out and zoom in on the hand sign between the two wheels. Push on the hand and you'll drift away... When the island has docked, zoom out and enter the elevator once more. Push the down button. Exit the elevator. Climb up the path. Turn to the left and zoom in on the vine again. Use the device to be transported across the ocean.
Important: one person told me that the vine couldn't reach the island at this point. If that's the case, see how to correct this problem by using the telescope.
Walk to the end of the footboard and enter the building. When you entered the building, save your game and switch over to Sam by pushing on his image at the bottom of your screen. To go to the next chapter of this walkthrough, click on the image below...
...to go to

Gas Collector Island
