Daventry - Dimension Of
Death - The Swamp - Underground Realm of the Gnomes - The Barrens Region -
The Frozen Reaches - Realm Of The Sun
Introduction
Mask of Eternity is a major departure from previous King’s Quest games.
For the first time ever, you play a peasant from Daventry, rather than someone
of royal significance. The green grass and dirt paths from the traditional
old King’s Quest games are back, along with the control from the arrow
keys. No more single cursor, or ”candy-coated” Disney-esque graphics.
This game was written for an older audience with a dark, serious, myth and
folklore-oriented story line. The entire world was blighted by an evil curse,
and by fate alone, you were spared. You (Connor) must learn about this strange
chain of events, fight enemies, solve puzzles, and use your wits to become
the savior of the world, the ”Champion Eternal”!!! You begin upon
finding that all mortal inhabitants have been turned to stone, and you set
off on the ultimate quest: to destroy the evil chaos, and to restore the world
to its former splendor and glory.
Kings's
Quest: Mask Of Eternity - The Solution
Kingdom
of Daventry
Notes about this world: Take every single mushroom you find,
plus all the coins some of the monsters leave when you kill them. Also, notice
the fountain near the lake - use this to heal Connor, should he become wounded,
and save the mushrooms for later. Explore the interior of each building, examining
everything that you see! You will find many useful items that will aid you
in your quest. Please remember that Daventry is an "easy" world,
intended to help the player adjust to the feel of the game. Later worlds will
increase in complexity and difficulty, as you gain experience.
Start by clicking on the
raven - and after it flies away, run after it. It will lead you to the water
where you'll meet the Wizard, who's still alive - but only half it seams. Talk
with him, and he'll tell you about your quest and he'll even give you a magic
map (lucky you... this will become very handy, and will be more and more visible
throughout the whole game for each world… and subworlds!).
Run back to where you started. Enter Sarah's house, and take whatever you may
find. Exit the house, and go right. The next house is Connor's, so enter and
pick up the knife on the table. Notice how Connor's stats change... Also click
on the small chest on the self to get the gold.
You will need a better weapon will the weak knife you just got. Proceed to the
windmill (beyond the bridge), but beware of the Spriggens. Kill them, and enter
the windmill. You will encounter another Spriggen with a crossbow. Kill it!
Now, look up at the ceiling, and look at everything. You should notice an axe.
How do you get it? Look for something to climb on. The nearby bale of hay should
work nicely. Push it so it's right below the axe (maybe a little before), and
jump on top of it. Now grab it and leave the building. Be prepared to fight!
The monster you just meet and killed is one of Lucreto's guards, and he'll send
out more to try to prevent you from getting any more mask pieces.
Next, go to the watermill. Notice that the wheel is turning. Go inside. How
do you climb on that platform, if it is moving? The simple solution is to stop
it. Did you notice anything that might create a natural dam outside? The tree
might work. Use the axe that you got, and cut the tree down. Now, you can enter,
and explore. Jump on the platform, and again into the loft. Notice something?
You should now have the rope and hook, which is required to proceed in your
quest.
**NOTE: The rope and hook
aids you in climbing, however, you should use extreme caution. Always use it
to climb DOWN, as well as up. In most cases, if you jump down, you will be injured,
or even die (as in previous King’s Quest titles). But a helpful arrow will
be visible when you're near anything that Connor can climb.**
Now, walk to the church,
and use the rope and hook to climb up. Use it again to lower yourself inside.
Get the candle. Proceed further. Put away your weapon, and PUSH the urn. Lo
and behold, the door to the mausoleum will open, revealing a secret portal.
This portal has been hidden (and forgotten) for centuries. Leave the church
by using your rope and hook to climb upward, and then downward, once on top.
If your experience level is at least ”5”, then you must proceed to
the graveyard. If not, look for some enemies to kill, to raise your experience
points, and then go to the graveyard. You must fight some zombies, and kill
the spriggan guarding the mausoleum. What have you here? A crossbow!! Take it,
and enter the mausoleum. Go through the portal to the Dimension of Death, and
watch the video sequence. You will then be returned to Daventry. Go back to
the wizard, and talk to him. He will ask you for three items: A flame from a
sacred place (you already have this… it is the candle from the church),
some ashes from a torch, and the ring of a dead hero. You may proceed to your
second quest.
Go to the the MAGICAL HOUSE.
The door is boarded shut, so you will have to break it open with the axe. Once
you do so, enter. Take the script for the spell of Might. You can also pick
up two other magic potions. (If you like beer, you can drink that, too!!) Take
them and exit... Behind the house there's a path - follow it, and talk to the
beast, uhm, unicorn (sorry!!!). She will give you some important information,
and a task. Keep talking to her till she has nothing more to say. After you
finish you'll learn that there's a secret entrance to castle Daventry, behind
the waterfall.
Follow the path, and draw your weapon. In this case, a ranged weapon is VERY
useful!! Kill the spriggan (guarding the crypt) with the crossbow. Once it dies,
the knight appears.... Talk to the knight, read the inscription above the crypt,
and click on the gate with your play cursor. Bolted shut, eh? No problem. Use
your axe to break open the door. Enter the crypt, put away your weapon, and
push on the coffin. The lid should pop off. Look inside. Lying alongside the
corpse is a ring… the ring of a dead hero, which the wizard asked you for!!!
Take it, of course, and continue on your journey. That is 2 of the 3 needed
items, which you now possess.
Walk to the waterfall, and
use your rope and hook to climb up. Put away your weapon, and push on the table.
Some bricks will fall into the water, creating a dam. Use your rope and hook
again, to climb down. Enter the opening that was previously hidden by water.
This is a good time to save your game. Continue your journey inward, and you
will be asked to load a new region. Say ”yes”.
Castle Daventry Follow
the tunnels, and you will find your way blocked. Simply turn the dial (to your
right), and you will see the interior of the castle. Walk over to the picture
of King Graham, and push on it. A secret hiding place!! Get the golden key that
is hidden here. Now proceed to the throne room. Along your way, you will notice
some torch ash. Remember that the wizard asked for this, as well, so you should
get it. Continue inward. A sad sight awaits you. King Graham and his minister
and guards are all stone statues. Look into the magic mirror. As it swirls,
click on it. You will be heckled by Lucreto. Leave the castle the way that you
entered, and you will find your way back to Daventry. Save the game again, in
case you haven’t already done so. Congratulations! You now have all three
items needed by the wizard.
Back in Daventry Again This next part
is optional. You can proceed to the castle ruins, or you can just go back to
the wizard. Should you go to the ruins, you can use the key from Castle Daventry
to reveal the teleport area (mind the booby traps!!!), and you can get some
protective armor at the very top of the building- this is highly recommended
to do, because once you have revealed the teleporter, you can always travel
back to Daventry in a faster way within other worlds..
**End optional part**
ANOTHER OPTIONAL PART:
While in the Wizards House,
use the reveal portion, and you'll discover a small chest... Try opening it
(come on... you're dying to see what's in there...)... Take the bell, and climb
down the cliff, and insert the bell in the strange sculpture near the water.
Use your axe on the bell a few times, and it will ring... now enjoy the animation,
and have fun with your new STRONGER weapon (it's recommended that you keep this
throughout Dimension Of Death, till you defeat the Egyptian Skeleton... do not
replace the weapon with the week weapons the normal skeletons leave when they
die).
Back to the wizard. Give
him all three items, and he will cast a spell for a magical ring of illumination.
You are now ready for the Dimension of Death. Save your game, if you haven’t
already done so, enter the mausoleum, and go through the portal. Congratulations!
You have successfully made it through Daventry!!!
Dimension of Death
(not completed)
Notes about this world: Be aware of skeletons on the walls. Use
the Sylph's sacred water, to heal Connors health, and continue to save the mushrooms.
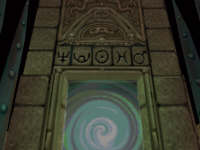
After you have arrived in
this dead place, note down the symbols on a piece of paper, because you'll need
it soon (otherwise check below, where you'll find a screenshot).
Start by walking around in the area, killing all the skeletons. Take whatever
they leave, and goto the the statue of Lord Azriel. Take the spinning keypaddle,
and run down to the fallen warrior. Click on him, and Connor will make a comment
about his shield, which is broken. Take the piece from the shield, and run to
the four flashing light. If you choose to break to wooden boxes, beware of the
skeleton that hides in one of them. In the other boxes you'll find mushrooms,
which will come in handy if your health reduces.
Insert the keypaddle in all the flashing lights, one after one, turning the
key. After this is done, the big doors, will open, so walk into the building.
Another set of doors opens for Connor, so continue into the next room, where
you'll encounter a puzzle!!! Remember the strange symbols you noticed earlier...
(you did remember it, didn't you..). Make
Connor jump on the symbols in the right order as the one you have written down
- from left to right.
NOTE:
You can also use your portion of reveal if you have one - this will allow Connor
to see what tiles must be jumped - you'll noticed that these tiles are red.
After he has done this,
you'll meet Lord Arzial. He will give you his key to the Compund of the Dead,
and you will be returned to the big doors. Go up and left until you come to
some crates. You can either push them, slice them, or shoot them. Be careful,
as some contents can help you, while others can contain skeletons. Along with
the boxes is a dead warrior. Click on him, and his shield will break apart.
Click on the broken piece of shield, and pick it up. You are ready to enter
the compound of the dead. You enter the compound by going right, and then up.
Select the triangle key from your inventory, and apply it to the keyhole. The
gate will open… and you must be prepared to fight! Kill the two skeletons
coming towards you, and run down while avoiding the skeleton with the arrow
- which you also should kill. Go right, and beware... lots of skeletons awaits
you there... ""Tip; Don't run to them first... walk slow, and make
sure you place the camera so you can see them in the distance... now, use your
armbow and kill with skeletons with the arrows first). After that is done, open
the small chest on the ground and pick up the strange key, and continue down
the way. Another skeleton will encounter you, so kill it! Run up on the side
way, and after running a few rounds, you'll come to a building. Use your rope
and hook you found in Daventry, to climb the building. On the top, you'll meet
a strong skeleton which have a better armor, that will increase your strength.
If you're not powerful enough, it's recommended, you don't climb the building,
and instead wait till your stats are higher (you can try and save your game
before, and then enter). Your goal here is to hits the skeleton, so he moves
backwards, and ends by falling down the building. If you make him do this, climb
down the building, and take his armor. Next, run back to the gate where you
entered the compound of the dead and continue the other way... Some strange
symbols written with a white color should appear on the walls... Follow the
way that the arrows on these symbols point, and kill any skeletons coming you're
way. Eventually you will come to a patch where there's burning lava, and a dying
knight in the corner. Talk to him, and he'll tell you about his smaller sister,
and then sadly die...
Well there's you're next clue...
The Swamp (not completed)
Notes about this world: Avoid the lighter green water, since
it's poisoned by the swamp witch. You need to solve a puzzle before Connor can
walk in it without dying, and another puzzle to actually "clean" the
water. The green "octopus-monster", moves fast, and is very dangerous,since
it's shooting some meatballs (heheh) after you, so try to kill them as soon
as you meet one. And another tip... find the arm bow right away - the Hammer
Of Azrial is only good for lowering the bridge in DOD.
Start by discovering this
new world, so you are aware of the different places. As written in the notes
about the Swamp, it's highly recommended that you find the armbow right away,
to you can replace the Hammer Of Azrial. The armbow is in the corner, where
the dead knight is lying, and where there's a lot of tree monsters (name soon
to come...).
Find the talking tree (picture
of map soon to come with location)... Click on it to begin talking with it.
The tree will tell you that for a price of one gold coin, it'll give out information.
Keep giving the talking
tree money, till he has no more to say... However, you're now well informed,
and should have enough knowledge to continue... Go to the top of the map and
use your sword to
kill the "snake" monsters - there's many, so get started, but hold
your distance... they only require one or two hits. After you have killed them
all (btw, no need to kill the ones going into the left patch, since there's
nothing for you there to explorer... but you might like to kill them to gain
experience), you'll finally come to the cute swamp wisps. Click on them and
Connor will start a conversation with them, and they tell him that they want
a juicy secret in return for a portion that will let Connor walk in the poisonous
waters...
Go explorer the lower part
of the map, where you'll find some houses... Inside the first one you'll see
some people turned into stone... sad, but while you're there you might as well
take their money, as they'll come to more use to you, then to them.
Use your sword to break the door open to the second room. Here you'll also find
some money, plus another barricaded door, which you'll just break like the other.
Now, in this room you'll find a very handy item... a hearing horn... Remember
that the swamp wisps wanted a juicy secret, well you'll need this horn to find/
hear one!!!!
Now that you've found the
unicorn horn, it would be a good idea to return to Daventry, to return the horn,
plus check up on the little girl you rescued in Dimension Of Death. In the witch's
tower, you'll find a teleporter which you can use to travel back to Daventry
in a zap... if you prefer, you can also take the long walk through the swamp
and Dimension Of Death.
Now back in Daventry, run to the swamp pool where the Unicorn is standing -
click the horn on it, and watch as it transfer from an ugly beast to a beautiful
unicorn. In return you'll get a weird pyramid shaped diamond, which will come
in handy later.
Go to the house near the
windmill - this is the house where Gwennie (the little girl...) is living. Go
inside and talk to her. She'll give you her parents money.
Back in the swamp... To get past the
death trap on the second floor, throw a stone, so the trap is automatically
will trigger. If you haven't got a stone, look downstairs - in the room with
the dead skeletons (maybe the witch' did some voodoo stuff on them...).Now,
proceed further upstairs, and take the new armor suit. On the other end of the
top is a chest.... Congratulations, you've found the second piece of the Mask,
but unfortunately Lucreto's helper also wants the piece, so you'll have to fight
with him. After you win, and that piece of metal is gone, take the hand and
exit the tower. Now, go to the place with the hand on the door... yep, Connor's
hand didn't fit, so you'll have to use the new one you just found. Once the
door is open a new puzzle awaits you. Now your goal here is to jump on the times
that won't toast you, so save your game right away, because this can get tricky
- not to mention messy! Try to follow the patch where the tiles are the same
height - they usually don't shoot fire when you step on them. When you have
safely come across the puzzle, more danger awaits you inside the building -
select one of you weapons (I recommend using the hand weapon), and go inside
- kill the spriggens, and examine the chest - you'll find the golden ladle.
To exit the building, pull each rope and press the button in the wall - outside
you can jump across any tile, since the fire is now off.
Remember what you were told
earlier in this world - to clean the water, you must have a golden ladle- well
you have one now, so go to the witch's tower, and use the ladle on the huge
pot with green "soup" in - now the water will be clean, and you'll
meet King Arthur, who's one charming fellow, and he'll make an entrance to the
Gnome World.
Underground Realm of
the Gnomes
Notes about this world: Beware of the nasty bats in this level,
plus the stone monsters
Connor is kind of trapped
in this level, as there's no exit - only one back to the Swamp... It's a little
hard to actually write the way to go to the places in the Gnome Underground,
so I suggest that you start off by exploring the world, so you're familiar with
the locations... Now, first you should talk with the very old man sitting by
the fire - he'll tell you about the missing light - so we'll start by inventing
some light. Use your sword to chop of some of the white crystals next to the
man - leave via the invisible bridge, and
The Barren Region
Notes about this world:
The Frozen Reaches
Notes about this world:
Proceed to the back side
of the castle - this is a climbable wall, to climb up, and walk to the trapdoor
and watch the animation... Well, you better be aware, because Lucreto want's
you dead BADLY!!! Enter the small building in front of you - here you'll meet
DLDLDDL. After talking to him, walk outside and climb down the building, and
go to the front entrance - kill the monsters and take the key plus the other
healing items + weapons you'll find. Go back to the GDFFG and release him -
he'll fly right away, so run back to the dragon and fly across the lake, and
pay him a little visit. GDG will thank you and give you a blue gem.
Remember the scroll you
found way back in Daventry? Well, you should now have all three items to make
the Spell Of Might. Start my putting the piece of the golden mushroom in the
chair, followed by the basiticicicic tounge and then the blue gem you just got
- now pull the lever, and you have the spell of might (look at your stats)..
Realm of the Sun (level
1)
Notes about this world:
Realm of the Sun (level
2) Lalalala
Realm of the Sun (level
3)
LAlalaalalal
Realm of the Sun Altar
Room
Well, the end is very close, but what an adventure this has been!!! But, before
you can relax, you should probably finish your ultimate task (might as well
since you have come so far!)... Click on the ghosty figure and you'll enter
the altar room. Guess who's waiting for you - Lucreto. After you have finished
your friendly little chat it's time to battle - DO NOT hesitate to use any of
your healing or help items - I had a lot of them back so always make sure Connor's
health is full. Fight Lucreto, and when he falls, run to the altar and place
a piece of the mask. Continue to do this, until you place the fourth piece.
After this is put on the altar, Lucreto don't show up, so hurry and put the
final piece. A vortex to another dimension will open, and you must fight Lucreto
into this vortex (just like the skeleton on the building from DOD)-
 Make
Connor jump on the symbols in the right order as the one you have written down
- from left to right.
Make
Connor jump on the symbols in the right order as the one you have written down
- from left to right.