
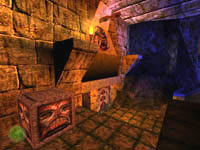
 When you enter the door you come face to face with the entrance to an ancient temple. Two glowing pools are on either
side of you. The pool on the right has a skeleton and a Poison Kit. Head over to the pool on the left and locate the block
and move it against the opposite wall and pull it over so you can use it to jump up to the angled ledge above. (see picture)
Climb to this ledge and use your whip on the post to swing across.
When you enter the door you come face to face with the entrance to an ancient temple. Two glowing pools are on either
side of you. The pool on the right has a skeleton and a Poison Kit. Head over to the pool on the left and locate the block
and move it against the opposite wall and pull it over so you can use it to jump up to the angled ledge above. (see picture)
Climb to this ledge and use your whip on the post to swing across.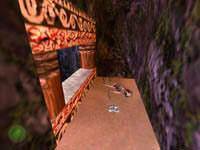 Use the Urgon Part to crumble the cracked wall on this ledge and go into the short cave and climb the ladder. Go forward and
head left at the T-intersection. Use the lighter to get through the dark passage and you will arrive in a room with a skeleton
and some Silver Coins. Take a look out the window then return to the intersection and take the
other path.
Use the Urgon Part to crumble the cracked wall on this ledge and go into the short cave and climb the ladder. Go forward and
head left at the T-intersection. Use the lighter to get through the dark passage and you will arrive in a room with a skeleton
and some Silver Coins. Take a look out the window then return to the intersection and take the
other path. Follow the steep slope down then U-turn to the left and go down once more. You can look out over the water again before
continue down the steps. A pair of scorpions hide in the darkness so have your pistol ready. Continue around until you
arrive at the lake. You are going to have to go for a swim and the piranha love the taste of seasoned adventurers. Get
your machete out and jump in. You need to head toward the gated entrance then turn left and go behind the pier.
Follow the steep slope down then U-turn to the left and go down once more. You can look out over the water again before
continue down the steps. A pair of scorpions hide in the darkness so have your pistol ready. Continue around until you
arrive at the lake. You are going to have to go for a swim and the piranha love the taste of seasoned adventurers. Get
your machete out and jump in. You need to head toward the gated entrance then turn left and go behind the pier.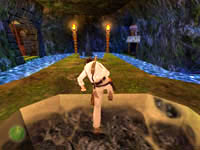 Climb out onto the low ledge then turn left and jump across to the next. Directly ahead of you is a hole leading down to
some water. Climb down the hole then jump into the water and swim the short distance to the next cave. Climb out and follow
the passage as it leads deeper into the center of the volcano.
Climb out onto the low ledge then turn left and jump across to the next. Directly ahead of you is a hole leading down to
some water. Climb down the hole then jump into the water and swim the short distance to the next cave. Climb out and follow
the passage as it leads deeper into the center of the volcano. You will enter a huge cavern with a lake of bubbling lava and flaming geysers. Turn left and wait for the geyser to stop
before jumping to the far block. Pull up and look at your path. (see picture). The bridge you are about to cross will fall
away as you run over it so keep moving. You will need to make a running jump across the large gap then do a series of simple
climbs to get to the high ledge in the corner.
You will enter a huge cavern with a lake of bubbling lava and flaming geysers. Turn left and wait for the geyser to stop
before jumping to the far block. Pull up and look at your path. (see picture). The bridge you are about to cross will fall
away as you run over it so keep moving. You will need to make a running jump across the large gap then do a series of simple
climbs to get to the high ledge in the corner.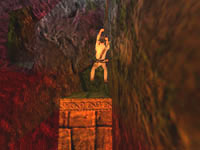 Use your whip on the post to swing across to the opposite ledge then quickly run into the small niche directly ahead to
dodge the boulder that comes rolling out of the chute on the left. When the dust has settled you can exit the niche and
jump over to the chute. Pull up and go inside to get the Gold Coins. Return to the end of the
chute and jump back to the ledge and follow the path of the boulder. Turn left and climb up to enter the next room.
Use your whip on the post to swing across to the opposite ledge then quickly run into the small niche directly ahead to
dodge the boulder that comes rolling out of the chute on the left. When the dust has settled you can exit the niche and
jump over to the chute. Pull up and go inside to get the Gold Coins. Return to the end of the
chute and jump back to the ledge and follow the path of the boulder. Turn left and climb up to enter the next room.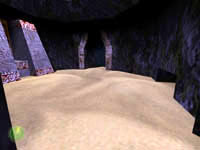 Silver Coins are waiting for you on the pedestal to the left but a very fast and deadly scorpion
is hiding in the low niche on the right. He won't come out until you take the coins. Take the treasure then retreat to
this room's entrance and kill the scorpion from the safety of the lower floor. Go back in the room and go out the exit on the
opposite side.
Silver Coins are waiting for you on the pedestal to the left but a very fast and deadly scorpion
is hiding in the low niche on the right. He won't come out until you take the coins. Take the treasure then retreat to
this room's entrance and kill the scorpion from the safety of the lower floor. Go back in the room and go out the exit on the
opposite side.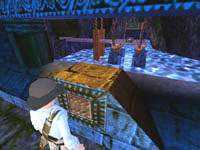 Locate the hole in the floor and climb down into the next room. Press the button on the wall to watch the funeral barge
lower into the water and float off. Also watch as the door behind you opens and a pair of scorpions attack. Kill them both
and enter the small room where you will find Gold Coins in the niche on the right wall. Take the
treasure and continue down the passage.
Locate the hole in the floor and climb down into the next room. Press the button on the wall to watch the funeral barge
lower into the water and float off. Also watch as the door behind you opens and a pair of scorpions attack. Kill them both
and enter the small room where you will find Gold Coins in the niche on the right wall. Take the
treasure and continue down the passage.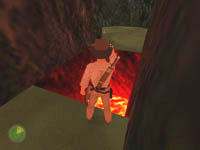 You will turn a corner and face a small pit that requires a running jump to cross. Hiding just around the corner to the left
is a scorpion. Try to kill it before you jump. If you can't then make the jump and run to the right to get some distance then
turn and kill it. Head out onto the catwalk and dive into the water. Dodge the sharks that were also released when the boat
launched and swim back around to the low ledge and return to the pier where you will now find the boat docked. A standing
jump puts you on the boat and you can take the Key from the skeleton.
You will turn a corner and face a small pit that requires a running jump to cross. Hiding just around the corner to the left
is a scorpion. Try to kill it before you jump. If you can't then make the jump and run to the right to get some distance then
turn and kill it. Head out onto the catwalk and dive into the water. Dodge the sharks that were also released when the boat
launched and swim back around to the low ledge and return to the pier where you will now find the boat docked. A standing
jump puts you on the boat and you can take the Key from the skeleton. Turn to face the gate across the water and look down through the water to spot a hole leading down through the sand. Dive in
and swim to this hole and enter. A pair of piranha will be in the tunnel ahead so have your machete ready. These passages
are easy to get lost in so turn on your map and follow the passage around and up until you can climb out of the water.
Turn to face the gate across the water and look down through the water to spot a hole leading down through the sand. Dive in
and swim to this hole and enter. A pair of piranha will be in the tunnel ahead so have your machete ready. These passages
are easy to get lost in so turn on your map and follow the passage around and up until you can climb out of the water. The webs should indicate the danger ahead. Kill the spider when you exit the pool and then slide down a pair of ramps. Kill
the second spider on the floor below before dropping down to his level. Follow the cave out toward the daylight and survey
the next section of this level. Be careful not to slide down the ramp into the lava!
The webs should indicate the danger ahead. Kill the spider when you exit the pool and then slide down a pair of ramps. Kill
the second spider on the floor below before dropping down to his level. Follow the cave out toward the daylight and survey
the next section of this level. Be careful not to slide down the ramp into the lava!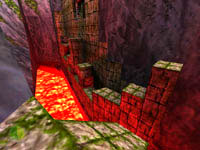 This next part is confusing so follow my directions exactly. Run off the flat ledge and start sliding down the ramp. Jump
immediately to reach the other side. Jump down to the next ledge and once more to the lower ledge. Move forward and pull the
first block back toward you. When you can no longer pull it, climb up and over to the other side and push it as far as it
will go the other way. Now jump back up and over and locate the next block and pull it back to where the first block was
when you started. Jump back to the high ledge and drop to the other side to see all the way to the other end of this long
ledge.
This next part is confusing so follow my directions exactly. Run off the flat ledge and start sliding down the ramp. Jump
immediately to reach the other side. Jump down to the next ledge and once more to the lower ledge. Move forward and pull the
first block back toward you. When you can no longer pull it, climb up and over to the other side and push it as far as it
will go the other way. Now jump back up and over and locate the next block and pull it back to where the first block was
when you started. Jump back to the high ledge and drop to the other side to see all the way to the other end of this long
ledge. Head there and ignore the side entrance. Climb up the first ledge then pull up to the higher one with the third block.
Climb over this block and push it from the other side until it is flush with the edge you just pull up on. Now climb onto
the block and do a running leap to the ledge across the way. Turn to face the wall and jump to pull up to the long hall
above. Kill all the spiders (there are a lot) then head to the far end of this hall and go up the steps. Use your machete
to slash the webs and enter the next room.
Head there and ignore the side entrance. Climb up the first ledge then pull up to the higher one with the third block.
Climb over this block and push it from the other side until it is flush with the edge you just pull up on. Now climb onto
the block and do a running leap to the ledge across the way. Turn to face the wall and jump to pull up to the long hall
above. Kill all the spiders (there are a lot) then head to the far end of this hall and go up the steps. Use your machete
to slash the webs and enter the next room.
 Press the switch in this dark room that overlooks the lake from earlier. The gate across the way will open allowing you
access to the next area. Go around the switch and jump into the lake and quickly swim to the ledge by the door and pull out.
Inside to the left is a keyhole which is a perfect match for the key you got earlier. Unlock the doors and enter into the
next challenging area.
Press the switch in this dark room that overlooks the lake from earlier. The gate across the way will open allowing you
access to the next area. Go around the switch and jump into the lake and quickly swim to the ledge by the door and pull out.
Inside to the left is a keyhole which is a perfect match for the key you got earlier. Unlock the doors and enter into the
next challenging area. This area is pretty fun when you know what to do. Your goal is to get to the blue door on the upper level on the other side
of the river. There are two blocks; one on each side of the lava river that need to be moved onto the light-colored floor
tile. Use the balanced bridge to cross the river and move the second block. Now return to the other side and investigate
the interesting wall ahead of you.
This area is pretty fun when you know what to do. Your goal is to get to the blue door on the upper level on the other side
of the river. There are two blocks; one on each side of the lava river that need to be moved onto the light-colored floor
tile. Use the balanced bridge to cross the river and move the second block. Now return to the other side and investigate
the interesting wall ahead of you. This wall has a series of ladders on it which make up a sort of vertical maze. Start climbing the ladder and follow the
path indicated in the picture to retrieve another treasure. When you have the Silver Coins you
can climb back out and then cross the ladders all the way to the ledge on the far left. Climb the ladder on the side wall
to reach the next higher ledge and follow it along the entire length of this room and turn right to enter the middle
room over the lava falls.
This wall has a series of ladders on it which make up a sort of vertical maze. Start climbing the ladder and follow the
path indicated in the picture to retrieve another treasure. When you have the Silver Coins you
can climb back out and then cross the ladders all the way to the ledge on the far left. Climb the ladder on the side wall
to reach the next higher ledge and follow it along the entire length of this room and turn right to enter the middle
room over the lava falls.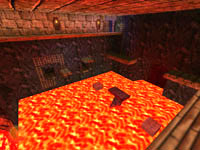 Press the button to open the exit door and also cause a major "disturbance" which results in a major piece of the walkway
being destroyed and the entire floor of this area getting flooded with lava. Return the way you came back down the long
catwalk. Use the ladder to return to the lower ledge then start climb the wall to the right until you are over the opening
below with the two slots above it. Release and grab to catch these slots and finally pull up into the opening. Turn to face
the lava.
Press the button to open the exit door and also cause a major "disturbance" which results in a major piece of the walkway
being destroyed and the entire floor of this area getting flooded with lava. Return the way you came back down the long
catwalk. Use the ladder to return to the lower ledge then start climb the wall to the right until you are over the opening
below with the two slots above it. Release and grab to catch these slots and finally pull up into the opening. Turn to face
the lava.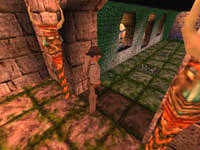 Do running jumps to the block, the bridge, and the second block then into the opposite opening in the wall. Follow the passage
back and around until you come out next to another ladder. Shimmy left, then up and right and down to the ledge where you can
make a few standard jumps to each of the higher ledges. Finally use the ladder to climb up to the walkway with the door and
enter. You will arrive at a "creepy" hall lined with statues and suspicious plates in the floor. An unlimited supply of
scorpions starts to drop into the room behind you forcing you ahead. Avoid the central plates and stay to the sides and you
won't trigger the darts that shoot from the heads.
Do running jumps to the block, the bridge, and the second block then into the opposite opening in the wall. Follow the passage
back and around until you come out next to another ladder. Shimmy left, then up and right and down to the ledge where you can
make a few standard jumps to each of the higher ledges. Finally use the ladder to climb up to the walkway with the door and
enter. You will arrive at a "creepy" hall lined with statues and suspicious plates in the floor. An unlimited supply of
scorpions starts to drop into the room behind you forcing you ahead. Avoid the central plates and stay to the sides and you
won't trigger the darts that shoot from the heads. You'll meet up with Sophia in the next room and she offers you a ladder. Get the grenades to the left and the Trauma Kit and
Submachine Gun from the box on the right before climbing up. Talk to Sophia and learn some more info regarding the story then
watch as she is captured by a Russian soldier. You may want to save now, as the next battle is very difficult. Stay in this
room and wait for the soldiers to come to you. Use the machine gun to quickly kill them all. There are at least six soldiers
and they come at you two at a time. If less than six come through the door then the others are waiting for you further on.
You'll meet up with Sophia in the next room and she offers you a ladder. Get the grenades to the left and the Trauma Kit and
Submachine Gun from the box on the right before climbing up. Talk to Sophia and learn some more info regarding the story then
watch as she is captured by a Russian soldier. You may want to save now, as the next battle is very difficult. Stay in this
room and wait for the soldiers to come to you. Use the machine gun to quickly kill them all. There are at least six soldiers
and they come at you two at a time. If less than six come through the door then the others are waiting for you further on.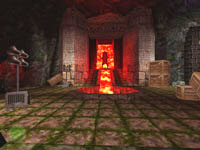 Enter the door when things have calmed down and go right to fetch the First Aid and Poison Kit from the corner. Turn and go
down the opposite hall looking for guards if you didn't kill them all yet. When you enter the next large room there will be
another guard to the right behind some boxes. Use your rifle to kill him quickly from long range. Another pair of soldiers
are through the arch to the left. They may or may not come through at this time. You should go kill them now if they don't
but DO NOT press that green button just yet.
Enter the door when things have calmed down and go right to fetch the First Aid and Poison Kit from the corner. Turn and go
down the opposite hall looking for guards if you didn't kill them all yet. When you enter the next large room there will be
another guard to the right behind some boxes. Use your rifle to kill him quickly from long range. Another pair of soldiers
are through the arch to the left. They may or may not come through at this time. You should go kill them now if they don't
but DO NOT press that green button just yet. Return to the previous room and locate the stone face (see picture) and crawl behind it to locate a moveable block. Push this
block forward twice then turn left and get the Gold Coins. Now you can return to the previous area
with the green button and press it - oh yeah - SAVE YOUR GAME!
Return to the previous room and locate the stone face (see picture) and crawl behind it to locate a moveable block. Push this
block forward twice then turn left and get the Gold Coins. Now you can return to the previous area
with the green button and press it - oh yeah - SAVE YOUR GAME!The elevator comes down with four heavily armed Russian soldiers. The game takes over for a brief second and puts you back at the arched entrance. Quickly roll to the left and get out your machine gun or rifle. Now roll right and shoot then roll left to take cover. Repeat this process until all guards are dead. Make sure to get all the ammo from their bodies before returning to the lift. Press the button again and get on the lift to ride it to the surface.
 As soon as you reach the top run to the crates on the left and take cover. Three soldiers across the lava stream are already
shooting and yelling at you. Try to target the barrel and you will kill them all with a single shot. You may have to shoot
a few of the closer guards if Indy refuses to auto-aim at the barrel. When they are all dead you can go forward and jump the
stream.
As soon as you reach the top run to the crates on the left and take cover. Three soldiers across the lava stream are already
shooting and yelling at you. Try to target the barrel and you will kill them all with a single shot. You may have to shoot
a few of the closer guards if Indy refuses to auto-aim at the barrel. When they are all dead you can go forward and jump the
stream.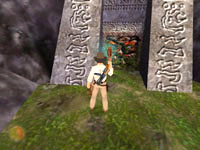 Head up the hill and face the strange block in the picture. Use the Urgon Part to destroy the block and enter the dark area.
You will want to use your lighter to see your way to the back. Look up to spot the post and use your whip to climb up and get
the treasure. When you have the Blue Gem you can return back to the lava stream, jump over and
turn right to climb down the ladder on the face of the cliff.
Head up the hill and face the strange block in the picture. Use the Urgon Part to destroy the block and enter the dark area.
You will want to use your lighter to see your way to the back. Look up to spot the post and use your whip to climb up and get
the treasure. When you have the Blue Gem you can return back to the lava stream, jump over and
turn right to climb down the ladder on the face of the cliff.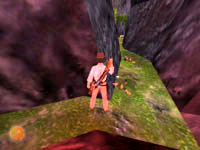 Follow the narrow path around until you reach the next camp full of guards. Lure them into the narrow canyon (see picture)
and shoot them from the safety of this hiding place. When they are all dead you can enter the camp. There may be a few
guards still hiding around the corner to the left. Shooting the barrel is a sure way to kill anyone who remains. Check
the table to the right for grenades, a machine gun, and an Iron Key.
Follow the narrow path around until you reach the next camp full of guards. Lure them into the narrow canyon (see picture)
and shoot them from the safety of this hiding place. When they are all dead you can enter the camp. There may be a few
guards still hiding around the corner to the left. Shooting the barrel is a sure way to kill anyone who remains. Check
the table to the right for grenades, a machine gun, and an Iron Key.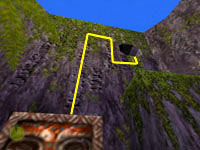 Head toward the opposite cliff wall and locate the vine-covered block. Use the machete to clear away the vines then pull the
block out and climb up. Climb the cliff surface to reach the hole above and to the right (see picture) and press the button
inside to open the main doors back down below. Drop to the ledge below the hole then jump to the block and then to the ground
and enter the doors to retrieve the Gold Idol.
Head toward the opposite cliff wall and locate the vine-covered block. Use the machete to clear away the vines then pull the
block out and climb up. Climb the cliff surface to reach the hole above and to the right (see picture) and press the button
inside to open the main doors back down below. Drop to the ledge below the hole then jump to the block and then to the ground
and enter the doors to retrieve the Gold Idol. Make your way back through the camp and down the narrow canyon to the ladder. Climb it and return to the lift on your right.
Use the button to ride the lift back down to the lava area below. Follow the passage out of here and return to the main room
with the large statue at the top of the twin ramps. Head up the ramp on the right and use your whip on the extended arm of
the statue. This will open the passage to your right and you can enter the next area.
Make your way back through the camp and down the narrow canyon to the ladder. Climb it and return to the lift on your right.
Use the button to ride the lift back down to the lava area below. Follow the passage out of here and return to the main room
with the large statue at the top of the twin ramps. Head up the ramp on the right and use your whip on the extended arm of
the statue. This will open the passage to your right and you can enter the next area.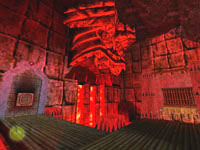 This next area has several points of interest. A button on the left opens the gate across the gap you must whip-swing across.
But the gate won't stay up long enough for you to get through. A stone block in the opposite corner (see picture) can be
reached by jumping from the ledge by the gate. Jump to the ledge and shimmy left until you can pull up by the lava falls.
This next area has several points of interest. A button on the left opens the gate across the gap you must whip-swing across.
But the gate won't stay up long enough for you to get through. A stone block in the opposite corner (see picture) can be
reached by jumping from the ledge by the gate. Jump to the ledge and shimmy left until you can pull up by the lava falls.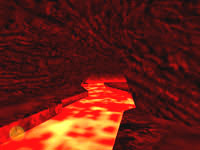 You are now on the ledge on the right side of the lava river. Make your way through this cave jumping back and forth across
the lava. Jump to the left and go back then jump over to the right. Line up with the dark entrance to the left and do a
running leap into the door. Follow the dark passage back until you reach a hole in the ground. Below is a ramp. Draw your
weapons and drop down.
You are now on the ledge on the right side of the lava river. Make your way through this cave jumping back and forth across
the lava. Jump to the left and go back then jump over to the right. Line up with the dark entrance to the left and do a
running leap into the door. Follow the dark passage back until you reach a hole in the ground. Below is a ramp. Draw your
weapons and drop down. Quickly fire on the guard who is down near the generator. Drop down and relieve him of his ammo then use the iron key you
found at the camp on the locked cage. Sophia is now free. After a quick conversation she will run off through the door at
the other end of this room. Follow her. This door leads back to the narrow walkway by the lift leading to the surface. Turn
left and return to the statue room and follow the passage to the right leading back to the button and gate room.
Quickly fire on the guard who is down near the generator. Drop down and relieve him of his ammo then use the iron key you
found at the camp on the locked cage. Sophia is now free. After a quick conversation she will run off through the door at
the other end of this room. Follow her. This door leads back to the narrow walkway by the lift leading to the surface. Turn
left and return to the statue room and follow the passage to the right leading back to the button and gate room.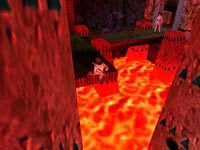 With Sophia here to help, you can now have her press the button when you are in position. Whip-swing to the ledge and give
her the signal and she will open the gate. You can make it to the other side but Sophia cannot join you. No matter - she
has "spy stuff" to do.
With Sophia here to help, you can now have her press the button when you are in position. Whip-swing to the ledge and give
her the signal and she will open the gate. You can make it to the other side but Sophia cannot join you. No matter - she
has "spy stuff" to do.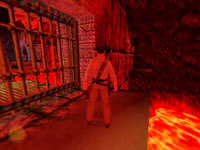 From this side of the gate, turn left and face the wall across the lava. There is a stone ledge you can jump to. Turn left
and pull up to the next higher ledge then turn completely around and do a running jump to the ledge above the lava. Turn
left and locate the cracked wall and use the Urgon part to smash it. Grab the Trauma Kit from the skeleton before moving ahead.
From this side of the gate, turn left and face the wall across the lava. There is a stone ledge you can jump to. Turn left
and pull up to the next higher ledge then turn completely around and do a running jump to the ledge above the lava. Turn
left and locate the cracked wall and use the Urgon part to smash it. Grab the Trauma Kit from the skeleton before moving ahead. Past the skeleton you will be back outside in a storage area. There will be several crates lying around and you will have to
move several in a specific order to get to the one you want. Drop down to the crate below and then turn left and drop to the
ground. Pull the first crate into this short area then climb up and over and turn left to face the second crate. Climb over
it and push it back to where the first crate used to be.
Past the skeleton you will be back outside in a storage area. There will be several crates lying around and you will have to
move several in a specific order to get to the one you want. Drop down to the crate below and then turn left and drop to the
ground. Pull the first crate into this short area then climb up and over and turn left to face the second crate. Climb over
it and push it back to where the first crate used to be.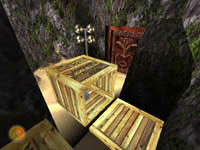 Now turn and pull the remaining crate toward you which reveals the open crate on the other side. Climb over and get the
spare pulley part. Climb back over all the previous crates and back up into the opening above.
Repeat the necessary jumps to get you back to the ledge by the gate then turn left and follow the walkway around the right
wall of this cave.
Now turn and pull the remaining crate toward you which reveals the open crate on the other side. Climb over and get the
spare pulley part. Climb back over all the previous crates and back up into the opening above.
Repeat the necessary jumps to get you back to the ledge by the gate then turn left and follow the walkway around the right
wall of this cave.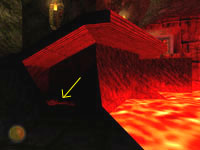 Head down the ramp and then some stairs and turn to look back toward the gate. Under the ramp in a small alcove is a skeleton
and another treasure. Get the Green Gem then turn around and go through the door behind you. The
passage ends in another "creepy" hall. You could cross this hall to continue but the final treasure lies behind you.
Head down the ramp and then some stairs and turn to look back toward the gate. Under the ramp in a small alcove is a skeleton
and another treasure. Get the Green Gem then turn around and go through the door behind you. The
passage ends in another "creepy" hall. You could cross this hall to continue but the final treasure lies behind you.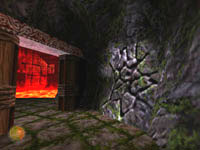 Head back up the passage until you arrive at the door (see picture) then locate the cracked wall and use the Urgon part to
smash it revealing a passage beyond. Follow the passage until you arrive at a large room. DO NOT ENTER. Save your game.
It is possible to get stuck in this room with no way out in which case you will need to restore.
Head back up the passage until you arrive at the door (see picture) then locate the cracked wall and use the Urgon part to
smash it revealing a passage beyond. Follow the passage until you arrive at a large room. DO NOT ENTER. Save your game.
It is possible to get stuck in this room with no way out in which case you will need to restore.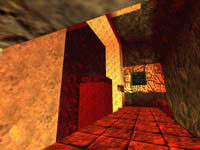 The brown tiled floor ahead of you will totally collapse when you step on it. You have a few seconds so start running out to
the middle then turn left toward the low column and jump and grab just as the floor breaks away beneath you. Pull up and do
a running leap to the far wall to retrieve the Silver Idol. Jump back to the previous column and
lower yourself off any side and drop down to the thin ledge around the base of this column.
The brown tiled floor ahead of you will totally collapse when you step on it. You have a few seconds so start running out to
the middle then turn left toward the low column and jump and grab just as the floor breaks away beneath you. Pull up and do
a running leap to the far wall to retrieve the Silver Idol. Jump back to the previous column and
lower yourself off any side and drop down to the thin ledge around the base of this column.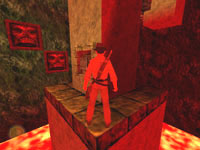 Locate the button on the one side of the column and press it to cause two stone blocks to extend from the wall and a large
shelf to slide out above these blocks. You can now jump across to the lowest block then climb to the second and jump to the
shelf. Pull up into the dark hole above the shelf and push the block inside forward until you can go to the right. Inside a
small Indy-size niche is a cracked wall. Use the Urgon part to crumble it and enter.
Locate the button on the one side of the column and press it to cause two stone blocks to extend from the wall and a large
shelf to slide out above these blocks. You can now jump across to the lowest block then climb to the second and jump to the
shelf. Pull up into the dark hole above the shelf and push the block inside forward until you can go to the right. Inside a
small Indy-size niche is a cracked wall. Use the Urgon part to crumble it and enter.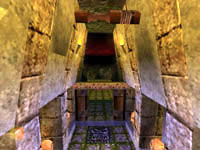 You can now walk out onto the ledge overlooking the "creepy hall" from earlier. Above you is a beam you can use to whip-swing
to the other side. From this ledge you can drop to the floor and kill the soldier who attacks from the right of the cross-shaped
lava pit. Head toward the left between the two stone columns and you will see a deep pit with a ledge to the right full of
soldiers. Use your rifle to kill them all and roll to the right to dodge their fire.
You can now walk out onto the ledge overlooking the "creepy hall" from earlier. Above you is a beam you can use to whip-swing
to the other side. From this ledge you can drop to the floor and kill the soldier who attacks from the right of the cross-shaped
lava pit. Head toward the left between the two stone columns and you will see a deep pit with a ledge to the right full of
soldiers. Use your rifle to kill them all and roll to the right to dodge their fire.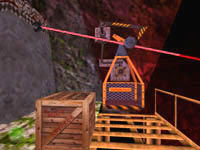 When it is safe, push the box toward the gondola then climb on and turn right to face the missing gear spindle. Use the
gear you found earlier to complete the pulley system. Doing this will start the end sequence of this level. Guards will come
pouring in through a hole in previous room so you must quickly get in the gondola and press the button to start it moving.
When you arrive at the bottom you can exit and open the stone doors to enter the Palawan Temple.
When it is safe, push the box toward the gondola then climb on and turn right to face the missing gear spindle. Use the
gear you found earlier to complete the pulley system. Doing this will start the end sequence of this level. Guards will come
pouring in through a hole in previous room so you must quickly get in the gondola and press the button to start it moving.
When you arrive at the bottom you can exit and open the stone doors to enter the Palawan Temple.

 Recommended Purchases:
(2) Rifle Clips
(1) Trauma Kit
(1) Submachine Gun Clip