
 Indy must now make his way through the final part of this lava-filled area. You will encounter several Lava Monsters. These
guys blend right into the rocks and are very hard to see until you are right on top of them. They are slow so you should be
able to dodge them quite easily. They can only harm you if you get too close. In addition to your ten treasures, you are also
searching for a pair of Tiki Keys which will allow you to obtain the next machine part and do battle with the Lava Guardian.
Indy must now make his way through the final part of this lava-filled area. You will encounter several Lava Monsters. These
guys blend right into the rocks and are very hard to see until you are right on top of them. They are slow so you should be
able to dodge them quite easily. They can only harm you if you get too close. In addition to your ten treasures, you are also
searching for a pair of Tiki Keys which will allow you to obtain the next machine part and do battle with the Lava Guardian.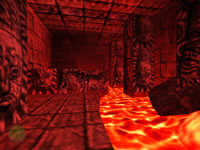 Head down the hall and climb over the crumbled section in front of you. Move to the right edge and jump forward over the lava
to continue. When you reach the left turn ahead proceed cautiously. There is a lava monster against the wall on the left
and the exit out of here is on the high ledge to the right. You need to jump and grab this ledge but first you need to lure
the lava monster away from the wall so you have room to make the jump. Go towards him until he wakes up then run away to the
corner behind you and wait for him to approach. Run past him and quickly line-up your jump to the ledge and get out of here.
Head down the hall and climb over the crumbled section in front of you. Move to the right edge and jump forward over the lava
to continue. When you reach the left turn ahead proceed cautiously. There is a lava monster against the wall on the left
and the exit out of here is on the high ledge to the right. You need to jump and grab this ledge but first you need to lure
the lava monster away from the wall so you have room to make the jump. Go towards him until he wakes up then run away to the
corner behind you and wait for him to approach. Run past him and quickly line-up your jump to the ledge and get out of here.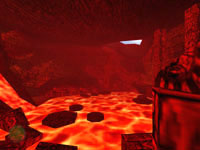 You are now in a huge lava-filled cavern. Stepping-stones lead around to the left and many of them rise and fall beneath the
surface making your path much more dangerous. Your immediately goal it to reach that patch of daylight across the cavern.
Make your way around the lava lake using the stones. Save often. When you reach the falls on the left you will jump to a
ledge to the right of the falls before lining up with the next stone.
You are now in a huge lava-filled cavern. Stepping-stones lead around to the left and many of them rise and fall beneath the
surface making your path much more dangerous. Your immediately goal it to reach that patch of daylight across the cavern.
Make your way around the lava lake using the stones. Save often. When you reach the falls on the left you will jump to a
ledge to the right of the falls before lining up with the next stone. 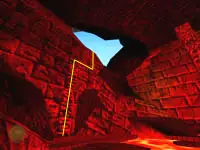 Continue across the remaining stones until you reach the flat rock ledge beneath the climbable wall section. Scale the wall
until you reach the upper ledge and return to the daylight. Head forward into the next cave and look over the edge. You need
to make a running jump to the ledge across the gap then jump down the tall stone steps in the corner until you reach the
blue-colored door below.
Continue across the remaining stones until you reach the flat rock ledge beneath the climbable wall section. Scale the wall
until you reach the upper ledge and return to the daylight. Head forward into the next cave and look over the edge. You need
to make a running jump to the ledge across the gap then jump down the tall stone steps in the corner until you reach the
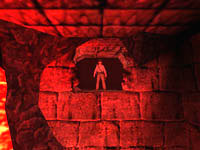
blue-colored door below. When you enter you will be on a ledge overlooking a large room. A lava monster is partially concealed behind the wall in the
middle section to the right. The webs on the left indicate spider trouble. Do a running jump to the left to reach the floor
below. Stay to the left and the lava monster will never even wake up. Whip out your guns and deal with the spider that comes
to greet you. Take the Shark Key from the skeleton then exit this room the way you entered.
When you enter you will be on a ledge overlooking a large room. A lava monster is partially concealed behind the wall in the
middle section to the right. The webs on the left indicate spider trouble. Do a running jump to the left to reach the floor
below. Stay to the left and the lava monster will never even wake up. Whip out your guns and deal with the spider that comes
to greet you. Take the Shark Key from the skeleton then exit this room the way you entered.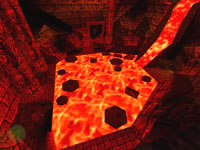 Climb back up the tall steps and jump the gap to return to the daylight. Continue to the lava cavern for a good view of the
area. (see picture). Your next goal is to reach the flat ledge back to the right of the lava falls. Climb back down the wall
and make your way across the various stones until you reach that ledge.
Climb back up the tall steps and jump the gap to return to the daylight. Continue to the lava cavern for a good view of the
area. (see picture). Your next goal is to reach the flat ledge back to the right of the lava falls. Climb back down the wall
and make your way across the various stones until you reach that ledge. Examine the wall to find the section that is ready to break. Use the Urgon part to shatter the wall and go inside. A small
lava stream flows beneath you. Turn and back off the ledge and climb down then turn and do a running jump over the lava.
Angle to the left as a lava monster is hidden in the wall right where you land. He comes to life but you can easily escape
into the next room where a second lava monster wakes up. Keep on running and turn right in the next area to find the low
tunnel under the stairs. Crawl through this tunnel into the next room.
Examine the wall to find the section that is ready to break. Use the Urgon part to shatter the wall and go inside. A small
lava stream flows beneath you. Turn and back off the ledge and climb down then turn and do a running jump over the lava.
Angle to the left as a lava monster is hidden in the wall right where you land. He comes to life but you can easily escape
into the next room where a second lava monster wakes up. Keep on running and turn right in the next area to find the low
tunnel under the stairs. Crawl through this tunnel into the next room. Locate the door and keyhole to the left when you enter this room. Use the Shark Key to open the door and enter the hallway
on the other side. Looking to your left you can see a large boulder perched at the top of the stairs. To your right is the
first Tiki Key resting on a stone block...directly in the path of the boulder. Climb the steps and approach the key.
Locate the door and keyhole to the left when you enter this room. Use the Shark Key to open the door and enter the hallway
on the other side. Looking to your left you can see a large boulder perched at the top of the stairs. To your right is the
first Tiki Key resting on a stone block...directly in the path of the boulder. Climb the steps and approach the key. Stand so you are behind the key and facing the boulder then take the Red Tiki Key and quickly climb
onto the pedestal. Get your whip out and quickly use it on the ring above your head and climb up into the hole above as the
boulder comes crashing down the stairs and rolls underneath your feet. While you are up here you can swing forward to collect
this level's first treasure; the Gold Idol.
Stand so you are behind the key and facing the boulder then take the Red Tiki Key and quickly climb
onto the pedestal. Get your whip out and quickly use it on the ring above your head and climb up into the hole above as the
boulder comes crashing down the stairs and rolls underneath your feet. While you are up here you can swing forward to collect
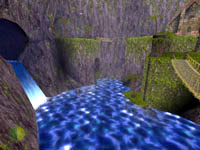
this level's first treasure; the Gold Idol.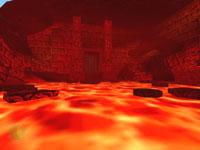 Drop back down and follow the steps at the other end of the hall up to the ledge above the room where you entered this area.
Carefully drop to the floor below and get past the lava monster as you jump back over the lava river and climb the wall to
the main lava chamber. Directly across the lava lake is a large door (see picture) so start making your way across those
stepping-stones again. As you get close to the door you will notice a flat ledge to the left of the entrance with a Poison Kit
on it. You probably won't notice the lava monster blending into the rocks right next to it. You decide if it's worth the risk.
There are plenty of spiders ahead in this level but you should have at least 5-7 Poison Kits already in your inventory.
Drop back down and follow the steps at the other end of the hall up to the ledge above the room where you entered this area.
Carefully drop to the floor below and get past the lava monster as you jump back over the lava river and climb the wall to
the main lava chamber. Directly across the lava lake is a large door (see picture) so start making your way across those
stepping-stones again. As you get close to the door you will notice a flat ledge to the left of the entrance with a Poison Kit
on it. You probably won't notice the lava monster blending into the rocks right next to it. You decide if it's worth the risk.
There are plenty of spiders ahead in this level but you should have at least 5-7 Poison Kits already in your inventory. Approach the door and insert the Red Tiki Key in the slot on the right. The door will open and a pair of spiders will attack.
Kill them as you enter the next large hall. The monkey is harmless so leave him alone - only Lara Croft kills monkeys.
In fact the monkey actually helps you. Follow him to the right side of the stairs and he will lead you to a treasure.
Approach the door and insert the Red Tiki Key in the slot on the right. The door will open and a pair of spiders will attack.
Kill them as you enter the next large hall. The monkey is harmless so leave him alone - only Lara Croft kills monkeys.
In fact the monkey actually helps you. Follow him to the right side of the stairs and he will lead you to a treasure.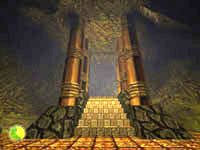 Kill another spider that attacks as you approach the stairs then get the Gold Coins. You may
have to fire a few shots to scare off the monkey. That's it for this area. Climb up the steps leading out of here and
follow the passage around until you reach the great outdoors. Just to your left are some medicinal herbs. Enjoy the breathtaking
view and try to figure out your next move.
Kill another spider that attacks as you approach the stairs then get the Gold Coins. You may
have to fire a few shots to scare off the monkey. That's it for this area. Climb up the steps leading out of here and
follow the passage around until you reach the great outdoors. Just to your left are some medicinal herbs. Enjoy the breathtaking
view and try to figure out your next move.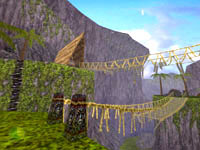 Find the house on the upper plateau and locate the black ladder leading up to it. (see picture) Drop down to the low ledge
then climb the ladder to the level with the house and kill the giant lizard at the top. Walk out onto the bridge and get a
running start so you can jump the gap and land on the middle pair of boards. Not much room to move here - drop off to the
bridge below and you can follow it out to the central rock pillar.
Find the house on the upper plateau and locate the black ladder leading up to it. (see picture) Drop down to the low ledge
then climb the ladder to the level with the house and kill the giant lizard at the top. Walk out onto the bridge and get a
running start so you can jump the gap and land on the middle pair of boards. Not much room to move here - drop off to the
bridge below and you can follow it out to the central rock pillar.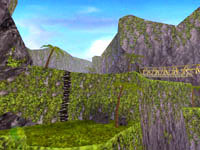 When you are off the bridge, turn right and face this ledge across the way. Do a running jump over to it and climb the ladder
leading to the upper level. Several more reptiles wait to attack you as you head up the long grassy hill to the next wooden
ladder. Climb this ladder to an even higher ledge where more lizards and a monkey are running around. Spare the monkey and
kill the lizards as you approach the spectacular view of the waterfall spilling into the lake with the house across the way.
When you are off the bridge, turn right and face this ledge across the way. Do a running jump over to it and climb the ladder
leading to the upper level. Several more reptiles wait to attack you as you head up the long grassy hill to the next wooden
ladder. Climb this ladder to an even higher ledge where more lizards and a monkey are running around. Spare the monkey and
kill the lizards as you approach the spectacular view of the waterfall spilling into the lake with the house across the way.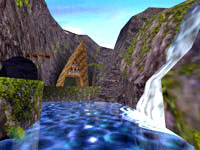 There isn't much else to do but just jump in the water. This area is piranha-free so enjoy the swim as the current takes you
over a small waterfall and leads you around over a larger waterfall. When you splash into the final lake you will want to
get out your machete and deal with the four piranha who are moving in for the attack.
There isn't much else to do but just jump in the water. This area is piranha-free so enjoy the swim as the current takes you
over a small waterfall and leads you around over a larger waterfall. When you splash into the final lake you will want to
get out your machete and deal with the four piranha who are moving in for the attack.
 Exit onto the low portion of the land with the black ladder leading up. Climb the ladder leading to the upper ledge then
cross the rope bridge leading toward the house. If you look back over the lake it should look like the picture. Enter the
house which actually conceals the entrance to a large cave. You may want to use your lighter to brighten things up in here.
Exit onto the low portion of the land with the black ladder leading up. Climb the ladder leading to the upper ledge then
cross the rope bridge leading toward the house. If you look back over the lake it should look like the picture. Enter the
house which actually conceals the entrance to a large cave. You may want to use your lighter to brighten things up in here. From the entrance you have a choice of two ladders. Head to the left one first. You can light the torch at the bottom if you
want then climb the ladder and take the Silver Coins from the skeleton. Now you can climb back
down and head to the other ladder. When you reach the top, turn and face the spikes behind you. There is an opening above the
spikes you can jump to. When you land, immediately take out your gun and kill the spider who attacks from the darkness on the
right. Then you can get more Silver Coins before jumping back to the opposite ledge at the top of
the ladder.
From the entrance you have a choice of two ladders. Head to the left one first. You can light the torch at the bottom if you
want then climb the ladder and take the Silver Coins from the skeleton. Now you can climb back
down and head to the other ladder. When you reach the top, turn and face the spikes behind you. There is an opening above the
spikes you can jump to. When you land, immediately take out your gun and kill the spider who attacks from the darkness on the
right. Then you can get more Silver Coins before jumping back to the opposite ledge at the top of
the ladder.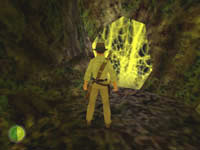 Head into the cave until you come to a thick web on the right. Slash it with your machete then kill the angry spider before
taking his treasure. When you have the Gold Coins stashed away turn and follow the passage up a
couple of ledges as you go deeper into this web-infested area.
Head into the cave until you come to a thick web on the right. Slash it with your machete then kill the angry spider before
taking his treasure. When you have the Gold Coins stashed away turn and follow the passage up a
couple of ledges as you go deeper into this web-infested area.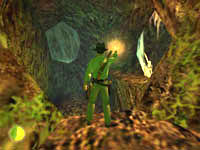 Kill the spiders and slash the webs. One spider will even be on the web when you slash it. Continue deeper into the cave
and kill any other spiders I forgot to mention until you reach a large pit. There are spikes below and poisonous spiders
everywhere. The only spider you need to kill is the one on the ledge to the right (by the speared skeleton). When that
spider is dead you can safely make the running angled jump to this entrance.
Kill the spiders and slash the webs. One spider will even be on the web when you slash it. Continue deeper into the cave
and kill any other spiders I forgot to mention until you reach a large pit. There are spikes below and poisonous spiders
everywhere. The only spider you need to kill is the one on the ledge to the right (by the speared skeleton). When that
spider is dead you can safely make the running angled jump to this entrance.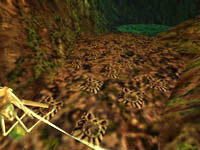 This next area is a deadly spear trap. Use your lighter so you can see the pockets on the floor which each contain spears
ready to turn you into a skeleton like your buddy here. Carefully walk around these holes being careful not to step on any.
When you reach the slimy green water at the back of the cave you are safe. Follow the tunnel leading out of this area as
it wraps around.
This next area is a deadly spear trap. Use your lighter so you can see the pockets on the floor which each contain spears
ready to turn you into a skeleton like your buddy here. Carefully walk around these holes being careful not to step on any.
When you reach the slimy green water at the back of the cave you are safe. Follow the tunnel leading out of this area as
it wraps around. The tunnel ends at some vines which are too thick to walk through. Use your handy machete to cut through them and exit this
cave. You are now on the opposite side of the first lake/falls you arrived at after killing all those giant lizards. Over
to your right is a post over the river. Use your whip to swing across to the other side and enter the cave.
The tunnel ends at some vines which are too thick to walk through. Use your handy machete to cut through them and exit this
cave. You are now on the opposite side of the first lake/falls you arrived at after killing all those giant lizards. Over
to your right is a post over the river. Use your whip to swing across to the other side and enter the cave. Deeper into this cave are several spears and a pair of ramps leading down below. Look down the ramp on the right and locate
the ledge below with a Silver Bar just waiting for you. Save your game because you only get one
shot at this. Slide down the ramp and at the very last second jump and grab for the ledge. Pull up to get the treasure then
drop to the floor below. Make your way through more spear pockets in the floor and follow the cave around to the daylight
where another giant lizard needs your immediate attention.
Deeper into this cave are several spears and a pair of ramps leading down below. Look down the ramp on the right and locate
the ledge below with a Silver Bar just waiting for you. Save your game because you only get one
shot at this. Slide down the ramp and at the very last second jump and grab for the ledge. Pull up to get the treasure then
drop to the floor below. Make your way through more spear pockets in the floor and follow the cave around to the daylight
where another giant lizard needs your immediate attention.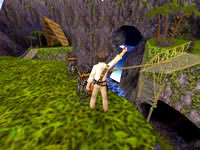 Head out onto the ledge overlooking the lake below. This place should look familiar. Run across the bridge and jump over the
missing section to land on the opposite cliff. Another lizard patrols this ledge - kill him when the time comes. Your
immediate task is to cut the single support rope on the bridge you just crossed. It will fall to the other side creating a
ladder to the cave below.
Head out onto the ledge overlooking the lake below. This place should look familiar. Run across the bridge and jump over the
missing section to land on the opposite cliff. Another lizard patrols this ledge - kill him when the time comes. Your
immediate task is to cut the single support rope on the bridge you just crossed. It will fall to the other side creating a
ladder to the cave below.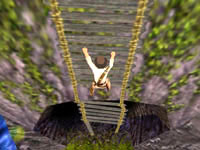 Now you have to make the long repetitive journey all the way back around to the opposite cliff. Remember the way? Head toward
the lower ledge behind you and climb/drop down then take the rope bridge back across to the house. Enter the cave and take
the right ladder up and through the spider caves. Whip-swing over the river and head into the cave and down the right ramp.
Sneak through the spear trap and back out onto the ledge where you can climb down the ladder. You will have to jump from
the bottom to land in the entrance.
Now you have to make the long repetitive journey all the way back around to the opposite cliff. Remember the way? Head toward
the lower ledge behind you and climb/drop down then take the rope bridge back across to the house. Enter the cave and take
the right ladder up and through the spider caves. Whip-swing over the river and head into the cave and down the right ramp.
Sneak through the spear trap and back out onto the ledge where you can climb down the ladder. You will have to jump from
the bottom to land in the entrance.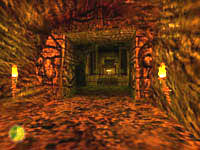 When you enter the cave the torches will flare up on their own...spooky. Continue deeper inside and get the Monkey Key
then start running for the exit as the entire place starts to cave in. You will take moderate damage from falling rocks if
you keep running and jump into the water. Hopefully you already killed all the piranha so you should have an easy swim back to the
low ledge with the black ladder.
When you enter the cave the torches will flare up on their own...spooky. Continue deeper inside and get the Monkey Key
then start running for the exit as the entire place starts to cave in. You will take moderate damage from falling rocks if
you keep running and jump into the water. Hopefully you already killed all the piranha so you should have an easy swim back to the
low ledge with the black ladder.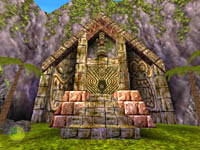 Climb the ladder to the first ledge then locate the other black ladder (opposite the rope bridge) leading up to the next higher
ledge. This is where you cut the bridge loose earlier. There are several medicinal herbs off to the right of this building.
Head to the large building against the cliff and use the Monkey Key to open the doors. Go inside and through the first hall
leading into the large room with the high ceiling.
Climb the ladder to the first ledge then locate the other black ladder (opposite the rope bridge) leading up to the next higher
ledge. This is where you cut the bridge loose earlier. There are several medicinal herbs off to the right of this building.
Head to the large building against the cliff and use the Monkey Key to open the doors. Go inside and through the first hall
leading into the large room with the high ceiling. Suspended from the ceiling is the Green Tiki Key and your job is to get it down. There are four buttons
on the walls down here. Starting with the button on your left as you enter this room, press them in a clockwise pattern
near-right, near-left, far-left, far-right). Each button causes a central platform to raise and/or spin and the final button
will lower the column back down with the key on it. Take the key and the floor will lower you down to the next area.
Suspended from the ceiling is the Green Tiki Key and your job is to get it down. There are four buttons
on the walls down here. Starting with the button on your left as you enter this room, press them in a clockwise pattern
near-right, near-left, far-left, far-right). Each button causes a central platform to raise and/or spin and the final button
will lower the column back down with the key on it. Take the key and the floor will lower you down to the next area.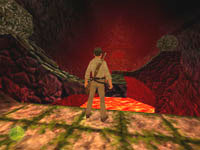 Run through this next area past the lava monster on the left and through the door. A boulder seals off the door and you are
left facing your next challenging puzzle. A pair of boulders rest on opposite ledges and they will start rolling as you jump
to each of their platforms. These boulders are "smart boulders" and will even turn the sharp corner and follow you. The
easy way through this is to make the first running jump and keep running toward the second ledge. Jump and HANG from this
ledge and let the second boulder come down and roll off into the lava. Then you can pull up and continue to the other end.
Jump to the short ledge then look up and use your whip on the ring to climb to the upper ledge.
Run through this next area past the lava monster on the left and through the door. A boulder seals off the door and you are
left facing your next challenging puzzle. A pair of boulders rest on opposite ledges and they will start rolling as you jump
to each of their platforms. These boulders are "smart boulders" and will even turn the sharp corner and follow you. The
easy way through this is to make the first running jump and keep running toward the second ledge. Jump and HANG from this
ledge and let the second boulder come down and roll off into the lava. Then you can pull up and continue to the other end.
Jump to the short ledge then look up and use your whip on the ring to climb to the upper ledge. Kill the attacking spider then follow the cave around to the left where another spider is waiting. Collect the
Gold Bar then approach the web. Use the machete to cut it away and kill the two angry spiders
that drop from the ceiling when you do. Continue deeper into this cave toward the red glowing area ahead.
Kill the attacking spider then follow the cave around to the left where another spider is waiting. Collect the
Gold Bar then approach the web. Use the machete to cut it away and kill the two angry spiders
that drop from the ceiling when you do. Continue deeper into this cave toward the red glowing area ahead.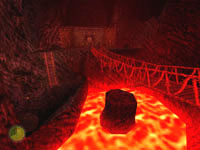 This area has another broken bridge leading across more lava. The jump is impossible to make so you need to jump early and
arc through the hole in the bridge so you land on the rock in the middle of the lake. From here you can jump to the ledge
by the ladder and get the Gold Coins. Oh, did I forget to mention the lava monster? Dodge him
while you get the treasure and climb the ladder leading to the next ledge.
This area has another broken bridge leading across more lava. The jump is impossible to make so you need to jump early and
arc through the hole in the bridge so you land on the rock in the middle of the lake. From here you can jump to the ledge
by the ladder and get the Gold Coins. Oh, did I forget to mention the lava monster? Dodge him
while you get the treasure and climb the ladder leading to the next ledge. This is the "big door". Use both of your Tiki Keys to open this door and enter into the cave beyond. Torches will light
your way as you go deeper into the cave. As you make the large turn to the right make sure to get the treasure to the right.
These Silver Coins are your ninth treasure - only one more to go. Head deeper into the cave and
it will turn left and lead toward a huge lake of fire and bubbling lava with many rocks and a large stone bridge.
This is the "big door". Use both of your Tiki Keys to open this door and enter into the cave beyond. Torches will light
your way as you go deeper into the cave. As you make the large turn to the right make sure to get the treasure to the right.
These Silver Coins are your ninth treasure - only one more to go. Head deeper into the cave and
it will turn left and lead toward a huge lake of fire and bubbling lava with many rocks and a large stone bridge.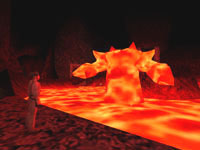 The Lava Guardian rears his flaming head as you approach the shore. This means that a Machine Part must be nearby. The
guardian isn't difficult to beat - in fact he's quite easy. The biggest strategy to beating him is to always keep moving.
If you stop he will zero-in on your position and rise up and start hurting you. As you make the jumps from stone to stone
around this lake you may want to save often.
The Lava Guardian rears his flaming head as you approach the shore. This means that a Machine Part must be nearby. The
guardian isn't difficult to beat - in fact he's quite easy. The biggest strategy to beating him is to always keep moving.
If you stop he will zero-in on your position and rise up and start hurting you. As you make the jumps from stone to stone
around this lake you may want to save often.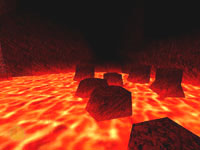 Do a running jump to the stone on the right and continue around until you are on the rocks that make up the base of this
side of the bridge. The guardian will rise up near the bridge making it impossible to cross. Turn and locate the next
series of rocks leading away from this ledge in a curved pattern. (see picture). Also note the single rock to the outside
of the curve which hold this level's final treasure. Make a quick jump out to get the Silver Idol
and maybe save here.
Do a running jump to the stone on the right and continue around until you are on the rocks that make up the base of this
side of the bridge. The guardian will rise up near the bridge making it impossible to cross. Turn and locate the next
series of rocks leading away from this ledge in a curved pattern. (see picture). Also note the single rock to the outside
of the curve which hold this level's final treasure. Make a quick jump out to get the Silver Idol
and maybe save here.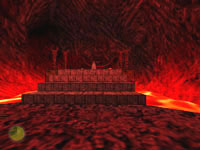 Jump back and continue following the curved pattern of rocks. Jump to the flat rock ledge on your left and stay to the right
so you don't wake up the lava monster. Cross the narrow gap of lava to the next flat area and stay to the left so you don't
disturb the lava monster here. One more running jump should put you on the flat rock with the stairs leading up to the
Taklit's Machine Part. When you take the part the Lava Guardian will rise up behind you and start
flinging fire at you. Immediately do a backwards roll to get out of the way and start running back the way you came.
Jump back and continue following the curved pattern of rocks. Jump to the flat rock ledge on your left and stay to the right
so you don't wake up the lava monster. Cross the narrow gap of lava to the next flat area and stay to the left so you don't
disturb the lava monster here. One more running jump should put you on the flat rock with the stairs leading up to the
Taklit's Machine Part. When you take the part the Lava Guardian will rise up behind you and start
flinging fire at you. Immediately do a backwards roll to get out of the way and start running back the way you came.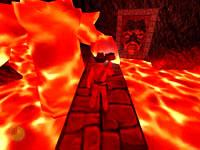 When you are about to jump from the flat ledge back to the curved pattern of stones the guardian will rise up on the left.
Ignore him and just quickly jump to the stone and pull up and turn to jump to the next. Now make a seamless series of jumps
from stone to stone all the way back to the bridge. As long as you keep moving he can't hit you. Walk out onto the bridge
and approach the Lava Guardian who will have appeared once again to the left. Use the Taklit Part when you are a few steps
away from his arm. You will vanish and the Lava Guardian will sink into the lava. Quickly run across the bridge and turn
off the part when you reach the other side.
When you are about to jump from the flat ledge back to the curved pattern of stones the guardian will rise up on the left.
Ignore him and just quickly jump to the stone and pull up and turn to jump to the next. Now make a seamless series of jumps
from stone to stone all the way back to the bridge. As long as you keep moving he can't hit you. Walk out onto the bridge
and approach the Lava Guardian who will have appeared once again to the left. Use the Taklit Part when you are a few steps
away from his arm. You will vanish and the Lava Guardian will sink into the lava. Quickly run across the bridge and turn
off the part when you reach the other side.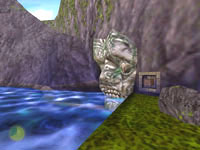 Follow the stone ledge as it winds its way back into the darkness. A lava monster is on the right but you can easily run past
him. When you jump the gap you need to be careful on the other side. More spear pockets are in the floor. Use your lighter
to spot them as you make your way to the exit back outdoors. Kill one more lizard as you exit the cave then approach the large
stone face on the right. Press the button to start a sequence of events which will destroy the Lava Guardian and create a land
bridge for you to exit this level.
Follow the stone ledge as it winds its way back into the darkness. A lava monster is on the right but you can easily run past
him. When you jump the gap you need to be careful on the other side. More spear pockets are in the floor. Use your lighter
to spot them as you make your way to the exit back outdoors. Kill one more lizard as you exit the cave then approach the large
stone face on the right. Press the button to start a sequence of events which will destroy the Lava Guardian and create a land
bridge for you to exit this level.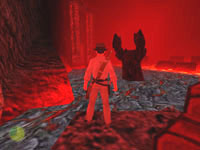 Return to the cave and carefully get past the spear trap. Jump over the gap and run past the lava monster once more as you
make your way back to the bridge. Ahead of you is the cooled-down Lava Guardian and just past him to the left is the large
stone door leading out of here. Drop to the crusted lava and walk across to the door. Poke the Lava Guardian on your way -
he's not so tough anymore, is he? Climb the steps and exit through the door to begin your Jeep Trek.
Return to the cave and carefully get past the spear trap. Jump over the gap and run past the lava monster once more as you
make your way back to the bridge. Ahead of you is the cooled-down Lava Guardian and just past him to the left is the large
stone door leading out of here. Drop to the crusted lava and walk across to the door. Poke the Lava Guardian on your way -
he's not so tough anymore, is he? Climb the steps and exit through the door to begin your Jeep Trek.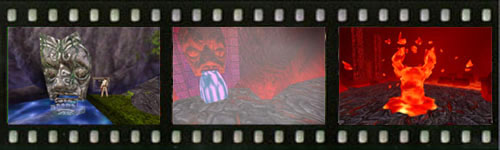

 Recommended Purchases:
(1) Rifle Clip
(1) First Aid
(1) Auto-Pistol Clip