![]()
by Cyan Productions and Red Orb Entertainment.
Solution by Mike Marcelais: Version 1.1, November 1997
Do you have the most recent version of this file? Updates are always sent first to The Spoiler Center at https://the-spoiler.com -- the best place to get spoiled on the web.
Thanks to Andrew Becker for helping with the image maps, Julie Pickhardt for help with the HTML, and Erik Gos, Tom Mueller, and Ron Opperman for extra tips and corrections.
Riven, like Myst, is a very open game. The puzzles to be solved are scattered around the world and are often integrated very naturally into the environment. Often, there is a lot of area that you can explore with access to lots of devices that seem like puzzles. Usually, you cannot solve, or even decipher the meaning, of a device when you first see it and many devices are places to provide atmosphere to the game and are not part of any puzzle at all.
Part of the enjoyment of games like Riven is to walk around and take in the local scenery. Enjoy the fruits of someone else’s imagination. Try to figure out what is important and relavant to your situation. Overuse of walktrhoughs like this will ruin this sense of discovery; lost in the rush to get through the game as quickly as possible.
But enough about that. Here is a brief overview of how this solution is organized. The maps section gives a line-drawing map of all of the important locations in the game and all of the walkways that link these locations. The solution section actually talks about the different locations, what you need to accomplish in each location (and sometimes why you need to accomplish it), and gives you the order that you need to do stuff in. Because of the way the ‘damaging’ information in the maps is hidden in hyperlinks, the map section is generally spoiler-free and can be used like a trail guide is used in a National Park. The solution section is not so safe.
Riven (also known as the Fifth Age) is spread out over five islands. Names I have asigned the islands are based on what I think is the most important feature of the island. The major islands can also be identified by the CD that the island is located on. There is also a small section of the game set outside Riven, one part in Ghen’ 233rd Age and another part in Tay.
All of the maps share a common legend: Paths are indicated in either red, green or black -- the different colors are used to represent paths of differing altitudes. If two paths cross, they actually meet if they are the same color, and pass over or under each other if they are different colors. Where possible, black paths are above the red paths but beneath the green paths.
Important locations are drawn with a number in a black circle. Clicking on that circle will bring up a thumbnail view of that location, to better orient yourself. The numbers are assigned arbitrarily and are used in the solution section of the game to describe locations more easily. Some locations may have paths of different colors entering and leaving the location. Sometimes, it is possible to go from one height to another in a location -- usually visiting the section in question makes this obvious.
All shorelines (including the edges of islands) are drawn in blue, often with a blue border (or solid area) to indicate the direction that the water extends. Dashed black lines indicate borders between the CDs. Paths which you travel along, but have no direct control over (such as minecar paths) will be shown in purple.
You start the game at location 1.
All numbers refer to map locations in the general maps. Location numbers will always be written in arabic numbers (ie: 17) while all other numbers will be written in english (ie: seventeen).
Don’t be afraid to explore areas that are open. There are many areas of the game that are accesable much earlier in the game then when they are visited in this solution. As far as I can tell, it is impossible to lose anything, break anything, or make a puzzle unsolvable, nor is it possible to get stuck anywhere (physically) and not be able to return to a location you have been previously. There is one way to lose the game, but it is hard to do and not possible until near the end of the game.
Generator Island is the island that you start the game on. Atrus sends you here with a Prison book and his journal and tells you that you need to trick Ghen into using the Prison book so that he can imprison Ghen and rescue Catherine and all of the natives of Riven from the world before it disintegrates. He sends you here (to location 1) where you promply arrive in a cage. A native arrives, talks in a strange language to you and takes the prison book. He is then ambushed by a rebel who takes the book but frees you.
Start by heading up the stairs towards 3. (You can look over the edge of the cliff to see the ambushed native if you like.) Ignore the telescope at 2 since you can’t do anything with it for a long time. When you get to 3, you can look into the room at 4. This room rotates: it has five entrances with two doorways. The button next to the door rotates the room: click it four times so that the doorways open to the entrances to your left and right. Then continue straight along the path.
At 5 you arrive at a gate. You can get around the gate by clicking underneath it. Enter to room and cross over to 8. At 8, there is a steam switch with an icon of the telescope above it. You will see many of these kinds of switches in the game: most devices in Riven are steam powered. This switch directs the steam from the ground beneath you to either the device (if the switches is lowered) or to the vent above you. Flip the switch. Head back to the doorway and pull the lever on the left. This opens up the gate that would block access to 6. Then push the button (on the right) twice to rotate the room so that the openings are at 6 and 8. Cross the room to 6.
At 6, there is a door blocking access. Turn around and pull the lever here. This opens the gate that blocks access to 7. Now, push the button twice to rotate the room so that you can cross back to 3; then at 3 push the button twice to allow access to 7. Then cross the room to 7.
At 7, walk across the bridge and enter the large domed building directly ahead at 9. This building is the main power generator for all of the devices on Riven. You can see pipes extending from this building to all of the other islands on Riven. This is why I named this island the Generator Island. Walk around the building and down the ramp until you get back outside. Here, there are two more switches, both of which control bridges, at 14 and 12 that you should flip. Then head back down the path and return to the bridge at 3.
Cross the bridge and head down the cavern tunnel. On the left there is a door that opens into 16. In 16, there is a chair which I never figured out a use for, although I believe it to be a communication device (based on several similar devices you will see later). If you enter the room and turn back around, there is a porthole thing on the left of the door. This displays a view of 17 and the lever attached to the device opens and closes the door there. Open the door. (The porthole on the right displays a view of 18.)
Return to the tunnel and head to 17. Head out the door to 18 where there is a suspended tram station. Push the blue button to call the car and hop on board. The controls are fairly easy to understand: the lever that looks like it turns circularly will turn the car around and the push lever in the middle causes the tram to move forward. Enjoy the ride -- the animation here is very well done. You arrive at the other end at 19.
You are now on Forest Island; so named for the forests that grow (and in some places, used to grow) here. At 20, there is a small marble in the stone that rotates. When rotated, you hear an animal sound and also see a Riven numeral. These Riven numbers are discussed in more detail when you arrive at 38 a little later in the solution.
Head through the caves to 21, and turn right heading up the stairs. (The button at 21 will call the tram if you find that it isn’t at 19 when you need it.) Head through the gate when you get to 22. Off the path in the jungle to your left, there is a path that leads to another marble (at 23). There is a large Riven dagger stuck in the ground here to let you know where this is.
Continuing along the path through 25 to 30, you will arrive at a walkway where a sentry in a watchtower above you will sound an alarm. When you go down the walkway to 43, you will see villagers here flee from you as quickly as they can. (I thought this, plus the language barrier, was a nice way of minimizing interaction with others while avoiding the appearance of a wasteland like Myst was.)
Continue along the walkway. At 41, there is a dock, but nothing docked here. Near 39, you will start climbing ladders and walking across elevated walks through the village. At 39, there is something that looks very much like an altar or a shrine and a submarine. Pull the lever next to the submarine and it will lower into the water (down to location 40). Now return down through the walkways and go to location 24.
At 24, there is a minecar. Jump into the minecar and pull the lever. The car will go through earthen tunnels, under water, and through elevated tracks all of the way to 44.
You arrive in the central bay area of this island, so named because Ghen does most of his experimenting on this island. You arrive at location 44, but quickly slide down a chute to 45.
From here, walk out to 46. There is a three way switch here that controls the power to this island. Currently it is set to deliver power to 50; move the switch to the middle setting so that power goes to 47. Then return to the shore and go to 47.
At 47, flip the side lever to turn off the heat in the tank. This will cause the water to stop boiling. Then turn the wheel to drain the water away. Now, turn to your left and flip the small lever there on the pair of pipes. This will cause power to flow to the third control: the switch that raises and lowers the platform inside the building. Go around and go inside (at 48). Go down the ladder and crawl through the pipe. There will be several screens where it is pitch blank, but eventually you will emerge at 49.
When you come out of the pipe, head down the path towards 50. On the balcony, there is a ladder leading down. Open the hatch to the ladder, since it can only be opened from this side. Then open the pair of double doors and go through them. Now close the doors, since the passages leading to 51 and 53 are blocked when the doors are open. Head towards 53. Along the way, there will be a lever on the right side of the path. Pull that lever, then return to 52.
If this area has power, the device at 52 can be used. You can open the steel sphere to reveal a bear-trap like mechanism. Drag a piece of food from the dish on the right and put it in the center of the trap. Use the lever to lower the sphere into the water far below. After a few minutes, you will hear the trap snap shut. Raise the trap back up and open it and you will have a frog.
However, this is completely unnecessary. If you look up, there is a ventilation shaft. The switch you pulled near 53 turns off the fan blades so that you can crawl safely through the vent and into 54. When you arrive, you will see that 54 is Ghen’ laboratory. The most important thing in this library is the journal laying on the desk beneath the vent. Inside, you will find the access code to the linking book domes. It will look like five symbols, inside squares in a row. The code is different every game, so you have to copy down those symbols (or skip ahead to the section on Riven numbers and just note down the numbers).
Now, go to the door with the blue button and open it. This leads back out to 53. Now head across the long bridge back towards the Generator Island. Right before you get to the end of the bridge, there is a section raised up. Use the lever there to lower the bridge so you can re-enter the generator.
Head inside the building and follow the catwalk around to 10. The wheel
here, when turned, will extend the catwalk across to connect with 9. Now, go
to 13. A section of the walkway is missing here. Turn around and push the button --
this will raise the walkway and allow you to cross over to 6. The lever here will
open the door. Return to location 9 and face out towards 7. To your right is a lever.
Pull the lever and this raises the stairs up. This causes the stairs to go from 7 up to 11
instead of to 9. However, you don“t know what to do at 11 yet, so lets
leave. Return to 53 via the bridge.
Part V: Experiment Island
Head into the building at 54 and exit out the other door to 55. There is another tram car. (If the car is’t here, you can call it by pushing the blue button back at 54.) Get in the tram and take it across to 56.
At 56, take the left exit from the tram car and head out the door to 62 and up the stairs to 61. Here, there is a button that will raise you up to the next level. From here, you can look back towards 56 and see a map of the Riven islands. Pushing one of the buttons on the keypad will cause water to form on one of the land masses corresponding to its topographical shape.
You can continue around to 60 if you like; this shows the location of another of the linking spheres. When you are done looking around, head back down to 56 via 62, go through the tram until you are on the other platform and head down the passage to 57.
At 57, pull the lever to call the elevator. Inside, push the button to descend. When you exit, you will surprise Ghen in the passageway and he will run to 59. If you follow him, you can see him leave in the tram. Don’t follow him, but head back to 58 instead.
There is a chair here which offers a view of the undersea life. The left dial offers a view of the underwater area (by pushing the right button) and a view of Catherine’s cell (by pushing the left button). The right dial allows you to turn on various undersea lights. This allows you to associate each of the colors with each of the Riven symbols for that color. Note that the purple light is burned out. Alas. Now, return to 59 and take the tram across to the Forest Isle at 29.
At 29, take the corridor to 28. This is an elevator. You are currently on the ground floor. The middle floor leads to a secret exit through the mouth of a fish at 27. The button to call the tram is also located here. Taking the elevator all of the way to the top leads to the treetop walkway. This is where you want to go.
Once up here, head past the linking dome at 25 to the building at 31. Sit in the chair in this building. The lever on the left will raise the chair up to a very high altitude and let you get a view of the entire village. If you look down, you will see this teepee like structure. The lever on the right will close and open the floor of this structure. Leave the floor closed. Now lower the chair and head back towards the elevator. Take the middle exit, down through 27, and make your way across the island to 21 continuing down the stairs to 35.
At 35, there are a pair of beached seal like creatures. Around the backside of the rocks where they are sitting is another marble. Continue along the passage to 34, there is a pool with another marble in it. If you turn the dial on the bottom-right of the pool, water will flow into the pool to make the silhouette of an animal.
Continue down the ladders to get to 40. The sub that you lowered from 39 should be here. The controls in the sub are identical to those of the tram, except that the go level is to the right and there is a slider along the bottom of the controls. This slider determines whether you will go left or right when you get to a junction.
Follow the tracks to location 33. Climb the stairs here and you will get to a room that has five levers. These levers control whether the docking rings are extended or not. If the rings are not extended, then the you cannot get to that dock with your sub. You will want to raise all of the levers. Now return to the sub.
Take the sub to 38. This is a schoolhouse. Along the walls are the letters of the Riven alphabet. The important thing here is just to the left of the door. It is a nifty game: there are two men dangling from ropes and a shark waiting below to eat them. Every time you turn the crank, a random number is spun in the window below and the man whose turn it is drops that many notches on the rope. First one to twenty loses.
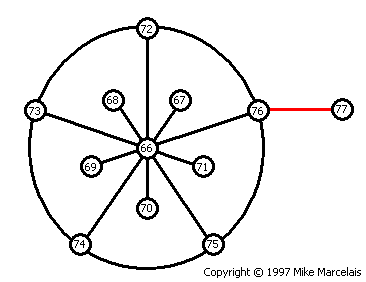
This game lets you learn Riven numbers. You can easily pick up the values of the first ten numbers.
Now, notice that the multiples of five are just the values one through four rotated
by ninety degrees. Riven numbers are base five: The first digit
is placed in a square normally, the second digit is placed at right angles to that
number. Subsequent digits are placed in new squares to the left. To read the numbers,
you take the rotated number, multiply it by five, and then add it to the non-rotated
number. See the example for seventeen above.
If you have more than one digit, then you multiply the left total by twenty-five
and add it to the right total. For example, Ghen’s world he called:  The left value is nine, the right value is eight. The total is (9*25+8) which is two
hundred thirty-three. Now that you know Riven numbers, you can translate the numbers
you found in Ghen’s journal.
The left value is nine, the right value is eight. The total is (9*25+8) which is two
hundred thirty-three. Now that you know Riven numbers, you can translate the numbers
you found in Ghen’s journal.
Anyway, now that you can count, return to the sub and head to 42. When you exit the sub, walk into the teepee area and pull the handle on the far side. This will lower a bar down to the ground. You can step into the middle of the area and grab the bar and ride up to the top. Once up here, use the button to the right of the door to open the cell. Once inside the cell at 32, lift up the drain in the floor and click there. This will raise a hidden switch that opens a secret door in the wall. Go through this door.
The passageway you enter is completely dark. Eventually, you will get to a seaview at 36. There is a light here that you can turn on by clicking it. As you walk back along the passage, there are more lights that you can turn on -- they were hidden by the darkness. Turn around again and you will see the side door that leads to 37 this time down. Head towards 37.
37 contains a circle of stones that need to be lowered in exactly the right order. Each of the marbles that you saw earlier in the game were associated with one of the animals depicted on the stones. The number of the back of the marble determines the order to push the tablets in. Here are the pictures of the five stones that you need to push:

These stones are located in the following locations: Facing the exit door, the 6th stone from the left, the 1st stone from the left; turn to the right, 2nd stone from the left, turn to the right, 7th stone from the left, 4th stone from the left. This will open a shelf straight ahead that contains a linking book. Use the book to link to Tay.
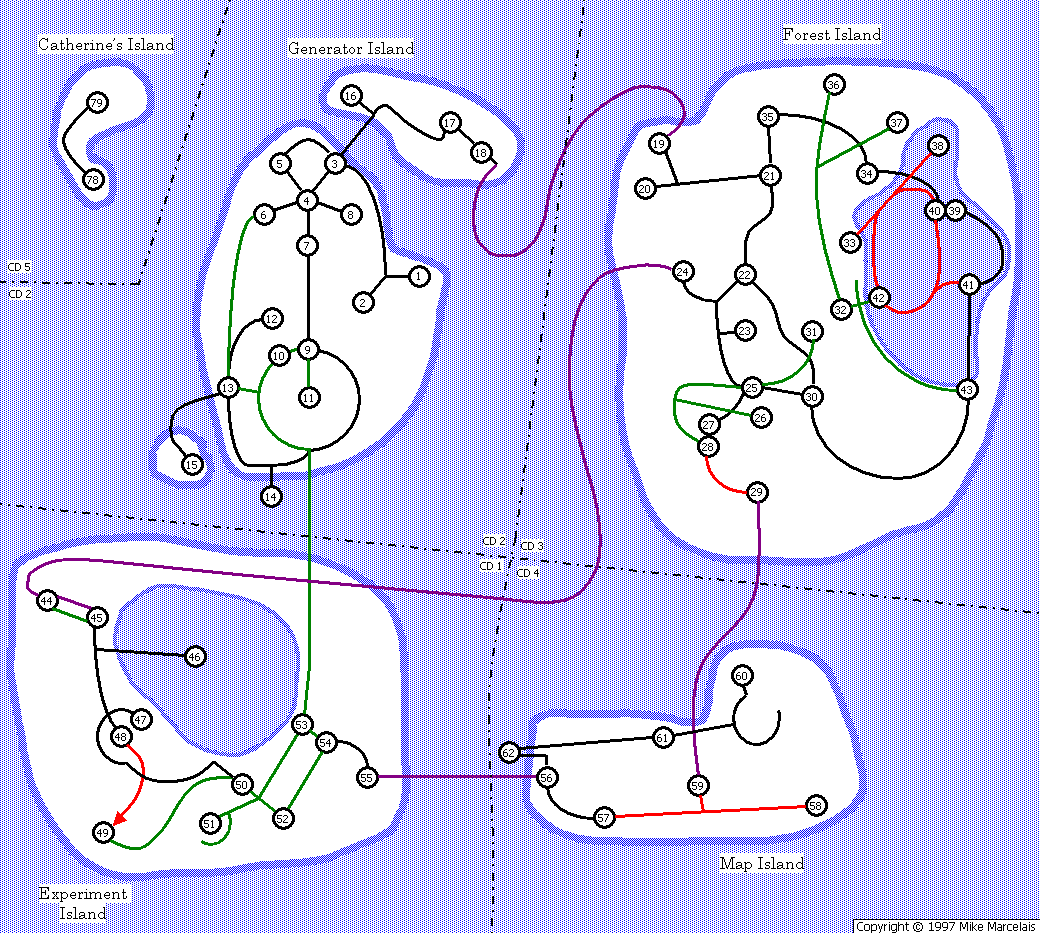
You arrive in Tay at 64. This is the cover picture for the Riven box, in case you hadn’t noticed. There doesn’t seem to be anything to do here, so return to the linking boot at 63. You will be ambushed and imprisoned by the rebels here. They will take you to a room at 65 where you will meet someone that brings you back the prison book and Catherine’s journal. The important piece of information in the journal is the combination to the telescope that you saw back at the start of the game in location 2. It is a series of five Riven numbers and the combination is different every game. After you have taken the journal, your captor returns with a linking book to return to to 37.
(Side note: Now that you have the combination to the telescope, you can go to it and break the fissure. Doing so before you have captured Ghen will cause Atrus to be summoned and captured and Ghen will escape Riven.)
When you have returned to 37, head towards location 4. Note that to get through the secret door at 32 you will have to lift the lever on the right side of the screen. You can also exit this upper area by going towards 43 where you can lower a ladder to have permanent access between the upper and lower levels of the village area.
You are now back in the rotating room at 4. Rotate the room so that an exit towards 7 is available. You should have raised the stairs by now (using the lever at 9) so you have access to the generator’s roof at 11 now. Head up to 11.
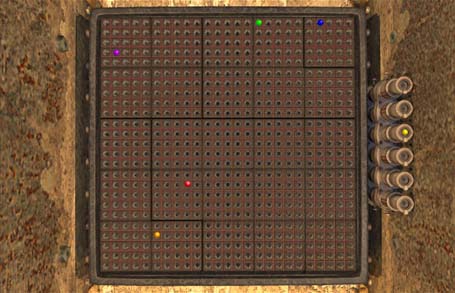
At 11, head towards the device in the center of the dome. There is a grid, twenty-five holes square and six marbles along the right side. The grid is divided up into five regions that are the same regions depicted on the Map Island map. What you need to do is locate the five linking domes; use the Map Island map to determine where on the grid the dome is located; determine what the color of the dome is by using the viewfinder located near each dome and then place the marble for that dome in the grid.
Or just look at the diagram below for the proper placement of the gems. Using text mode coordinates, assuming that the lower-left corner is (0,0), then the red marble goes at (8,8), the orange at (5,3), the green at (15,24), the blue at (21,24) and the purple at (1,21). Now head back, pull the lever down and push the white button. You know you’ve done it right if you hear a drilling like sound after pushing the white button. This now gives power to all of the linking book domes.
Now, return to the inside of the dome (via location 6). This can be done by pushing the button at location 3 three times. Head to the lower level of the dome and exit (heading towards 14) and go to location 13. Push the button against the wall and the floor will descend to the lowest level. This will allow you to get to the linking book dome at 15.
To use the linking book domes. Nearby each dome is a dome viewer. For the dome at 15, the viewer is right in front of the dome. For other domes, it is always nearby. (The dome at 51 deserves special mention; the viewer is hidden in a passage that is blocked when the door to the room containing the dome is open.) To get access to the dome, you need to hit the button on the viewer just before the dome’ color symbol appears. You can always tell what that symbol is by watching the pictures in the viewer. There is always a short pause on the dome’s color symbol and it is always highlighted. You will have to anticipate the symbol some. Now, head to the dome and set the five sliders to the five numbers that you found in Ghen’s journal and push the button. Then use the book to link. You can push the button at the base of the bookstand to exit the dome.
Go into the dome at 15 and link to Age 233; where Ghen is hiding.
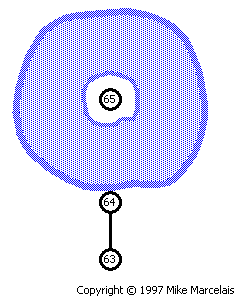
You arrive here, at location 66, in a cage. (Side note: locations 66 through 76 are all in this room.) Turn around until you see a button just outside the cage. This button is located in the direction of 75. This will call Ghen to the chamber. He gives you a long speech about how he has changed; takes the prison book from you when he notices that you have recovered it; is about to use it when he gets suspicious and then asks that you go first.
If you remember from reading Atrus’s journal, the prison book is a one man prison; if a second person uses the book, then the first is released. So go ahead and enter the prison book. Ghen will quickly follow releasing you from the prison and entrapping himself in. You are now free to explore the room.
Locations 67 through 71 are linking books that link to the following locations (respectively): 60, 25, 57, 15, and 51. Location 72 is a generator for making power to these linking books. The slider turns it on and off. The power is on if the red window below the lever glows. 73 is a writing table with Ghen’s newest book. 74 is a doorway leading outside. Unfortunately, there is no way to open it. 75 is a lever that opens the cage. 76 is a stairwell that descends down to Ghen’s bedroom at 77. Take that stairwell down.
Inside his bedroom, on the nightstand, is Ghen’s personal journal. More importantly, next to the journal is a sphere that when clicked will play five tones that are either ‘dings’, ‘cranks’ (like a wrench), or ‘clanks’ and this combination is different every game. Make a note of the tones that you hear from the device.
Return to 69 and link through that book. (The linking book has but one square on the cover.)
You arrive at Catherin’s Island, at 78. Head down the path to the building where there is an elevator. The device against the back wall is the lock for the cage. Click on the pedals to duplicate the five tones that the device at 77 made and flip the lever. This will open the cage. You will rise up to the top level where Catherine will greet you and congradulate you. She will tell you to return to the telescope and open the fissure.
Head back to the linking globe at 78, link back to Ghen’s world and then link to 15 using the book at 70 (the book with five squares on the cover).
Head to location 2. Look at the left leg of the telescope. There is a device in the support that prevents the telescope from dropping beneath a certain level. Remove that support. Then click on the cover in the center of the telescope. Key in the combination from Catherine’s journal (numbering the buttons from one to five, left to right), then click on the handle to open the cover. Now look at the button on the right side of the telescope railing. Twist the handle around the button until it is pointing down, and then push the button until the telescope breaks through the glass covering the fissure.
The fissure breaks, Catherine and Atrus are reunited, and in a fit of madness, they throw you into the fissure. (It makes much more sense when you watch the ending.)
Riven: The Sequel to Myst solution Copyright © 1997 by Mike Marcelais. All commercial rights reserved. This document may be distributed, so long as no content is changed and no fee is charged. All screen captures are from the game and are copyright © 1997 by Cyan and Red Orb, used without permission.
If you have any suggestions, additions, or corrections, send me a note at [email protected]. Contributions will be appreciated and credited.