Atlantis: The Lost Tales

All screen shots in this solution are from Atlantis, � Cryo Interactive Entertainment (http://www.cryo-interactive.fr/CRYOGAME.HTM). They were simply captured using the "print screen" toolkit!
This is at least the third adventure game using the Atlantis myth that has been produced during the last two years (the other two are Timelapse and Ark of Time). This one has its own charm, though it's the "toothless version" (look at the characters). The 3D engine makes you a little dizzy in the beginning, but you get used to it. There are some flaws in the game, but not very irritating. However, the auto-saving option is a very bad choice. It doesn't save at the right spots and sometimes you have to replay long sequences.
By mistake I bought the Dutch version so I had to do with the usual terrible voice acting. Therefore the names of the characters may differ from versions in other languages. I have to apologize for my language errors, but I don't think they will cause serious misunderstandings. I use some abbreviations in the walkthru, (AS) for automatic scenes and (DB) for the dialogue boxes.
Any feedback is welcome.([email protected])
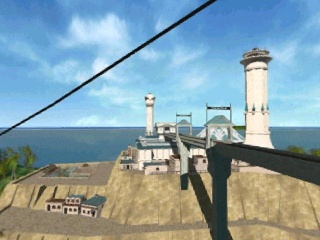
Go to the guards (DB). Climb stairs. At your right you will see two stairs. The left one leads to the palace, the right one to the town. When you look up you will see three towers. The left one is the the tower with the lift, that you will use later in the game to go to the tower at the right (in the water), where the flying vessels can be found. The tower in the middle is the tower next to the throne room and yes, you will be able to visit this tower too. Go to other guards (DB). Show your badge. Climb stairs. You enter a square and will see two big doors ahead, leading to the throne room. At your left and at your right are two wings (left and right wing of the palace). Go forward, turn left, forward and climb stairs in left wing. Turn right and go to the other side of the building. Open door and enter the room (AS). Forward (AS). Forward, left and click on the men with the mark on his head (Maljanz). Choose thumb down (AS). Talk to the girl (Agatha) and choose thumb up. Leave the room and go back to the stairs (you may choose the other way around now). Down again, go forward, right and down the stairs. Turn left, forward, left and climb the small stairs to enter town. Go to the right and speak to the woman. Turn, forward, right, go up the small stairs, walk straight to the wall and turn left. Speak with the sitting man, who will tell you that the queen has been attacked at the road at the coast.
Go back to the palace. In the thrown room you will be questioned by the consul. When you are asked about your findings, choose thumb down. Go back to Agatha and talk with her. Go back to the square. Go to the passage alongside the right wing and talk to the man called Lascoyt (DB). Show him the earring you got from the fisherman. After some dislodges, he will give you an amulet that looks like a sheep. Lascoyt will distract the guard around the corner. When he leaves, wait a moment, go around the corner and enter the door at your right to enter the right wing.
In the second hall in front of you you see another guard. Go quickly to the left to hide. When your hear that he is walking away (two or three steps), go to the second hall and immediately turn left and climb the stairs. You are in a room with a stone lion. At your right is a room with a planetarium. At the end of this room look down and click on the controls.
Planetarium puzzle (planetarium room)
(Click here to return to the list of puzzles)
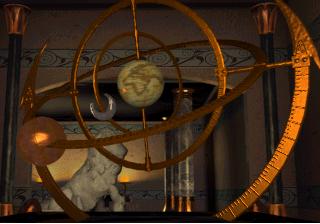
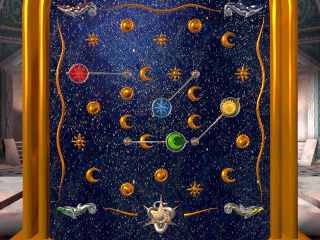
The left handle moves the sun. Turn it until the sun is at eight. Turn the right handle until the moon is between the sun and the earth. There must be a straight (diagonal) line between sun, moon and the yellow dot (atlantis) on the earth. Now the sun, moon and earth will flicker and you will see that the lion opens his mouth.The picture has to looks like this:
Go to the mouth of the lion, step forward and put the sheep from your inventory in his mouth. At your right a secret passage will open. Enter the passage. Put the earring on the wooden door in front of you. Enter prison chamber and jump out of the window.
Go back to the house with stairs. Climb the stairs, turn left, forward (the door at your left will not open, as most doors in the village), forward again and turn left. Down below you will see a man walking in the alley (if you go to this alley, he will kill you). Move forward and turn right. Look down and get the flowerpot. Watch the guy and estimate when he will pass your position (make sure that the railing is horizontal on your screen). Throw the pot when he is right under you (if you throw the plant at the wrong moment, he will throw his knife at you and kill you). Go down to the alley and take his knife.
Leave the alley. At your left is the entrance of the inn. Enter the inn and move forward. Lascoyt will talk to you. Talk to him again (DB). After the dialogue, Meljanz will enter. After he finishes (and you have to be very quick here), you are facing him. Turn left 45� (facing the stairs), go forward, turn left, climb the stairs, turn left, forward, turn left. Look down and cut the rope. Use the rope on Meljanz below. You will swing to the front door.
Outside, you will hear a women's voice (Agatha). Hurry back to the passage with the two iron gates. Open the gate to the left (the other one is closed) and talk with Agatha (DB). She tells you to spy on Creon and you agree to meet afterwards in the other garden. Go to the corner of the garden and take the ladder. Go to the bench in the other corner of the garden and put the ladder on it. Climb the ladder, put it in your inventory, turn right (you now have a nice view on the other garden), go forward and turn left. Put the ladder across the passage and climb through the window. Go through the door to the secret passage. Take the crowbar. Turn around and look at the left side of the wooden door. Use the crowbar on the dark hole in the wall. Take the "key" and walk towards the cat at the end of the passage. Use the key on the hole (upwards to the left). A door to a secret room opens at your right hand.
(Click here to return to the list of puzzles)
Talk with the Rat catcher (DB). Accept his offer to play the game and listen to his instructions. Look down and click on the board.
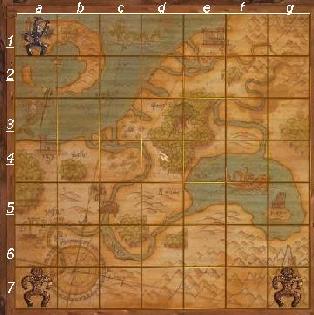
Click on the upper figure to start the game. You can move two steps with this figure; the other two figures (that try to kill you) can only move one step at a time. Sometimes you will be able to see the hidden queen. The aim is to move to the same spot as the queen does. It's rather simple to succeed. When you replay the game, you will see that some sequences will repeat (in which the queen appears at the same spots). In one of these sequences the following moves will bring you to the queen:
B2 / D2 / E3 / G3 / G5 / G7 / E7 / C7 / C5
After your conversation with the Rat catcher, you will fall through a trapdoor (AS). Go to the triangle figure on the wall and push the star symbol. This will open a hole in the ceiling at the other end of the room. Turn around and go to the fountain with the dolphin and mermaid. Move to the right side, turn and enter the fountain. Take the harpoon. Go to the hole in the ceiling and click with the harpoon on the hole. You will hear that Creon has kidnapped the queen and tries to find the hidden knowledge of Atlantis in the temple of Ammu at at Carbonek (AS). Put the harpoon back in its place and push the star to close the hole. Now go through the door.
Wait until you see that the guard climbs the stairs to the room with the stone lion, then quickly go through the hall, turn left and climb the stairs at the end of this passage. In this room (notice the carcass of a whale at the ceiling) there are two guards. When you step upon the red carpet, the floor will crack. After three cracks, the guards will seize you. When you are at the top of the stairs, don't go to the right (on the red carpet) but move forward and follow the left wall. At the end turn to the right. In front of you are the guards. If you move quickly, they will not notice you. Move two steps forward (towards the first guard), then turn to the right and move forward (you hear a second crack). Turn to the left and move forward, so that you will be behind the back of the first guard. Click on the cupboard (it will fall down on him) and you will be able to jump through the window
Go to Agatha (AS). The guy next to her (Carven) says that he will watch the gate, but this traitor will return with a guard. Talk with Agatha (DB). After the dialogue, Carven will attack Agatha with a knife and a guard will attack you with a spear (AS). Kill the guard with your knife. Agatha takes care of Carven, but will die. Take her bracelet.
Go to the first garden and enter the palace the same way as you did before (with the ladder). Go through the secret passage to the room with the stone lion. Go halfway down the stairs and listen again to the footsteps of the guard. Move quickly to the front door. Outside, move forward, turn right, forward and turn right. Enter the second door of the right wing, which leads to the left tower (and to the second cd).
Go to the elevator and use it (handle below). Leave the tower and you will see a long passageway to the tower with the flying vessels. Outside to your left -ladies and gentlemen - you will see the middle tower, next to the throne room (at some spots of this passage you are able to bend over the railing, which makes you very dizzy and crying for your mom - same goes for the walls in the town below). When you cross the passage you will face a door. You may go to the right and explore this part of the tower (and enjoy the view), for later on you won't be able to this again. Otherwise, turn left and go to the first ship. Enter the ship and move towards the seat. You will take a nap and Hector, the brother of Agatha, will wake you up (DB). Show him the bracelet and he will fly you to Carbonek.
(Click here to return to the list of puzzles)
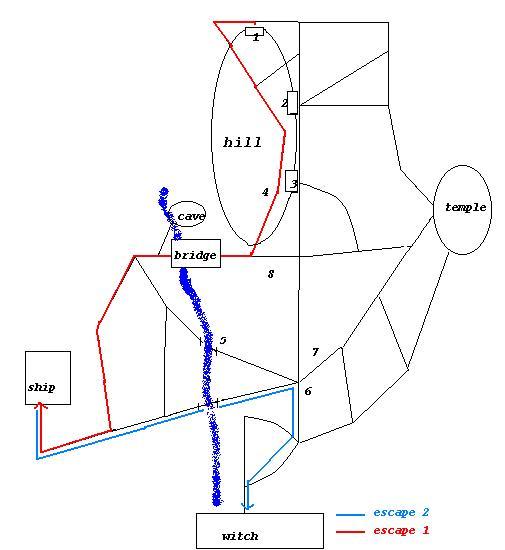
Hector will guard the ship while you try to find queen Rhea. You may explore the island, but you may get caught. It's however advisable to explore, for you have two escape two times and run like hell, and when you don't succeed, you have to replay rather long sequences. The picture above is the poor result of my efforts to draw a map of the island. It's difficult to determine the positions for the interface doesn't supply a compass.
Turn around and move forward. Turn left and follow the road to the bridge. Memorize this route as it is part of your first escape route (red line on the map) . Don't cross the bridge, but take the left road and jump into the water to swim to the underwater cave. At the end of the passage in this cave you see a snake puzzle.
Snake puzzle (underwater cave)
(Click here to return to the list of puzzles)
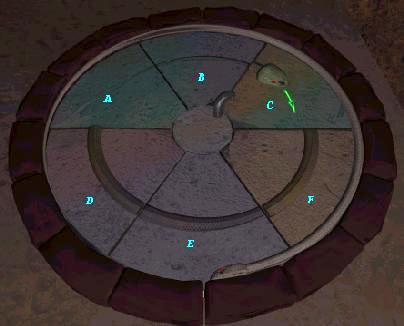
It has six tiles that can be moved only once, clockwise (cw) or counter clockwise (ccw). You may reset the puzzle by clicking in the middle. Click on tile
c-cw// e-ccw// c-cw// a-ccw// b-ccw// b-cw.This is the result:
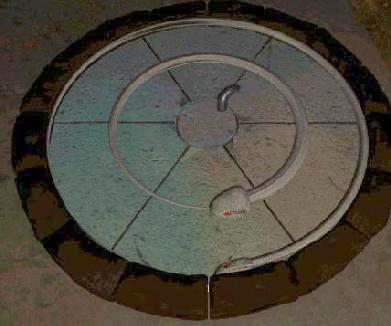
Talk to Rhea. Click on the guard to take his clothes and give the priest clothes to Rhea. Turn around and wait until she says she is ready. Talk to her (DB). Talk to her again (to remove her eye mask).
Leave cell. Move forward and take the left passage. Keep going to the left, until you are in the room with the beds, turn right and walk to the guard in front of the kitchen. Talk to the guard (DB) and click on the lowest icon. Enter kitchen and climb through chimney. Jump in the water again, look at hole in ceiling and go through it.
You now have to follow the first escape route (see map). Double clicking the left mouse button speeds things up. I preferred to click the left mouse and after that the escape button. Facing the cave from which you escaped, turn right. Forward, turn left, forward, forward, little to the right, forward, forward (going down), cross the bridge and go to ship, forward, forward and at end turn left, forward, turn right.After a conversation sequence follow the second escape route (see map). Turn to the right to provoke the guards, turn around to the left (opposite direction) forward, forward, across water, forward, turn right until you see a free path, forward, forward, left and forward. Screen darkens, wait until voice says to open your eyes.
(Click here to return to the list of puzzles)
After the automatic dialogue, you are asked to solve the chicken puzzle.
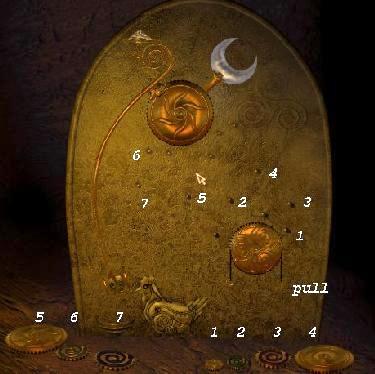
The result looks like this.
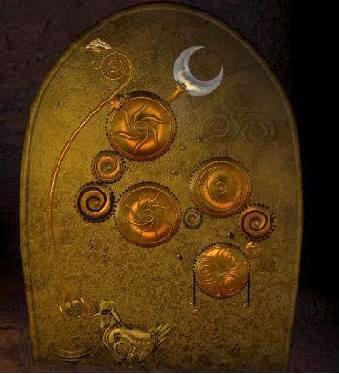
Pull the chord at the right side four times to get the eggs.
(Click here to return to the list of puzzles)
The witch asks you to solve a second puzzle, the snake puzzle.
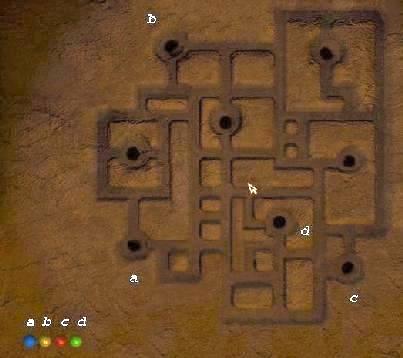
Each snake must get his egg, but can't cross the path of another snake. Put the eggs in the holes and click on the heads to move the snakes. The result (except for the last snake)looks likes this.
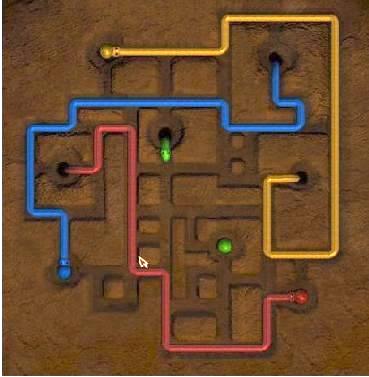
After a dialogue, she gives you a third task. You have to look for "a feathered murderer high", wash it in the water near the sign of the beast, kill the white beast, take "the thing" of its nose and put its blood in a bag.
After after a conversation, you will take a nap. In the automatic sequence that follows, you will witness (as an owl) how Creon's men worship Sa'at at the temple and discover the hidden knowledge (a head that speaks). When you wake up, first talk to the witch (several DB) and next to the priest. Leave the cave and you will be transported to Atlantis and disk 1.
Next day visit the Rat catcher. Take the way through the village (enter the palace with the ladder), for the guards at the other stairs (to the throne) will stop you. Talk to the Rat catcher. He will ask you again to play a game. Accept.
(Click here to return to the list of puzzles)
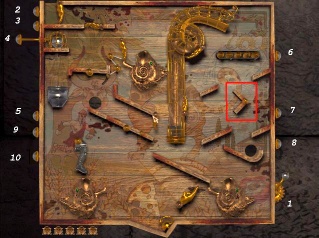
You start with five chances (rats). The rat has to fall to the bell at the bottom. Press button (1)to start the game. Press button 2 and 3 (keep pressing button 3). Press button 4 and 5 (keep pressing button 5). Press button 6 (the belt has to rotate to the right). With button 8 you shoot the rat upwards and the aim is to get it in the hole at the right side. In the red square you see the right position of the v-shaped figure to do this. However, this figure rotates, so you have to calculate. If you press button 8 not long enough, the rat won't get out of the tube. If it goes wrong, you may press buttons 6 and 7 in order to get the rat back in the tube. If it goes right, the rat will appear in the left hole. Press button 9 several times, for the rat has to fall down. If it falls down, press button 10 (hold). Don't try to kick the rat with this button (which operates the foot); just let if fall on the foot. When you have solved the puzzle, the Rat catcher tells you to look under the throne and gives you a ball of glass. Then you will fall through the trap door again.
Put the ball in the hole in the wall. You will see this picture, that you will need in order to solve the throne puzzle.
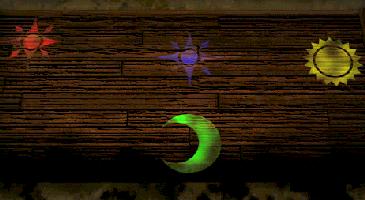
Turn around and walk down the corridor until you arrive at a wooden door. Take a deep breath, for a fight is coming up. When you enter, you are welcomed by the men with the mark on his head and a soldier. After the dialogue, quickly turn left, grab the vase and throw to the guard to the left. Now turn to the right and move forward to see your surprising talent: you dive between the legs of your opponent. Click on the door at the right, turn around and take the spear. Click the spear on the door to block the entrance. Now proceed to the back of the throne. Click on it and you will see the throne puzzle in close-up. At the top and bottom are four handles to move the stars, suns etc. At the bottom in the middle there is a button to activate the hidden trap door under the throne. When you solve it, it looks like this.
(Click here to return to the list of puzzles)
Go down the stairs, turn to the left and walk down this long corridor. Climb the stairs. Look at the figure at the ground and click on it. It this tile puzzle you have to complete each figure. When you have solved a puzzle, a statue will arise in which another piece is hidden. With this new tile you can complete the next - larger - figure. Start with the smallest figure. Click the right mouse button to get this figure horizontal at the bottom. Pick up the tiles with the left mouse button, rotate them with the right mouse button. The first tile lies already at the right spot.
(Click here to return to the list of puzzles)
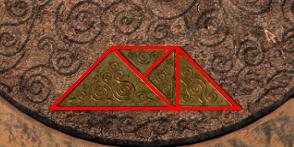
When you have completed the first figure, go to the statue that has emerged. Between the tail and the leg you will find a new tile. Click with the new tile on the figure on the ground.
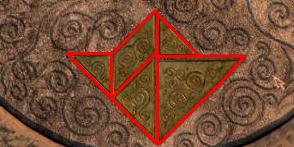
On the second statue the tile is hidden in the middle of the right arm.
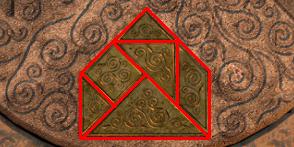
On the third statue you will find the new tile in the neck.
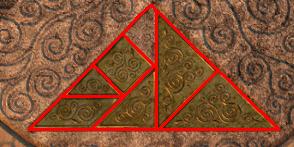
When the last figure has appeared, click on its mouth. The mouth turns and click on it again.
Now you are able to climb the middle tower next to the throne room. Go out and turn to the right, where you will find a fork in a niche. Return and climb the stairs to the top of the tower. Click with the fork on the brown spot at the bottom of the tree and you will get another ball of glass. Go back to the room with the statutes and click on the hole in the ground.The old woman will appear and tell you what your next destination is. Click on the hole again to return to the square beneath the throne. Take the left corridor and at the end click with the fork on the puzzle.
Figure puzzles (secret entrance walls)
(Click here to return to the list of puzzles)
It's easy to solve it, but here is a sequence that will complete the figure (columns A/B/C, rows 1/2/3). You can use this sequence too with the other two puzzles we have to solve after this one.
B3-A3// C3-B3// C2-C3// B2-C2// A2-B2// A1-A2// B1-A1// C1-B1// C2-C1//
C3-C2// B3-C3// B2-B3// B1-B2// C1-B1// C2-C1//
C3-C2// B3-C3// A3-B3// A2-A3// B2-A2// C2-B2// C3-C2// B3-C3// A3-B3.
Now go to the fisherman's cabin and talk to him. He will give you a crystal of the mother of his daughter Anna, who will fly you to your next destination. Go back to the palace and town and open the secret door in the wall again. Return to the square beneath the throne, turn around and take this time the right corridor. Solve the puzzle with the same sequence. Go back to the square beneath the throne, turn around and take the corridor at your right. Solve the third puzzle.
Now leave the palace in the same way as you did before (planetarium room, secret passage). Outside, go to the house with the stairs and talk with the woman. Go to the main stairs and enter the house at the right side. Talk to the woman (Lona) and afterwards to Anna. Go outside. Anna will kick you and disappear. Go the inn.
After the dialogue, move forward and only talk to the man with the bandage on his head (Servage), not with the man with the beard. Click the icons in this order: soldier, Anna, Creon, Queen, Servage. Climb the stairs and enter other part of the inn. Move forward (you will hear some voices) and enter the room to your right. Go out. Servage offers to help you. Accept (thumbs up). Enter the opposite room. After the dialogue, talk to Servage (to your left). Talk to him again (Creon icon), again (Creon icon) and again (Servage icon). Leave the room with Anna.
After an automatic sequence you will hide in the first garden. Show Anna the crystal and your badge. Enter the palace with the ladder and go to the tower with the elevator in the same way you did before (when you enter, you have to insert the third disk).
Use the elevator an look for a sack in one of the corners. Talk to Anna, click with the sack on her. Take sack and leave. After the conversation with a guard, go to the other tower and enter the first ship at your left hand. Move towards the seat and turn. Anna will appear again and bring you to the first island of your cruise.
Head for the igloo village. Talk to the natives and show them your badge. One native (Kotchak) will tell you the history of his tribe. When Anna touches one of the painted skins, you are knocked down and imprisoned. Look at the painting with the dolphin and use you knife on the rope. Use the rope with a piece of wood on the floor, look up and click with your so cleverly composed tool at the opening.
Outside you will be able to get in only two igloos at a time; when you enter a third one you will be imprisoned again. Go to the igloo in which a fire burns (in the centre) and take the pieces of wood between the figures. Outside, turn to the left and move forward closely to the left of the igloo. When you turn, you will see an igloo behind the central igloo (the one with fishes hanging in front of it). Go to the igloo next to it (at the right, it has some water in front of it).
Star puzzle (island of the white beast)
(Click here to return to the list of puzzles)
Enter the igloo and click with the wooden pieces at the figure on the ground. With the left mouse button you can pick up the pieces, with the right mouse button you can turn the pieces. You have to match the symbols of the pieces with the symbols of the figure on the ground.
This is the result: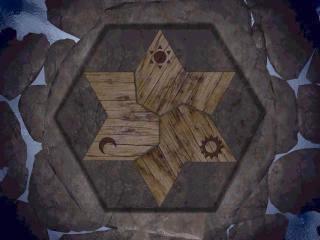
Go through the hole in the ground and take the right passage. You will see a secret place where the natives worship their God. Don't enter, but when the natives see you, quickly turn around, take the left passage and enter the secret place from the other side. Turn around and close the door. Go to the statue and take the mask. An automatics episode will follow (the natives will think your are their God).
Free Anna with your knife. Look at the statue. Talk to Anna and ask her to look at the statue. Talk to her again (click on crystal icon). When she says that she sees a star shaped figure, turn right and go to the mosaic with the star figure (at the left side of the open door). Click on the figure. After the sequence turn right and go to the next one (repeat this for the figures with the child, man, woman, sun and moon). After this sequence take the statue off the bench next to Anna and leave the scene.
Outside, go to the place where your ship has landed. After the automatic episode that follows, don't return to the village, but go to the right in the direction of the cave. You see a bear in front of the cave and to your left a pillar (pile of rocks). Turn left to go to the rocks, turn around and take the left passage alongside the rocks. Turn left. The bear will rise, but don't wait and return in the direction of the rocks. Take this time the right side and go through the cave. Move forward to the man at the ship and another automatic sequence will follow.
Crab puzzle (first island of standing God)
(Click here to return to the list of puzzles)
I don't think the colors of the crabs matter. Drop the crab just below the other one when the king counts "three". If you winn, Jomar is killed. Go down towards the boat and try to enter it. Click on the inventory and then move the cursor to the picture of the king (DB). After completing the dialogue, click on his picture again (statue icon). Now visit the fallen statue and click on the picture of the king. A ship with Hector will arrive. Tie the rope to the statue. Talk to Hector (click on the ship icon). Enter the ship. Also the second time (thumbs up) will fail. Go back to the boat and again try to enter it. The king will call one of his daughters (Naka).When Hector and Naka have succeeded in resurrecting the statue, click on the king picture again (statue icon). His other daughter (Sama) will take you to the other island of the standing God (Muria). Go to the boat (thumbs up again, I think) and you will leave.
Statues puzzle (second island of the standing God)
(Click here to return to the list of puzzles)
Walk towards the entrance in the mountain. Click on stone below. If you click with a statue on the right spot at the top row, it will give you a clue how to proceed with the other rows and you will know the right spot for this statue. For instance, the red statue tells you that she eats the fast moving animal in the wood (swine) and won't sing for the goddess of the night (moon).
This is the solution:
- first row: blue, red, yellow and green statue;
- second row: bird, swine, fish and crab;
- third row: globe, star, moon and sun.
Enter the mountain and talk the woman, who doesn't reply. Go to one of corridor entrances and enter. Return to the woman and talk to her (DB). Give her your ball of glass and enter the same corridor as before. Click of the cube twice and complete dialogue boxes. (When you click on the icon with the ball of glass, you are being told that you can use it against the dark knowledge. When you click on the iron head, it is said that the hidden knowledge can't be destroyed. But it seems in the endgame that you are able to destroy the dark knowledge that it contains).
Turn, click on one of the stones near the wall and step on the green stone. Turn right, walk to the first missing stone in this circle and click on this spot. You now see a pyramid in the centre of the room with a stone door. Go through the door and take the staff. Return to the room with the pyramid. Step between the pyramid and the green stone and click with the staff in the middle of the pyramid. Click with the stone ball at the top of the pyramid. Enter the hole and click on the cube. In your inventory you now have a blue hand icon. Click on ship (disk 4).
In the skull room in the centre of the maze Creon will try to shoot you with a light gun. Use the blue hand symbol on the gun and follow Creon who tries to escape through a hole in the wall. Use the blue hand symbol on the iron head, which transforms into a green beast and quickly go back through the hole and move forward. Turn to the left and click with the blue hand symbol the the glass ball on the floor. Use the ball on the beast and the end sequence will follow.
