| ||||||||||||||||||||||||
SHORE | ||||||||||||||||||||||||
| From talking to Inspector Skalnic, Stasek, Ida and Melina you get a pretty good idea of what's happened. Also, read the prologue details in your inventory to get more background. | ||||||||||||||||||||||||
| Take a walk around and familiarize yourself with the area - it will be useful later in the game. | ||||||||||||||||||||||||
OLD CHAPEL | ||||||||||||||||||||||||
| En route to the old chapel you overhear Otokar Kubina telling his henchman to rough you up. | ||||||||||||||||||||||||
| Emile Korona says he wrote down the combination on a piece of paper, but cannot remember where it is. | ||||||||||||||||||||||||
| The piece of paper with the safe combination is in the bookcase, second shelf on the left. Examine all the other items in the bookcase, one of them provides the clue to working out the symbols needed to open the safe. | ||||||||||||||||||||||||
| Korona's safe is at the far end of the room, on the altar. The combination (74821536) is entered by inserting the wooden blocks (from the bottom row) into the top row, in the correct sequence. To do this, each symbol on the wooden blocks must be associated with a number. | ||||||||||||||||||||||||
| ||||||||||||||||||||||||
| When taking the coroner's report and the picture from the safe, Gus' thoughts are that the police may well have overlooked something at the crime scene, so you should go check it out. | ||||||||||||||||||||||||
| After your somewhat unpleasant encounter with Kubina's henchman (you later learn his name is Peter) head off to the park. | ||||||||||||||||||||||||
PARK | ||||||||||||||||||||||||
| Talk to Apolina and then enter the park. Take note of the 'hand' icon and flashing photograph in the top left and right corners respectively - indicating that the photograph must be used here. Open your inventory and 'use' the photograph. Click the icons at the bottom right to toggle between the photograph and the actual view. Examine the two scenes carefully, looking for any differences. | ||||||||||||||||||||||||
| ||||||||||||||||||||||||
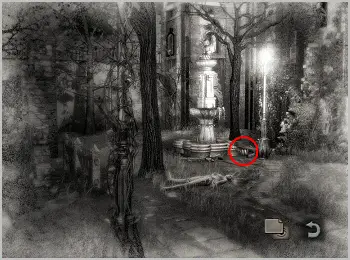
| A broken off corner of the statue is visible in the photograph, but is missing in the actual view. Click the broken corner (while viewing the photograph) to switch to a close up view of the spot. The words carved on the rock are a clue as to where else to look. The killer would have 'proposed to the angel' by placing an engagement ring on her finger. So climb up the statue and examine the angel's finger. | ||||||||||||||||||||||||
| In the cut scene that follows you chase the thieving crow all the way to the burned neighbourhood. | ||||||||||||||||||||||||
BURNED NEIGHBOURHOOD | ||||||||||||||||||||||||
| The coachman talks about Vladanna (who is missing) and his theory that the killer has to be using the sewers to move about the city unseen. Fortunately he also returns the stolen ring. | ||||||||||||||||||||||||
| Ida comes to tell you that one of the previous victims, who survived her attack, is hiding in the junkyard. | ||||||||||||||||||||||||
JUNKYARD | ||||||||||||||||||||||||
| You're forced into a hasty retreat because Peter (Kubina's henchman) is guarding the entrance. Perhaps this is a good time to try 'clear the air' with Kubina. | ||||||||||||||||||||||||
LINGERIE SHOP | ||||||||||||||||||||||||
| Kubina offers to exchange favours. In return for freeing Roman (his other henchman) from jail, he offers to allow you to speak to Vladanna, the victim hiding in the junkyard. | ||||||||||||||||||||||||
POLICE STATION | ||||||||||||||||||||||||
| The newspaper article pinned on the bulletin board details how Kazimir Stasek got a medal for bravery. Talk to Stasek about freeing Roman, and he agrees to do it if you get his medal back from Apolina. | ||||||||||||||||||||||||
PARK | ||||||||||||||||||||||||
| Talk to Apolina, explaining the benefit of having Roman freed, and get Stasek's medal from her. | ||||||||||||||||||||||||
POLICE STATION | ||||||||||||||||||||||||
| Give Stasek his medal and he frees Roman. Now that the series of favours is complete, return to Kubina. | ||||||||||||||||||||||||
LINGERIE SHOP | ||||||||||||||||||||||||
| Kubina says that you may now speak to Vladanna. He also gives you a lock picking kit. | ||||||||||||||||||||||||
JUNKYARD | ||||||||||||||||||||||||
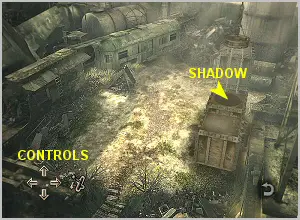
| After surviving the near fatal attack by Peter's killer dog, you find yourself outside the crane control room. Walk around the outside of the hut, to the edge of the wall, and learn that Vladanna is in one of the tramways across the yard. The four crates in the yard must be moved so that you can walk along the top of them and get across to the tramways. The crates can only be moved by using the crane. | ||||||||||||||||||||||||
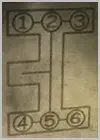
| The six red knobs on the crane control panel (on the outside wall of the hut opposite the entrance) must be in their correct positions to unlock the crane. Did you notice the diagram on the wall inside the control room? | ||||||||||||||||||||||||
| ||||||||||||||||||||||||
| The diagram is an illustration of how the knobs must be positioned. To move a knob, first click the actual knob, then click the empty space where you want to move it to. A knob can only be moved to an unobstructed space and not over or around another knob. The recessed space in the centre is the key to solving this puzzle. Again, there are a number of different ways to achieve this, and the solution below is not the only way. | ||||||||||||||||||||||||
| ||||||||||||||||||||||||
| Note: The above solution only works if you start with the knobs in their original positions. Also, there is no way to reset the knobs to their original positions. | ||||||||||||||||||||||||
| Once the crane's engine is running, go back inside the hut and use the controls to manipulate the crane. If you mastered the art of 'crate moving' in Broken Sword III, this puzzle will be a piece of cake! | ||||||||||||||||||||||||
| Begin by lifting the two unchained crates (one at a time) and place them side by side next to the chained ones. Do this by using the controls visible in the bottom left of the screen. Note that when the crane is directly above a crate, there's a shadow visible on the crate. | ||||||||||||||||||||||||
| ||||||||||||||||||||||||
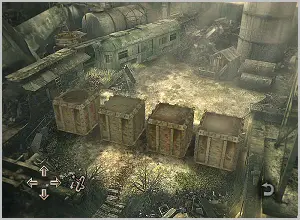
| Pick up the cutters lying on the ground next to the hut. Walk along the newly moved crates and cut the chains around the two other crates. Return to the control room and arrange the four crates in a line enabling you to get across to the tramways. | ||||||||||||||||||||||||
| ||||||||||||||||||||||||
| You find Vladanna inside the tramway. | ||||||||||||||||||||||||
At this point the game switches back to Victoria - Chapter 3 | ||||||||||||||||||||||||