| Harry Gilligan flies you to the Congo, but the plane crashes and hangs perilously on a cliff edge. |
| |
Your adventure begins... |
| |
| |
IN THE PLANE |
| |
| To unbuckle the seatbelt click the bottom (primary) action key (the 'S' key by default) while the hotspot flashes on the seatbelt buckle. Pick up the bottle of beer lying on the floor. You cannot enter the cockpit as there's not enough weight at the rear of the plane. Unfasten the strap holding the crate in place. |
| |
| Now for the first of many 'crate moving' puzzles. Stand on the right side of the crate, grab it with the 'fist' icon and then pull it to the right while holding the 'fist'. Move to behind the crate and push it (5 times) toward the rear of the plane. With the weight of the crate at the back you can now enter the cockpit. |
| |
| Pick up the fire extinguisher and use it to smash the cracked window at the front of the plane. You still need a bit more weight at the back of the plane before being able to escape through the window. Search Harry to find a bottle opener and use it to open the bottle of beer. Holding the open bottle of beer under Harry's nose will wake him up. Talk to Harry and select the 'Plane tilts' dialog topic to get him to go to the rear of the plane. Now climb through the window in the front of the plane. |
| |
| |
| |
ROCK CLIMBING |
| |
| Finding a way off the cliff face is not really difficult and there are only 2 places to go 'wrong'. |
| |
| 01) The first thing to do is jump across to the next ledge on the right (towards Harry) | | 02) Next, climb up to the ledge on the right (where Harry is) | | 03) Move to the right edge and it crumbles - you drop to the ledge below | 04) The next move is slightly tricky. Move quickly to the right side of the ledge to avoid dropping
to an early death! | 05) When you get to the right edge jump across to the right before the ledge crumbles. If you're
not quick enough you'll drop to another ledge below and must climb up to the right. | 06) Note that the ledge to the right is extremely narrow and if you stand close to it an action key
to 'press up close to the wall' is available. Use this key and make your way round the wall. | | 07) Climb down to the next ledge - you should be at the waterfall | | 08) Climb down again and drop onto the next (lower) ledge | | 09) Climb down again and similarly drop onto the lower ledge | | 10) Jump across to the ledge behind the waterfall | | 11) Climb up to the next ledge | | 12) Climb down to the right - you should be hanging onto the ledge | | 13) While hanging move along the edge until you get to a point where you can drop down | | 14) Again press up close to the wall and go round the rock corner | | 15) Climb up to the next ledge on the right | | 16) Jump across to the next ledge - you should be at the extreme right side of the cliff | | 17) Climb up to the ledge above | | 18) Again climb up to the next ledge above | | 19) At this point you can either go left or climb (up to the right) - you must climb up to the right | | 20) Now climb up to the next ledge | | 21) Climb up to the ledge on the left | | 22) Move to the left edge and climb down to the ledge below | | 23) Again press up close to the wall and go round the rock corner to the left | | 24) Climb up to the left | | 25) Finally climb up to the left again to reach the cave entrance |
|
| |
| You overhear Cholmondely being shot... |
| |
| |
| |
At this point the game switches to Nico in Paris |
| |
Click the icon below to follow the game sequence |
| |

|
| |
| |
RETURN TO INDEX | 
|
|
| |
| |
| |
| |
INSIDE THE CAVE |
| |
| You can find Cholmondely's ID card by searching his body, but the only purpose it serves is providing an added dialog topic with certain of the characters you meet later. Take the Glastonbury postcard and magnifying glass from the table in the corner. Take note of George's memories of 'setting fire to his father's sunhat' when picking up the magnifying glass. |
| |
| The door opposite the cave entrance is opened by applying weight to the square pressure pad on the right. You need to move the black crate onto the pressure pad to keep the door open so you can enter the next room. |
| |
| The machine is switched on by pressing the red button. Once it's on, a lever on the right (connected to the gas cylinders) is activated. Unfortunately the machine explodes when you pull the lever. Pick up the metal rod (part of the lever) now lying on the floor. |
| |
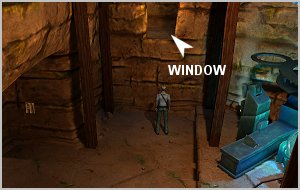
| Look through the window (next to the wooden door) and get your first glimpse of Susarro. Note that there's also a window in the far corner. It's too high to reach, but perhaps by standing on a crate you could get to it! |
| |
|
| |
| Did you notice that the housing on the wall next to the open door has a hole in it? Insert the metal rod and then pull it once to 'open' the door, even though it's already open. Take the metal rod from the housing. You can now move the black crate to below the window in the far corner. Climb onto the crate to reach the window. |
| |
| |
| |
OUTSIDE THE CAVE |
| |
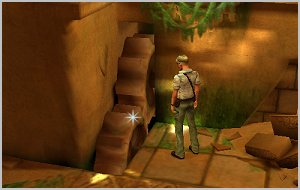
| Through the window, to George's right, there's a bird's nest high up on a ledge. Use the metal rod to knock it off the ledge and pick it up. Examine it (in your inventory) and note that it's 'dry as tinder'. |
| |
| Hug the wall and make your way round the rock. Next grab the ledge above and climb round to where the ledge widens. From there jump across to the ledge on the left, then through the hole in the wall. |
| |
| The hollow in the carved statue has remnants of a fire. Put the bird's cage (dry as tinder) in the hollow and then set it alight with the magnifying glass - reliving your childhood memories. |
| |
| After being spotted by Susarro you need to make a fast getaway. To do this, use a combination of the ← and ↓ keys while simultaneously holding down <SHIFT>. When you get to the jeep, a hotspot appears on it. As soon as the hotspot is activated, press the 'S' key. You may need a few tries to get it right. |
| |
| |
| |
At this point in the game George goes to Glastonbury |
| |
Click the icon below to follow the game sequence |
| |

|
| |
RETURN TO INDEX |
|
|
| |
| |
| |
THE CAVE |
| |
| Harry brings you and Nico to the front entrance of the cave. |
| |
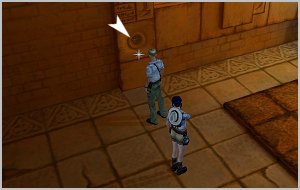
| The metal rod must be inserted between the doors, but the gap is not wide enough. Ask Nico to pull the doors apart (select Nico Collard in your inventory) to widen the gap and then insert the metal rod. This has to be done fairly quickly as Nico won't pull the doors for too long. If the metal rod icon is not close enough to the Nico icon (in your inventory) you may not be quick enough. To overcome this open your inventory and move the metal rod icon next the Nico Collard icon. Do this before getting Nico to open the doors. |
| |
| Go to the room you initially entered and insert the Omega Stone into the slot on the omega-shaped door. |
| |
| |
| |
SPIKES PUZZLE |
| |
| To avoid being spiked to death grab the ledge on the left wall and work your way across to the other side of the room. Initially use the ↑ key to move and after part of the ledge crumbles switch to the → key. Due to the ledge crumbling Nico obviously needs an alternate way to cross. Did you notice the two large cogs in the corner? |
| |
|
| |
| Once again your trusty metal rod comes to the rescue! Use it to jam the cogs (this stops the spikes) allowing Nico to cross. |
| |
| Before moving on you need to get to the body in the centre of the room. Push one of the stone blocks onto the floor - it stops the spikes from coming all the way out. Push the block twice more to allow the second block to be placed behind the first one, but with a gap between them. Now push the first block until it stops the next lot of spikes, with the second block still stopping the first lot of spikes. |
| |
| Search the dead body to find an ancient scarf, noting George's comment that there's something wrapped inside it. Examine the scarf (in your inventory) to get the metal plate with a lightning symbol on it. |
| |
| |
| |
FLOOR TILES PUZZLE |
| |
| To get across the floor of the next room you must find a way to safely navigate the tiles. Each floor tile is either blank or it depicts an animal. Note that the borders of the blank tiles are lit up and that by standing on any one of the pressure pads on the side (fish, scorpion, snake and bird respectively) all floor tiles with the same animal will similarly light up. A floor tile is only safe to stand on if it's lit up. Begin by standing on the only blank tile in the first row, then ask Nico to stand on one of the four pressure pads and make your way to another blank tile. |
| |
Click the icon below for the detailed solution to the puzzle. |
| |

|
| |
| After crossing the floor tiles enter the narrow corridor. Although there's an exit at the opposite end you can't get to it. Instead, climb down in the left corner and drop onto the ledge below. From here jump across to the ledge on the right. Climb down, and while holding onto the ledge make your way around to the right and then down to the ledge below. Lastly, drop down two ledges to the floor and enter the cavern with the balancing rock slab. |
| |
| |
| |
SEE SAW PUZZLE |
| |
| To get to the entrance on the right you must walk across the large rock slab, which is balancing like a see saw on the stalagmite in the centre. You need to keep the left side (resting on the blocks) down in order to walk all the way across the slab to the right. |
| |
| Note that there are three tiers of blocks on the left and that the slab is level with the top tier. To keep the left side of the slab down, the stone block marked 'T' in the diagram below (top level) must be moved onto the slab. The other moveable blocks are marked 'M' (middle) and 'B' (bottom). |
| |

|
| |
| 01) Move BLOCK M to the area marked 1 (note that BLOCK B must be where it is to do this) | | 02) Move BLOCK B round the outside and into the gap marked 2 | | 03) Move BLOCK M from the area marked 1 into the gap marked 3 (with BLOCK B in gap 2) | | 04) Move BLOCK T across BLOCK M onto the area marked 4 | | 05) Move BLOCK M from the gap marked 3 into the gap marked 5 | | 06) Now return BLOCK B to where it was originally | | 07) Move BLOCK T from the area marked 4 onto the area marked 6 | | 08) Now return BLOCK M to it's original position | | 09) Finally move BLOCK T (over BLOCK M) in the direction of the arrow and onto the slab |
|
| |
| Now walk along the slab, keeping to the left to avoid falling off, and jump across to the entrance on the right. |
| |
| |
| |
MECHANICAL DEVICES |
| |
| Examine the four ancient mechanical devices noting the number of hollows and protrusions that each one has. |
| |
| Use the control console to change the flow of the energy beam, either clockwise or anti-clockwise. The 'S' key is pressed to move a mechanical device along the energy beam. Device 4 is the only one that cannot move, so you need to attach devices 1, 2 and 3 to device 4 by inserting the protrusions into the correct hollows. |
| |
Click the icon below for the detailed solution to the puzzle. |
| |
|
| |
| When the mechanical devices are connected, the energy beam is transmitted to the adjoining room. The touch sensitive panel on the front device is used to reverse the flow of the energy beam, either backwards or forwards. |
| |
| |
| |
THE CRYSTAL ROOM |
| |
| The energy beam is aimed at one of the crystals, all of which are mounted on poles, in this room. The beam is initially deflected to the right by the crystal. Take note that the sealed door (along the right wall) has a lightning symbol above it. If you press the touch pad (in the far corner of the room) four of the eight lights surrounding the lightning symbol light up. There's a second touch pad, but you'll have to find it. Did you notice the stairs behind the mechanical device (the same as in the adjoining room) that's fallen off a shelf? The energy beam is capable of moving the mechanical devices, so perhaps it can be used here to gain access to the stairs. |
| |
Click the icon below for the detailed solution to the puzzle. |
| |
|
| |
| Go through the door with the lightning symbol above it, and follow Nico along the ledge in the cave until you get to another room. This room also has a door with a lightning symbol, but the symbol is on the actual door. |
| |
| |
| |
LIGHTNING SYMBOL DOOR |
| |
| Examine the circular recess on the wall of the room to learn that it has the same symbol as on the metal plate you got from the body in the spikes area. |
| |
|
| |
| Putting the metal plate in the recess opens the door, but it doesn't stay in place for too long. Do you remember how you found the plate originally? It was wrapped in the ancient scarf. You must use the ancient scarf to stop the metal plate falling out the recess. Put the metal plate into the recess, then while the door is opening, open your inventory and use the scarf. This has to be done quickly or else the metal plate will keep falling out. Once you've tried this, and got it right, Nico automatically opens the door allowing you to go through. |
| |
| |
| |
POWER SITE |
| |
| Walk along the bridge in the power site and take the Alpha Stone from the column of energy. |
| |
| While making your way back you're once again confronted by Petra, and have to make a quick getaway. Get prepared to escape by holding down the <SHIFT> and ← keys immediately after the Petra falls. This seems to work most times, but occasionally it doesn't. George may run in the wrong direction the first time, but it should work on either the second or third attempt. When George and Nico stop and take a breather, get ready for your next move. Press the <SHIFT> and ↓ keys down to run to the part of the ledge you jumped across on your way in. As soon as the 'jump' icon (the 'S' key) is visible - press it. |
| |
| George and Nico return to Nico's apartment, which has been trashed. They learn that Bruno has been taken to Prague, so Nico goes to the theatre (to search the office) and look for a clue as to a possible location. |
| |
| |
| |
At this point in the game Nico returns to the Theatre |
| |
Click the icon below to follow the game sequence |
| |
|
| |
RETURN TO INDEX |
|
|
| |