|
|
While I'm playing this wonderful game, I notice that there is a different path. I'll mention that way as details as possible without ruining your games under sub chapter 'ALTERNATIVE WAY'. You don't have to use this way to finish the game, but if you're adventorous enough, you might want to try that way ...... For those who want to finish the game as soon as possible, just read the main path ...... Let's begin the game.
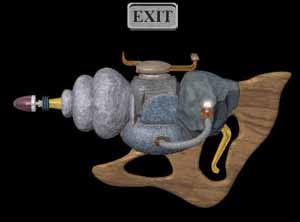
You start the game with a voice message from your strange friend, Prof. Krick. After you heard his message (that's the third message on your phone) about his daughter, Amanda, you'll be ready to go. Peek through the window and see that thunderstorm hits the LIGHTHOUSE ......
Q : What should I
do first ?
A : Get
your journal from inside the drawer. Move the chair that block
your way to open the drawer. Don't forget to pick up your lighter
from inside the red box. Grab that hand bag and umbrella on the
coat hanger.
Q : Where is the
car's key ?
A : It's
hidden in your desk drawer. Move everything aside and you'll find
your key underneath.
Q : Where is the
key to unlock the front door ?
A : It's
under one of the four things around the door mat below the door
(it's just use the random order). Move it and pick up the door
key.
Q : It's dark here.
Where is the light ?
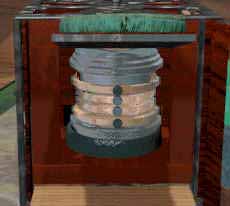
A : Turn on
the generator first. The key to unlock the door is hidden inside
the lantern beside the main door (to the left of it). Open the
circuit box and pull down the leftmost 2 levers. The other lever
is not working now. Maybe later. Don't forget to take the
crowbar.
 |
Q : What
should I do inside the study room (the first room on the
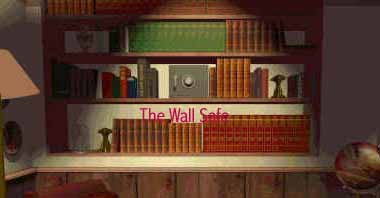
right) ? A : You'll find several useful things on the shelf, a hidden safe behind the books on the bookshelf at the back (it's on the second shelf), a strange box inside the roll-top desk and a letter opener inside the right drawer of the roll-top desk. Grab all the toys on the shelf. You could pick up : the wooden bird, red leaves, and the bee. |
The Wall Safe |
Q : What is the
combination to open the hidden safe ?
A :
It's written on the Krick's letter. Pick the letter from the
mailbox outside. Open it with the letter opener. The combination
number is 5-18-28. To open the safe, just do this step. First,
clear the combination lock by turning it 360 degree. First turn
right until it reach 5, turn left until it pass 5 and stop at
number 18, finally turn right until it reach 28. If you do it
right, it will open automatically.
Q : What is the
combination number to unlock the lab's door ?
A :
It's written on one of the diary sheet (page 59) inside the
roll-top desk. The number is : 8-24-96.
Q : The baby is
crying. What should I do ?
A :
Give her the milk bottle. It's inside the fridge. Get the toy on
the floor (this is important), the clock on the dresser, and the
diary sheet on the table. You could go back to the living room
again to pick up the compass from the bookshelf. There is also a
journal on the counter in front of the fridge.
Q : The creature
kidnaps the baby. What should I do ?
A : There
are 2 ways to overcome this problem. You could just chase the
creature to the porthole or you might want to try the harder ways
and more adventorous. Both ways will meet again at the beach near
the tower. If you chase the creature, he'll hit you when you turn
around on the other side of the porthole. You wake up on the
beach.
THE TOWERMain Goals : Find a way to reach The TempleWhen you first arrive on the beach, don't forget to take the message in the bottle to your left. It'll be usefull later on ..... It mentions about some coordinates : 20 degree north and 118 degree west. |
 |
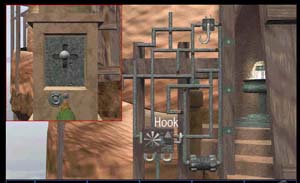 |
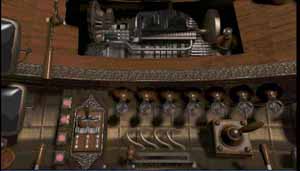
Q : How
could I lower the gate to the tower ? A : Pick up the rod at the pier's end. Go to the tower. Open the left keyhole. Insert the rod in it, then manipulate the small white hook in the machine to raise the other small hook on the lower left corner. Look at this picture to help you. |
Q : How could I
pass the iron bird on the top of the tower ?
A :
Look at your soldier toy in your inventory. Release its key.
Insert the key to your bird toy. Put the toy into the cuckoo
clock. Now move the pendulum. It will chime 3 times and the iron
bird will fly away.
Q : How could I
prevent the bird man from taking the submarine
controller arm
from the desk ?
A :
Try to lock him out. Get the big yellow key from the desk drawer
(it's the one on the lower right corner). Move the small screw
and the wood panel to reveal the key. Close the window and use
the key to lock it. That will do it. Now you could open the
middle drawer and take the controller.
Q : Where is the
key to unlock the top right drawer ?
A :
It's hidden between the files inside the lower left drawer. Try
to flip the files around and you'll see a small yellow key in
between. Unlock the top right drawer and take the whistle. This
whistle could be used to call your bat flight later on the game
as an option.
Note : Pick up the medallion on the death body nearby. It'll be needed later.
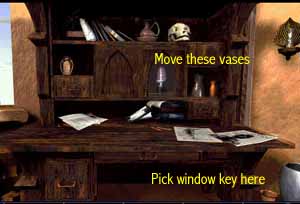
| Q : How
could I get that blue light bulb shape machine part on
the desk ? A : Uh huh, you have to move around several items to get that part of the machine. Do this sequence : move the transparent and orange vases on the middle right opening to other places on the desk. One can go beside the skull and the other can be placed beside the brown vase on the left. Click on the opening where the vases were. Now slide over the left shelf and take the light bulb shaped object. |
|
The desk in study room |
Q : How could I
lower the ladder on one corner of the room ?
A :
You need a remote control for that. There's one inside the
working room on the lower level of the tower.
Q : The bird man
close the door, how could I get into the working room ?
A :
Pick up several stones from the beach. You could find 5-6 of them
lying on the sand. Throw the stone to the bird man and while he's
losing his balance, throw another stone to the lever next to him.
Quickly get into the room and lock him out from the room if you
want. If you don't lock him out, he'll fly back to the room to
destroy the remote control. But don't worry, even if he smash the
remote control you still could repair it. You just have to pick
up the part that flew out from the remote control (it's on the
table).
Q : How could I
repair the remote control ?
A :
You have to pick up the coil first from the top left drawer of
the desk in the study room above. Move all the components so you
could see the coil. Take it and go back to the working room. Get
the 4-head wrench and also the nuts and bolts from the bench. Put
the remote on the bench where the drill is. Use the drill to open
the remote. Use the wrench to loosen both of the coil locks (on
the lower part of the remote). Replace the coil (if the bird man
smashed the remote, you should put back the antena again on the
top of it). Close it and it's ready to use. Go back up and use
the remote to lower the ladder.
Q : How could I
operate the bat flight in the attic ?
A :
Take the L-shape key from the bench. Open the controller on the
back side of the attic. Pull down the lever. It will make one of
the bat flight roll down to the ramp. Get the gear on the floor
and also the crank on the pole. Insert the gears to their places.
Use the crank on it. Turn the crank to the right until it roll
back again to the opposite direction (it should take 13-14
turns). Open the cockpit and you're ready to fly. Pull down the
lever on the left side, and you'll fly to .......
When you first arrive here, don't forget to take some gems lying on the beach. Maybe they'll be usefull later. Open the elevator and hop in. You'll be transported directly to the temple.
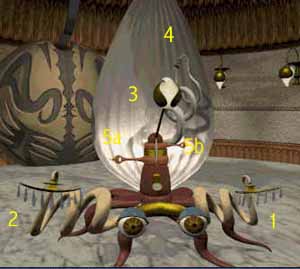 |
Q
: What should I do with this strange pod in the rightmost
room ? Q : What
should I do with the disc ? |
Q : What should I
do with Lyril, the girl on some kind of strange transportation,
inside the middle room ?
A :
Talk to her. Give her the nuts and bolts from the working room in
the tower. Show her the message in the bottle also. She'll tell
you to build a strange machine to defeat Dark Being. To build
this machine, you have to find its parts that scattered around
the dimension. After that, go to the left control panel. Move
things a little bit and when you pull down the lever all the way
to the left and then pull down the main lever, a bird man will
show. He tries to attack Lyril. Now, use the lever to catch the
bird man. Lower the magnet so it could attract the bird man. Now
Lyril will thank you and allow you to operate the middle control
panel.
Q : What should I
do in the lower chamber ?
A :
Pick all the components you could get. There should be 5 of them.
You combine 3 components from the crate to build a device. The
other 2 are the parts for building the final device to defeat
Dark Being. Pull the left and right lever on the control panel
there and you'll see a picture of a volcano and its coordinates.
Memorize this. Don't forget to take the drawing also. This
drawing will help you to activate the transporter in the upper
room.
Q : How could I
operate the transporter in the upper chamber ?
A : This
is a little bit complicated. But let me show you the way. The
machine will be divided into 3 parts : The Power Modules, The
Main Control Panel, and The Coordinates Panel. The Main Control
Panel is divided into 3 parts: LEFT
Controller, UPPER
Controller, and LOWER
Controller. First go to the Power Modules on the left panel. Plug
in the leftmost module. Go to the main control unit (LEFT Controller)
and pull the main, center breaker (has 4 red lights beside it).
Move to he UPPER
part (left picture below) and flip the large switch to the right
of the breaker. Now head into Coordinates Panel and turn on the
right monitor. It has a couple of dials. Turn the first dial
until you see a picture of the lighthouse. Turn the second dial
until you see a picture of Krick's laboratory. Click the small,
black button on the second dial to set the destination. The
screen will change to black with red cross on it. Now the
destination has been set. Now you have to map the coordinates.
Turn to Main Control Panel.
|
|
UPPER part of Console |
LOWER part of the console |
Look at the LOWER part of the center console (right picture). Pull the large, left lever down (to extends platform) and then pull the right lever (to opens roof). Push the lower, left button (to power the lower monitor) and align the lines on the screen with the center of the circle by using the four control knobs around the monitor. Pull down the two small levers at the top of the monitor. Pull the small breaker at the bottom right of the monitor (it will reset itself). Pull the large, slider lever (on top) to the right. Watch the gauge carefully. Click on the slider lever again as soon as the gauge is on the red line (must be exactly on the red line...not below or above but ON the red line). If it goes past the red line the unit will blow. Pull the breaker under the monitor again. The porthole will be created on the platform. Go into the porthole.
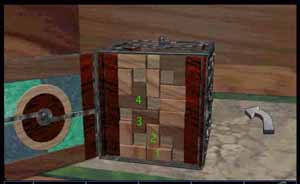
Q : What should I
do to open the strange box ?
A :
Turn it around and click on the spinner on one of the sides. It
will open a secret room with wooden blocks. Click on the light
colored blocks starting from the top to bottom, left to right.
Work your way down and from. Once these are set, you can slide
some of the lower blocks to open a secret compartment with red
button in it. Look at picture 1 to help you. Press this button.
Another part of the box will open to display a large, red button.
Click it. Turn the box around and click on the small, gray
button. Then click the red button one more time. It will open a
hidden drawer with key inside it. Take the key. Click the red
button one more time, another panel will open slightly. Click on
the brown square button on the lower right corner of the opening
(you might have to turn the box slightly to see this button. A
picture puzzle will reveal. Solve this terrible slide puzzle.
Look at picture 2 to help you. By the way, you could look at your
journal to see what kind of picture you should build from this
puzzle (it's the Hawk picture). Memorize the symbol on the result
paper, picture 3.
 |
 |
Picture 1 |
Picture 2 |
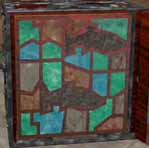
Note : You might want to use this cheat to solve the slider puzzle. When the panel to this puzzle open, exit to the long shot of the dek. After doing this 4 times, a message box with "Solve It" sentence on it will appear. By clicking it you'll bypass those horrible puzzle. Nice touch ...
 |
Q : Is it
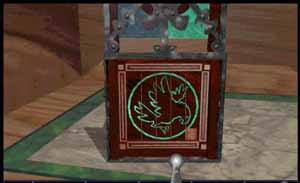
all done with this strange box ? A : Nope, it's just half of it. Turn the cube again and click on the spinner. It will activate another gray button. Turn the cube again and click the gray button. Another compartment will open. Click all four blue plates and then click the lower fish symbol. Click the button. Now, click the gray buttons (there are 4 of them) and then click on the upper fish symbol. Insert the key into the keyhole. A disk shape will comes out from the hidden panel. |
 |
Picture 3 |
Picture 4 |
Q : What should I
do with the disc symbol ?
A :
Insert the medallion
from the tower and the 2 red leaves
from the shelf in the lighthouse. It will reveal some kind of
mechanism. Now align all the pictures to form the same pictures
from top to bottom (you may want to do this 4 times for different
pictures -- see picture below to help you). Each time you choose
the right pictures (it's in random order), you'll hear a click
sound. After all 4 different combination form (some parts of the
mechanism will be opened), Use the combination from picture 3
above to unlock the mechanism. You'll get a strange machine part.
Take it. Now it's time to move back to the tower. Head back to
the lab and this time you'll need to activate the porthole.
Q : I try to turn
on the computer on the desk. There is an error. What should I do
?
A :
See that machine just beside the cage. Open its control box.
Click on the button to activate it. Now you could try the
computer again.
Q : Ooopps, the
computer couldn't be initialized. Now what ?
A :
Get the soldering gun, the memory tube, and a piece of wire on
the workbench. There is also a journal here if you want to read
it. Open the compartment like a stove in front of the computer.
Change the wire and insert the tube. Solder both the wire's end
with the soldering gun. Try the computer again.
Q : Now it needs a
power suply. How could I fix that ?
A :
Look at the red toolbox on the floor. Pry the lid open with the
crowbar twice. Get the fuse inside. Examine the right panel, just
in front of the computer. Pull down all the switches there. Pull
down the lever. It will raise some kind of equipment. Climb up
the ladder to the attic. Hit the lock 3-4 times with the crowbar
to open it. Go up and open the strange equipment. Change the
fuse. Look up. Hook the electric plug. Go down again to the lab.
Get out from the lighthouse and go to the generator cabin. Pull
down the lever. The power is fixed now. Now you're ready to
operate the computer. Reset the computer, then turn around, pull
down another lever on the panel. A porthole will appear nearby.
This is your door to the other dimension. Enter it and you'll
arrive on the beach near the tower.
When you reach the tower again, you have to go directly to the underwater cave and try to operate the submarine to reach the volcano that Lyril mention about .......
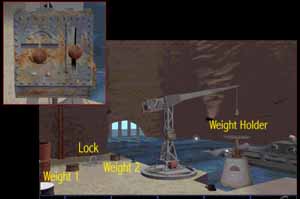 |
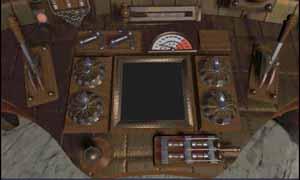
Q : How
could I open the under water gate ? A : Look at this picture to help you. First, you have to operate that machine to move the weights to the weight holder. Use the left-right controller to move the machine from side to side and top-down lever to lower and raise the lifter. Then use the machine again to raise the lock. That's it !!! You've opened the gate. Q : How could I enter the
submarine ? |
Special Note : Due to the known bugs, DON'T try to open the submarine while using the compass. You'll be thrown away to Windows. Close the compass first then you could open the hatch safely.
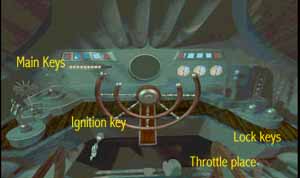
Q : What should I
do to start the engine ?
A :
Go to the front of the sub and turn the ignition key which is
under the wheel. Insert the submarine
control arm in the small, cylindrical
tube to your right. Now you've repaired the throttle control arm.
There are 3 keys here on the left part of the panel (from top to
bottom): engine, navigation, and diving. The two keys to the
right control the door locks. The first one is for the bridge
door and the second is for the engine room doors. Turn both to
upright position to lock the doors. Make sure both are in the
upright position at all times. Note that the three keys to your
left are in the off position when facing you. You will often lose
all power if you turn all three system on at the same time. Turn
only the bottom key on for now. Now you're ready to dive.
|
|
Front of the sub |
Diving unit |
Q : I want to dive
now .... What should I do ?
A :
Go to the middle part of the sub and click on the diving unit to
your right. The flashing light indicates that the power is on.
Pull the two small levers down. Spin the left wheel. When the
water reaches the blue line, quickly spin the second wheel. The
sub will dive. Go back to the front of the sub. Now turn on your
engine power key (top key). Go to the back of the sub and open
the door by spinning the left wheel. Go into the engine room.
Blue lights and steam indicate the power is on. Pull the large
right lever to start the engines. Now that the main engines are
running, you may turn on the navigation key.
The Engine room
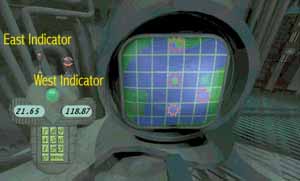
Q : How could I set
the coordinates ?
A :
Go to the center of the sub. There are a few small tubes beside
the navigation control pad. The tube to the right has a map in
it. The map contain the coordinates to the Ship Wreck (it's
almost identical to the map on the beach earlier, but more
accurate). Click on the globe beside the navigational control
pad. A monitor will appear. Pull down the left lever on top of
the control panel, then enter 20.67 (for east coordinates). Click
on the right lever and enter 118.96 (for west). Now press enter.
The new position to the Ship Wreck is now displayed on the
monitor. When you're done, return to the front of the sub and
pull the throttle. You'll be travelling to .......
Notes : Starting now, when I told you to start the sub, do all of those things again.
Q : What should I
find here ?
A :
According to the journal and what has Lyril told you, you've to
find several machine parts which are scattered in 5 different
places. So far, you have collected 3 of them. This is the third
place to look. Find the abandoned ship with a metal safe in it.
Your first part will be inside the safe.
 |
Q : How to
reach the ship ? A : Use your mini-submarine. Go to the middle part of the submarine and climb down the hatch. Look up and pull the lever next to the hatch to lock it. Pull the other lever to release the mini-sub lock. Look down and turn to right. Pull the diving lever to release the mini-sub from the submarine. |
Q : Where is the
safe ?
A :
Before you go to the safe location, you have to upgrade your
mini-sub's robotic arm first. To activate the arm, Pull the arm
switch on the lower right of the window. A control panel will
appear on the upper right of your window. For the sub movements,
the ball in the center directs the sub and the left control arm
activates the motion. You must click on either side of the ball
(NOT on the ball).
Q : Where is the
part I needed to upgrade my robotic arm ?
A :
Do these actions : Ball --> right and pull the lever, pull the
lever, Ball --> right and pull the lever, Ball --> right
and pull the lever, Ball --> right and pull the lever, pull
the lever one more time. The mini sub will be over the opening in
the front of the boat. Pull down the diving lever again (it's to
your right). Inside the wreck, Ball --> left twice until you
see a hook on the wall. Use your controller to grab the hook.
Note : if you have downloaded the patch, it'll be easier for you
to control the arm. Everytime you reach the exact position when
you could grab something, a red light will flash on the top of
your window. Look at this picture to understand what I meant.
Q : Now, where is
the safe ?
A :
Pull up the diving switch to ascend. Once you are out of the
ships hold, do these movements: Ball --> left and pull the
lever, Ball--> left and pull the lever, pull the lever, Ball
--> left and pull the lever, Ball--> left and pull the
lever, pull the lever, You will see a skull. Pull down your dive
switch again to ascend. Turn the sub once to the left. You will
see a safe here.
| Q : How
could I open the safe ? A : There are two pieces of wood against the safe. Use the robot arm to remove the lower one (hard to see). Now turn the sub to the left once. You must now put the hook (at the end of the remote arm) into the hole in front of the sub. Once you get it in, the second piece of wood will fall away. Use the arm to open the safe and then to retrieve the item inside. The mini sub will return to the main submarine. Now set your coordinates to the Fortress (it's on the middle of your coordinates monitor), push enter and go directly to ............. |
 |
The fortress has 2 towers in it. In one of the tower you'll find an ancient aeroplane. You can use this aeroplane (after you fix it) to fly back to the temple where Lyril was. Inside the second tower, you'll also find a small black key to unlock the secret compartment on the base of the statue in the first tower. Unfortunately, a monster blocks your way to the second tower. First, you have to think the way to kill this monster...
Q : On the lower
floor, I see a dark path on one of the corner. What should I do
inside ?
A : You've
to build a bridge to cross the chasm. This will lead you to the
blacksmith place where you could find something to kill the
monster.
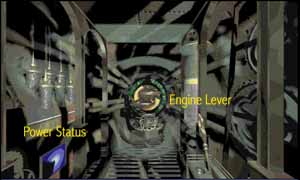
Q : How could I
activate these machines ?
A :
You have to start the generator first. Go to the back room where
the generator is. Pull the left lever to raise the windmills.
Turn left and pull down the lever to connect the gear. If somehow
you make the gear damaged, you could get the extra gear to
replace it, inside the working room (it's inside the wooden box
on the floor belowe the cutting machine). Turn right again and
pull down the right lever to start the windmills. Now the power
is set.
Q : How could I
make the bridge ?
A :
Use the cutting machine to get 2 long board and the other cutting
machine (with bird head figure on it) to get 4 short board. Now
go back to the dark path and put the long board on the chasm.
Q : The monster
destroy the bridge before I could build one. What should I do ?
A :
Try to distract him first. If you look outside through the window
in the working room, you'll see the dark being playing with
monster with a fish. First, get a fish from the fishpole outside
at the pier. Then head into the upper floor. Climb the ladder
again into the third floor, the tower. Look up and you'll see a
hook. Put the fish on it. Now go down again and look through the
window. You could scroll down and up to see a better view. You
should wait until you see the monster climb the stair to the
tower. To see this you might have to move back and forth from the
window several times. When the monster is out of your sight,
quickly back to the dark path and build the bridge using all the
boards. Cross the bridge and enter the blacksmith room.
Q : I try to go to
the tower again and the monster still there. What should I do ?
A :
Kill him first before you go back to the tower. There is a stair
leading up to the cannon tower from the blacksmith room. Go up
there. Look at the cannon. Get the cannonball, powder keg, and
the fuse. Open the cannon and insert the powder and the
cannonball (remember, insert the powder first before the ball).
Close the cannon and put the fuse on it. Unlock the cannon by
picking up the metal key on its base. Move it to the right twice.
Look at the tower where the monster is and light up the fuse by
using your lighter. Kaaabooommm ... the monster is gone forever.
Q : How could I
open the secret compartment on the base of this white marble
statue ?
A :
Get the key on the table at the second tower where the aeroplane
is. Unlock the compartment and get the fifth part. Return to your
submarine and head directly to ............
Q : How could I fix
the broken aeroplane ?
A :
You should use the furnace in the blacksmith place to make the
part to replace the broken part on the aeroplane.
Q : How to start
ignite the furnace ?
A :
Get the woods and the coals. Put them inside the furnaced and
light it with your lighter.
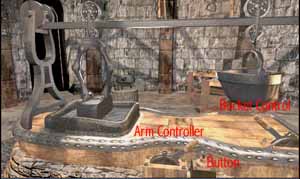
| Q : How to
make the part ? A : Get the metal rods from the box and the casting mold from the table. Put the mold on the center of the furnace table. Put all the rods into the iron bucket and pull the right lever to move it into the furnace. Wait for 20-30 seconds. Then pull back the bucket. Turn left and push the button to pour the melting rods into the mold. Pull the left lever to move the mold into the water. When it's cooled down, pull the lever back and open the mold. Get your part. |
 |
Q : Where should I
use this part on the aeroplane ?
A :
Look closely to the side of the aeroplane. You'll find a broken
hook there. Pick it up and change it.
Q : How to fly this
aeroplane ?
A :
First, plug in the gas hose on the back of the plane by sliding
the tuner to the (+) sign. The turn the crank to the right until
the pointer move 360 degree. Then, pull the lever on the right to
release the plane. Open the cockpit and hop in. Opedn the
controller on your left, turn the crank, and pull the throttle on
your right. You'll arrived at the Temple soon.
Q : Where is the
location of the Volcanoe ?
A :
You must have seen it somewhere ..... Hmnmmm... yup, the Temple.
Turn on the engine, pull the main engine lever, then remember
that picture and enter its coordinate on your coordinate system.
Its : 22.01 (east) and 119.11 (west). Pull your throttle and
watch the scene ...
Notes : When you arrive inside the volcanoe, you notice that the Dark Being is expecting you here. Look at his presence when you turn around and face that high cave window.
|
Q : How
could I open the lock on that iron gate ? A : Get the iron cutter and the dynamite from the compartment on the site of the drilling car (just beside of the door). Use the cutter to cut loose the lock. Open the gate. Q : How
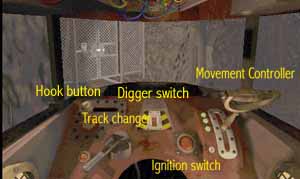
could I operate this drilling machine ? |
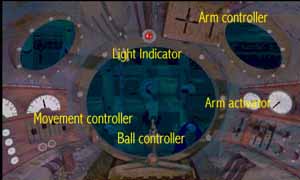
Internal View of the cockpit |
Q : What should I
do first ?
A :
Try to find the Dark Being laboratory. Use the movement
controller to go forward until it reaches a big platform. Stop
the train when it does. Click the red exterior view button on the
lower level corner. Look at the green machine. Click on it. Pull
the lever to raise the platform. Now continue move forward until
the red button appears again. Stop. It will come on inside a
large tunnel with three tracks. Click on the red button and click
again on the wooden box. Get the rod inside. Click on your
compartment, get the wrench. Click on the switching box post in
the tunnel and insert the metal rod. Use your wrench to tighten
the rod. It will raise the power of the switcher boxes. Continue
your journey to the main intersection (platform). Stop. Click on
the red button. Now, use your compass. Click on the wooden
pillar. Crank the handle 360 degree then click outside the crank
window to rotate your train. Do this move again until you face
North. Move forward. Switch the track changer before you reach
the intersection (when the red light beside the changer flashes).
You'll go to the left track. The Dark Being will show and throw
some rock to block your track.
Q : How could I
remove the rock ?
A :
Use your dynamite on the boulder and light it. Kaboooommm ....
continue your journey until it stop automatically. To your right
is the door to the Dark Being laboratory. Alas .. it's locked.
Q : Now I've seen
Dark Being, but where is Amanda ?
A :
Get back into the train and reverse back to the main
intersection. Rotate the train by using the handle so that it
faces east. Go forward. When you reach an intersection, go pass
it a little bit. Stop the train and reverse. Quickly change track
and follow the left track (still in reverse movement). You'll
have to do this act quickly. It will stop automatically. Exit the
train and enter the room. Wait ..... that's Amanda !!!
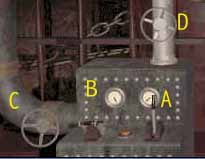
| Q : I have
to release Amanda, but how ? A : Look at the picture. Lever A will release Amanda, but it's out of power now. You have to repair it. If you pull down switch B, it'll open a gate behind Amanda's cage (this will unblocked your way to the power room). You could proove this thing by this way : turn right and use your umbrella on the hole on the metal door (the top hole). It'll jam the door temporary. Go through the door and see that the gate behind Amanda is opened. Now get back to your train (don't forget your umbrella). |
 |
Q : What should I
do to repair the lever ?
A :
Go back to the main intersection and rotate your train to face
North. Go forward and take right track. Keep on following the
track until it stop. Exit the train. Go through the door and look
over the edge. You'll see a nachine there. That's will help you
to fix the lever.
Q : How could I get
in the machine ?
A :
The controller is on your right side. Look at the broken bridge.
Use your umbrella to hook it back (you have to use your umbrella
from your purse or else you could only open the umbrella not
using it). Quickly attach the small hook on the bridge so it
won't loose again. This small hook is at the right edge of the
broken bridge. Move forward and pull the lever to lift the
machine. Get inside the machine and pull the right lever down to
lower it.
|
|
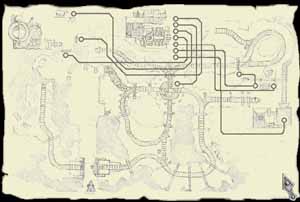
Q : What should I
do with this pipe ?
A :
If you look at the map on the wall outside it will show you which
pipe is for which lever/room. You'll see 6 arrows from top to
bottom. Change the direction of the first, second, four, and six.
It will open a recess down there. Go down and take the final part
of the machine (the mighty cannon). On the way back up, you have
to push back the first, second, fourth, and six arrows to their
positions. I know this is the pain in tha A** but you have to do
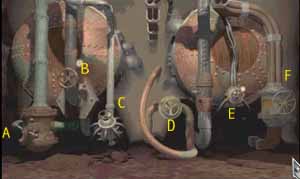
it anyway. Now back to valve room outside and turn valve C, F and
D. Valve C will fix the lever and valve F and D will open the
Dark Being lab's front doors. Now go back again to Amanda'a
place.
Note : Here is the route back in case you forget. Reverse your way back to the main intersection. Rotate the train to face east. Go forward a little bit at the intersection, stop, and quickly reverse and flip the lever to change track. You'll be back at Amanda's place again.
Q : How could I
release Amanda ?
A :
Now look back at the picture of
Amanda's cage again. Turn valve D and then pull down lever A. It
will move the magnit towards the iron chunk. Turn around and face
the control again. Push the red button on the middle to lower the
magnit. You should time your move right or you could never get
the iron chunk. When you got the iron chunk, pull up lever A
twice toward Amanda's direction. Then push the red button again
to release the iron chunk. It will open the cage. Look right and
insert your umbrella again into the hole on the metal door. Pass
through the metal door and get Amanda. Go back to your train and
head on back to the track.
Q : Where should I
go now ?
A :
You have to build your final machine now. The "vacuum"
cannon. Go back to main intersection again. Rotate your train to
face east. Now go reverse until you reach the three tracks
intersection. Once pass it, go forward past the switching box.
Stop the train after you pass the intersection. Reverse and
change track immediately. The train will stop at a drawbridge.
Push the red button to view outside. Lower your hook using the
hook control on your lower right view until it hook up the bridge
and lift it back again. Proceed again in Reverse.
Q : My train get
flip over after sometime, what's wrong ?
A :
There's a bent track nearby. As soon as your red button flash,
stop the train. Push the button. Click on the broken track. Get
the large plier from your compartment and use it on the track to
release it nail. Get it. Turn left and use the plier again to
release the good track. Get that track at put it on the place
where the broken track was. Now, you've done with it. Continue
your journey.
Q : Hey, I'm
arrived at the dead-end. After all this trouble .....?
A :
You need to switch your train direction. Go forward again until
you reach the main intersection. Now rotate your train until it
faces east. Move forward until you reach back the dead-end. Push
the center button on your control panel to dig the cave's wall.
Walk through the hole on the wall.
|
|
Q : How could I
build this cannon ?
A :
Look at your diagram in your inventory. Click on the wood piece
in the vice on the table. You can now build you cannon. Start by
connecting pieces 1 and 2, then 3. Add piece 4 (with
"flaps" open) and piece 5 (with "flaps"
open). Add piece 6. Close the "flaps" on piece 4 and
also the ones on piece 5. Click on the metal parts at the top of
piece 3 to set them both open. Open the top of the gun (piece 3)
and put piece 7 inside. Close the top and lock both of the metal
parts of piece 3. You will hear the cannon activate. Press exit.
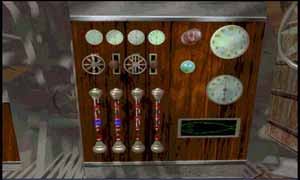
Ending One : Catch Dark Being
Q : How could I
catch Dark Being ?
A :
Wait for a moment until he set up the porthole for you. Before he
reaches the right lever, quickly use the cannon on him. It will
catch him permanently.
Q : How could I
wake Krick up ?
A :
Try to use the electric shocker machine. Pull the left lever to
hook up the head gear on him. Pull down lever B. Set down the
electric level by using the turn knob. Pull down the right lever
to execute it. Do it three times, and Krick will wake up
automatically. Talk with him and return Amanda to him. Note : You
could set up this machine into higher level of shock but do it
just for fun, it won't wake him up.
Q : Where is his
blue print ?
A :
His blue print is kept inside the trunk under the table. Use your
hammer to open the trunk. Give it to Krick and then follow him
through the porthole. Talk with him twice, turn around and watch
the ending.
Ending Two : The Dark Being escapes
You do exatcly the same thing like ending one, except you wait until Dark Being escapes before you enter the room, or you could just come rush into the room without using the cannon on him.
Another creation of CRASH
Copyright @ August 1998.
All pictures are property of Sierra On-Line
Any comments could be send to me.