MIRRORS AND TUNING FORKS |
| Through the green door is a room with a large mirror in each corner. The mirrors have a triangular shaped design and four organ pipes of differing length at the bottom. |
| |
| There are four different coloured devices (purple, green, pink and gold) on the bench. Each device has a round plate with four tuning fork slots. Some of the slots are empty, but there are tuning forks scattered around on the bench. Also note that each plate has a swirl design on it. |
| |
| The first thing to do is associate each coloured device with a specific mirror. Click the purple balls above the round plates and listen carefully to the sounds. The same four sounds can be heard by clicking on the mirrors. The simplest way to match the sounds is to listen to a particular device's sound a few times, then try each mirror in turn until you hear the same sound. The mirrors and devices are associated as follows: |
| |
| Purple device - Near right mirror | | Green device - Far right mirror | | Pink device - Far left mirror | | Gold device - Near left mirror |
|
| |
|
| |
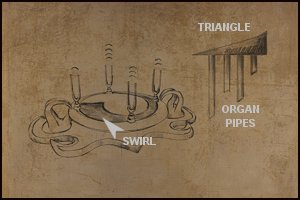
| Study the swirl closely, noting that it widens as it moves clockwise round the plate. Similarly, the triangle also widens from left to right. |
| |
| You can now work out a correlation between the organ pipes and the tuning forks. The longest organ pipe (below the narrowest part of the triangle) and the tuning fork at the narrowest part of the swirl (marked with four lines) are associated. Similarly, the shortest organ pipe and the tuning fork with one line above it are at the widest parts of the triangle and swirl. Apply the same logic to the second longest and second shortest organ pipes to associate them with the tuning forks marked with three and two lines respectively. |
| |
| Some musical knowledge is needed to work out which tuning forks to insert into the empty slots. |
| |

|
| |
| After correctly inserting all the tuning forks click the large gold button in the middle of the devices. The four mirrors should now reflect the four different worlds of Na-Tiexu. To visit a particular world, press the smaller gold button in front of the round plate. The globe above the corresponding mirror should now be flashing and the world is accessible through the brown door at the far end of the room. |
| |
| |
| |
ASTROLOGY WORLD - PURPLE |
| Initially, all you can do is talk to the Astrologist. He tells you to gather all the artefacts of Na-Tiexu. He says he can help you make the Star Dust, but you must first get the Grain Of Life from the spirit world. |
| |
| |
| |
SPIRIT WORLD - GREEN |
| Keep walking more-or-less straight ahead until you get to an old woman on a raised wooden platform. She tells you to find the seven mood figures and then go back to her. Take the mood figures from each of the seven statues holding them. Note that you won't be able to take the figures until you've spoken to the old woman. Go back to the old woman and she tells you to take the Grail (from the platform floor) to the main deity, who'll reward you with the spirit if you complete the task he sets. |
| |
| |
| |
MOOD FIGURES |
| The main deity (large statue) is beyond the seven stone posts and pool of water. |
| |
The mood figures are, in fact, a set of stone-age emoticons. Study their facial expressions very carefully and make a note of the seven different 'moods':
Anger
Fear
Frown
Happy (smiling)
Plain (no expression)
Sad (crying)
Surprise |
| |
| Place the Grail on the deity's outstretched hands and then click the pool of water. Images of all the mood figures appear in the water in a specific sequence. Make a note of the sequence, then try work out where it can be replicated. |
| |
| Did you notice the green vine intertwined between the seven stone posts? It seems to start at the leftmost post (facing away from the deity) and links the posts in a specific sequence. Trace the route followed by the vine and place the mood figures on the posts in the same order as they appeared in the water. |
| |
SEQUENCE OF MOOD FIGURES IN THE WATER |

|
| |
| MOODS | ROUTE FOLLOWED BY THE VINE | 1) Fear
2) Sad (crying)
3) Frown
4) Surprise
5) Plain (no expression)
6) Anger
7) Happy (smiling)
| 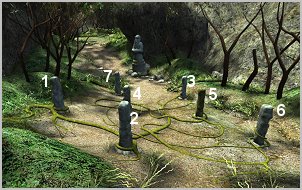 |
|
| |
| The following is a quick method to placing the mood figures on the correct posts: |
| |
| Face toward the statue at the bottom (deity behind you) | | Take two steps forward | | Pan slightly to the right and put the 'Plain' figure on post 5 | | Pan to the right and put the 'Anger' figure on post 6 | | Pan to the right and put the 'Sad' figure on post 2 | | Pan to the right and face toward post 1 (next to the grass) | | Take one step forward | | Pan slightly to the left and put the 'Fear' figure on post 1 | | Pan to the left and put the 'Surprise' figure on post 4 | | Pan left and face the statue at the bottom | | Take one step forward | | Pan to the right and put the 'Frown' figure on post 3 | | Pan to the left and put the "Happy' figure on post 7 |
|
| |
| If the mood figures have all been placed on the correct posts you see the spirit enter the Grail in the cut scene. Take the Grail With Spirit - you have your first artefact of Na-Tiexu! |
| |
| |
| |
FINDING THE GRAIN OF LIFE |
| Return to the old woman, who now says that her young helper can assist you in finding the Grain Of Life. |
| |
| Ask the young helper (she's on the wooden platform next to the old woman) about the Grain Of Life. She tells you it's in the roots of an old tree stump in the cave. She also suggests you take the Pot With Flower Manna (on the bottom shelf) as the cave is dark. |
| |
| The cave is in the area through the hole in the rocks. Put the Pot With Flower Manna on the stone table in the cave. Although you can shake the large root now visible on the cave roof, you won't be able to open it. Go back to the young helper, who says she forgot to tell you to take the Vial Of Smoke. She also tells you that there's a third thing you need to do to get the Grain Of Life. |
| |
| Put the Vial Of Smoke on the stone table in the cave and click it to remove the cork. The large root opens, but you still need to do the third thing the young helper spoke of. The root in the cave is obviously below ground, so go to the actual tree stump above ground. The winding path next to the cave leads you to it. |
| |
| Shake the leaves of the small tree next to the tree stump and some powder drops on the stump. Watch the cut scene carefully and you'll see one of the pods on the root below falling off. Go back to the cave and look for the pod. You find it between the two rocks (on the ground) just to the left of the stone table. |
| |
| Before you leave there's one more item you need to find. Where the path leading to the main deity starts, look closely at the pile of rocks on the ground to your left. You find a Leaf that will come in handy later. |
| |
| |
| Now that you have everything you need, return to the Astrologist via the mirror room. |
| |
| |
| |
ASTROLOGY WORLD - PURPLE |
| When you show the Grain Of Life Within The Shell to the Astrologist he says it needs to be cleaned, then placed 'where the 5 dragons stand'. |
| |
| |
| |
CLEANING AND CHARGING THE GRAIN OF LIFE |
| The items you need for the cleaning process are both on the bookcase. Take the Pot With Plants from the bottom shelf and the Vial With Liquid from the top shelf. You should also click the scroll (bottom shelf on the right) to get a new entry in your Journal. The symbols on the new entry are needed later. |
| |
| The cleaning device is next to the Astrologist's desk. Two of the holders at the top already have vials, so place the Vial With Liquid into the third holder. Put the Pot With Plants on the circular base at the bottom and the Grain Of Life Within The Shell on the receptacle near the top. Click the Vial With Liquid to start the cleaning process. You now have a Grain Of Life Without The Shell. |
| |
| The device opposite the Astrologist (with the coloured mosaics) has five dragon holders, but two of these holders are empty. The missing dragons are on the table against the far wall to the left of the Astrologist. Insert the two missing dragons in the empty holders. Now place the Grain Of Life Without The Shell into the small dome-like receptacle at the bottom to transform it into the Charged Grain Of Life. |
| |
| |
| |
ALIGNING THE PLANETS |
| The Astrologist now tells you to go upstairs and align the planets, so climb up the spiral staircase. On the wall at the top of the staircase is an instrument panel that looks like a lift control. The first button moves the indicator to the 1st notch, the next button to the 2nd notch and so on. |
| |
| If you clicked the scroll on the bookcase shelf in the Astrologist's laboratory, then a new diagram would have been entered in your Journal. Note that the symbols on the lift control buttons are identical to those in the centre of the diagram in your Journal. |
| |
|
| |
| |
| Go through the door onto the balcony. The round control panel is used to align the planets. To activate the panel insert the Charged Grain Of Life in the glass vase at the top. |
| |
| The eight receptacles in the centre represent the positions of the planets. The planet models at both sides of the panel must be put into the correct receptacles to align the planets. Each planet model has a symbol on it. Do these symbols look familiar? They are very similar to the symbols on the diagram in your Journal. |
| |
| This is probably the most difficult puzzle in the game and needs some 'out-of-box' thinking. The diagram in your Journal provides the key to the correct positions in which to place the planet models. |
| |

|
| |
| |
| |
MAGICAL WORLD - PINK |
| A short way along the main path a narrow path leads off to the right. However, you're confronted by two Amazon-type women if you take this path. Instead, follow the main path to where it forks left and right. |
| |
| The left fork leads to a cave, but halfway through a tree prevents you going further in. While most plants require sunlight to survive, this tree seems to thrive in the dark. When you turn round to walk back to the entrance, you find a Stick wedged between the rocks on your right. It's not clearly visible so you need to look closely to find it. |
| |
| Along the right fork you see a large stone slab balancing on a pillar of rocks. Use the Stick to dislodge a rock and collapse the pillar. The large stone slab shifts and sunlight shines into the cave. In the cut scene that follows the sunlight causes the tree in the cave to wilt. |
| |
| You can now continue to a waterfall at the end of the cave. To get past the waterfall you must find a way to stop the water supply to the waterfall. |
| |
| Another path leads to the right of where the pillar of rocks stood. At the end of the path you find a dead vine. None of the trees seem to have any leaves, but one step before the dead tree a solitary green leaf is lying on the ground to your left. Does it look familiar? Did you find a Leaf in the spirit world? If not, go back to that world and get it. Refer to the last part of the spirit world section above. This is a subtle clue as to how the dead vine can be resuscitated. |
| |
| The Leaf from the sprit world can be filled with water at the waterfall in the cave. Pour the water over the dead vine to bring it back to life. Climb up the vine to an area with a stream of running water. There's a log with a rock clamped to it, suspended above the stream. The log is held in place by a rock on the left. Move the rock on the left and the rock on the other end drops into the stream blocking the flow of water. You can now continue beyond the waterfall in the cave. |
| |
| |
| |
TELEPORTATION BUBBLE |
| If you click the button in the centre of the large blue gong you get attacked by two Amazon-type women. You may have encountered them before if you tried going down the path near the mirror room. |
| |
|
| |
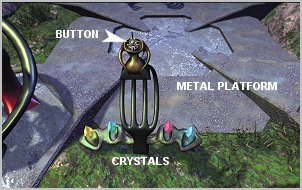
| Note the different coloured Teleportation Crystals at the bottom of the device in front of the gong. Each Crystal fits into the claw shaped holder on the four sculpture-like devices. The sculpture devices are not identifiable by colour, but by their positions relative to how you found the Crystals. Start by going to the sculpture device on your right and insert the blue Crystal in the holder. Move to the next sculpture on the left and insert the red Crystal in its holder, and so on. Only the correct coloured Crystal can be placed in a particular sculpture's holder, so you can't go wrong. |
| |
| After inserting all the Crystals press the button at the top. A teleportation bubble forms around the metal platform in front of you. Finally a way to get rid of those pesky women! Click the gong again and as soon as the women appear press the teleportation button. Although this is a timed sequence, you have more than enough time to do it in. |
| |
| |
| |
GIGANTIC CRYSTAL |
| The drums on the rack next to the gong have various different sounding drumbeats. The relevance of the different drumbeats only becomes apparent after you've found the gigantic crystal. |
| |
| The gigantic four-sided crystal is down the path where the women came from. Each of the four sides has four white buttons and a different coloured stone at its base. The four sides can therefore be identified by the stone colours, i.e. blue, green, yellow and red. All the buttons make a tin drum sound when pressed. |
| |
| Return to the drums on the rack and establish which drums have the same tin drum beat as the buttons on the gigantic crystal. You should find six of them. Did you notice the coloured rims around the drums? The rims around the drums in the first column are blue, green in the second column, yellow in the third column and red in the fourth column. The drums in the columns can therefore be matched with the buttons on the gigantic crystal. The six drums with the tin drum beat are: |
| |
First column (blue) - 3rd and 4th drums from the top
Second column (green) - 1st and 2nd drums
Third column (yellow) - Only the top drum
Fourth column (red) - Only the 2nd drum | | |
|
| Now press the corresponding buttons on the four sides of the gigantic crystal. When a button is pressed it will have a small indentation on it. If you accidentally press an incorrect button, press it a second time to reset it. The gigantic crystal transforms into the Symbol Of The Magical World. |
| |
| Note that the path at the opposite end is a shortcut back to the mirror room. |
| |
| |
| |
CRYSTAL WORLD - GOLD |
| The room to your left, as you enter, is a kiddies playroom. Take the Magical Pyramid from the table to the left, and a Glowing Yellow Fang out the bowl to your right. Look around the room carefully, there are two important clues needed to solve puzzles in this world. |
| |
| |
| |
GLOWING FANGS |
| At the end of the main passage is a pedestal with tiny floating crystals above it. On top of the pedestal is a holder with five empty slots. In addition to the Yellow Fang in the playroom you'll also find Pink, Green, Red and Blue Fangs in the receptacles against the side walls along the passage. The Fangs must be placed in the correct slots on the pedestal holder. Can you think of something else that had these five colours on it? Did you notice the drawing (next to the far door) in the playroom? Arrange the five Fangs in the same pattern as on the drawing. |
| |
| DRAWING | PEDESTAL | 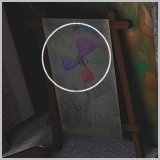 | 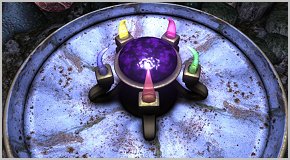 |
|
| |
| The tiny floating crystals will disappear into the cave on the right. The cave is now sufficiently well lit to explore. Note that you can enter the cave when it's dark, but won't be able to see or do anything. |
| |
| |
| |
TEDDY BEAR |
| Go down to the second level of the cave to find a toy Teddy Bear. Remember the small blanket and pillow you saw in the playroom? Well, it's time for Teddy to take a nap! |
| |
| Put the Teddy Bear down on the blanket, then leave the playroom. When you re-enter you find a little girl in the room. She thanks you for finding her Teddy Bear and says her brother may be able to help you. |
| |
| Follow her out the far door in the playroom. For now, you can only go left in the tunnel on the other side. You find the little girl and her brother in the open area overlooking the sea. He wants you to get the bird flying overhead to sing again. |
| |
| |
| |
BELL (WIND CHIME) |
| The Bell (Wind Chime) hanging in the green stone altar is the artefact you need from this world. |
| |
| I'm not sure whether done intentionally or just a programming bug, but there are two ways of getting the Bell. The 'shortcut' is to hold the Magical Pyramid over it and click. By doing it this way you avoid having to solve the Magical Dust puzzle below. |
| |
| |
| |
MAGICAL DUST |
| As this puzzle is optional, it is dealt with as a Detailed Solution. |
| |

|
| |
| Once you have the Magic Dust, sprinkle it over the blue flowers on the ground. The change in background music is very subtle - presumably the sound of the bird singing. |
| |
| Take the Bell (Wind Chime) from the altar and return to the mirror room. |
| |
| |
| |
ASSEMBLING THE RINGS |
| If you've collected all the artefacts of Na-Tiexu the globes above all the mirrors should be flashing. The artefacts are as follows: |
| |
| Astrology World (Purple) - Star Dust | | Spirit World (Green) - Grail With Spirit | | Magical World (Pink) - Symbol Of The Magical World | | Crystal World (Gold) - Bell |
|
| |
| When you now exit through the brown door you enter a new room. There are four large globes each with a receptacle opposite it. The mirrors in the mirror room were associated with the four worlds according to their position in the room, so do the same with the globes and receptacles. |
| |
| Astrology World (Purple) - Near right globe - Star Dust | | Spirit World (Green) - Far left globe - Grail With Spirit | | Magical World (Pink) - Far right globe - Symbol Of The Magical World | | Crystal World (Gold) - Near left globe - Bell |
|
| |
| After correctly placing the artefacts in the receptacles another Sphere within the Tetrahedron forms. To get to it you must climb the stairs with a red carpet on them, turn round to face the Tetrahedron and then walk towards it. Climb back up the stairs and put the Sacred Rings in the centre of the device in front of you. |
| |
| Now that you've assembled the rings, it's time for the last part of your journey. Head back to the journey ship and travel to the Island of Unity... |
| |
| |

|