[Since this is a large weight-class mission, it's time
to start breaking in your "B" team (grin). You also are joined by
several Regulars and a couple of Greenies so shuffle things around so that
people start gaining experience]
Speaking of morale... the increasingly jerk-like Colonel Re-nard (rhymes
with RE-tard, see?) makes some disparaging remarks about mercenaries before
handing you his dirty work. Hmmm. I think we'll have to re-evaluate this whole
relationship soon... btw... what happened to that pretty
little Liao Ambassador? Hmmm...

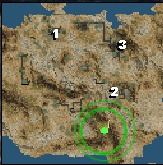
You start out in a deep canyon. Forward of you at the end of it is a large
Refueling Station. To your left, the walls of
the canyon can be jumped, but send your Raven back and you'll find a way up
to the plateau there. This is also the way to take mechs with no jump capabilities.
Go West, young Commander
Up top, you'll find a destroyed fuel station. Head West, keeping to the ridge
top, and you'll get a sensor contact; a Resource Building
sits there. When you go for it, you'll run into a greeting committee.
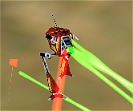
LRMs will come your way... but beware, these aren't normal LRMs but
Swarms - a kind of area-effect mini-bomb, which
will damage any mech in the target area! Thankfully, they
are not guide-locked, like regular LRMs, so a jump-enabled mech can
leap off the blast floor before getting harmed, if you are quick. Make everyone
else hustle. Get rid of these hell-spawns quickly! Then mix it up with
the Urbans and Ants,
Harassers and Partisans
and other ground vehicles.
Moe, Larry! The cheese!
After this little tete-a-tete, you'll also get a vidcom transmit from
Col. Renard, giving you additional Objectives
and promising rich rewards, yadda yadda. Good day to go shopping, I guess,
although he's a little... presumptuous in his phraseology... hmmmph.
One of the Objectives you were just handed is the Refueling
Station you observed before, at the end of the canyon. Don't worry;
you'll get back to it :) Go West along the ridge until the mountain starts
to get green. North of this is another Resource Building.
There is a force of Ants, Urbans
and vehicles patroling this area so watch for them.
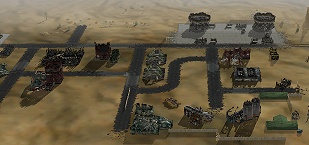
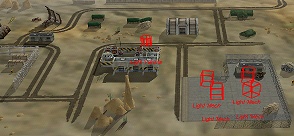
Look sharp - the Weapons Facility lies ahead
Going up the road, between the spires, you'll hit another decaying installation.
A little North of that, you'll find the edge turret control station. Here's
where your mission truly begins. Grab the turrets, because they come in handy.
East is the Weapons Facility as well as another
Resource Building. When you go to grab both,
several Urbans will activate and charge you,
accompanied by ground vehicles. Use the turrets to good effect by remaining
near them, concentrating fire on the mechs and letting the turrets do the
vehicles, which is what turrets are good for. Then grab the Facility, gaining
Ultra Autocannon tech.
Time to make some bacon
You may also, at this time, run into another patrol - Heavy
Choppers, which are actually Medium Mechs
and harder to kill than Attack Choppers, and some ground units. Going further
East, you'll see another burned-out fuel depot and turn up a set of Urbans,
Ants, Partisans, Hetzers
and Centipedes. Boy, this area is crawling with bugs! And no wonder
- ahead and to the South is the Bandit HQ.
You may be rather chipped-up by now and may wish to repair everyone to top
health before you go for the camp.
The back way is the best way
Now, the turrets ahead of you aren't the slow SRMs you have been running
into before - no. They are LRM turrets, and they
are mean. Get a good picture of the standing forces before you make any moves
towards the controls. To the right is a small spire of rock near a rising
ridge - a nice place to begin your assault, providing you can rid yourself
of the Urban and Ant
pests. Depending on how close you are, you may trigger various other units,
including Swarm LRMs; just keep plinking away.
When things become quiet, you can go forward and grab the turrets. Hopefully
you have cleared out the little guys and face an "empty" camp. Empty?
Hmm.
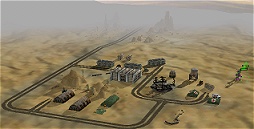
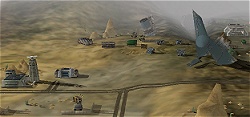
Behind the Spacecraft Tail is the Bandit HQ,
near a Resource Building. It is backed up against
a rising hill. Look on that hill for the real teeth of this outpost - some
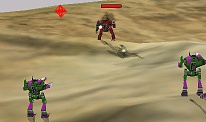
Starslayers and a Lao Hu.
It's the Bandit Leader that's on your Objectives
list, and that beautiful mech too. Any move towards the HQ or the Resource
Building will trigger his approach. He is not content to charge you, like
the 'Slayers; he jumps, and he jumps fast. So beware who he sets his
reticules on; with his power, it's easy to lose mechs against him and the
Slayer twins. Be careful how much power you pour into him though; you don't
want that mech melted!
Guess who's coming to dinner?
The lovely Lao Hu, das who!
After you are triumphant, destroy the Bandit HQ and move South to the front
turrets, capturing them and subduing any resistance. From here, you'll get
an interesting ping slightly West. There you'll find a snug little crater
which contains your Extract marker as well as some Swarm
LRMs guarding it. Try to lure them away before you paste them, or else
a perfectly good Resource Truck will be blown
to smithereens by the fuel trucks, and for what? Nothing. It's heart-rending,
I tell ya; so be careful.
Up from that bowl South is a little base camp and a ledge conveniently overlooking
those wonderful Fuel Tanks. Like any picnic,
this one has Ants, running around the rim.

Boom boom... here I go again/boom boom...
Depending on how bloodthir- er i mean, thorough you have been, there
shouldn't be much more than the Ants and a dozen vehicles to conquer - which
is simple, given that the huge fuel tanks make correspondingly huge explosions.
Too bad this mission isn't at night! Oh well, it's still LOUD!
Now gather ye rosebuds and salvages while ye may, and stately promenade to
the Extract Zone. The mission is ended, and with it your contract with House
Steiner and Campaign 1. Good thing, too; that Col. Renard was certainly becoming
a bore.
[Longshot and Meat got promotions with accompanying skills]