So, that little rat Jason Cho's miscalculations have screwed up your beautiful
campaign and lost the better part of his forces, upsetting his Mom and forcing
her to ally with House Steiner to repel the Davion forces. And it's your job
to escort the little slug to the rendezvous. Something
tells me this ain't gonna be no simple babysitting job... good thing
you have at least one Sharpshooter and a bitchin' mech bay. If you don't,
uh... take some big mechs and make out your will.

This mission is a doozy. First, you find out your mission
is accomplished; you've made it to the rendezvous. You'll hear Rice
Boy make his deal with Colonel Re-tard... who then demands your head as the
price! (boy, can that guy hold a grudge) You
are betrayed!
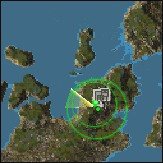
You'll hear TacOps frantically telling you that there is an
abandoned Steiner base North of your position and urging you to take
it. If you have a strong team with at least one Sharpshooter, you are bitchin',
man. If you have a weak team... go back to the vats, freebirth scum!
Ah haha no; ok. Here are several possible opening gambits:
Lame Freebirth Toad Approaches
Fat Chance #1 - Right behind you, down at the
bottom of the hill, is a small city and... several large
fuel tanks. Run down and into the tree cover behind the city. Most
of the mechs will follow you. Use the fuel tanks to destroy or damage them
severely, then finish them off. Be aware that some mechs
will split off and try to take the Steiner base ahead of you, which wouldn't
be at all good. But if your team is weak or you have no Sharpshooters,
the fuel tanks are your best choice. The city can also help you tangle the
mechs up and slow down their approach. You'll still have to race a mech or
two to the base, however. Good luck!
Fat Chance #2 - ok, go ahead and run for the
Steiner base and dig in.
Skip to "Steiner Base"
Bitchin' Mac Daddy Approach
Ok, your team is boss, and you have nerves of steel. You'll need them here.
Do not think: RUN into position thus:
 Just to your right is the beginning of the tree cover. Position your Sharpshooter
just beside the lead tree. Position your second-best Shooter right next to
her. Curve the rest of the team around these shooters. Put everyone on Hold
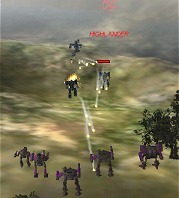
Position (H). Here's who comes up the hill at you: 2
Zeuses, 3 Highlanders and a Bushwacker,
pretty much all at once. If your shooters are good, you can take the entire
wave of attackers one by one as they come up the hill by going for quick head
shots (hold down Numpad 8 + click). Keep your Sharpshooters on these mechs!
Just to your right is the beginning of the tree cover. Position your Sharpshooter
just beside the lead tree. Position your second-best Shooter right next to
her. Curve the rest of the team around these shooters. Put everyone on Hold
Position (H). Here's who comes up the hill at you: 2
Zeuses, 3 Highlanders and a Bushwacker,
pretty much all at once. If your shooters are good, you can take the entire
wave of attackers one by one as they come up the hill by going for quick head
shots (hold down Numpad 8 + click). Keep your Sharpshooters on these mechs!
 A small auxiliary force of Razorbacks and Hollanders
will come at you from the Southeast side of the hill; swing the whole team
around to meet them. Keep aiming those Sharpshooters! When it gets quiet,
sometimes the last two Highlanders won't come
down off the hill fast enough for me, so I send a mech forward to goad them
into giving chase. When the Highlanders are dead and you hear Fanboy whining
to Reynard about more troops, then turn
around and make tracks North for the Steiner base.
A small auxiliary force of Razorbacks and Hollanders
will come at you from the Southeast side of the hill; swing the whole team
around to meet them. Keep aiming those Sharpshooters! When it gets quiet,
sometimes the last two Highlanders won't come
down off the hill fast enough for me, so I send a mech forward to goad them
into giving chase. When the Highlanders are dead and you hear Fanboy whining
to Reynard about more troops, then turn
around and make tracks North for the Steiner base.
Steiner
Base
If you took a Lame Toad approach:
#1 - You will be trailed by several tough mechs in varying conditions of
health and will probably die trying to kill them because you are so torn up
from your futile tricks at the fuel tanks that the Base's LRMs will probably
wound you severely before you can capture them. We have no sympathy for you.
#2 - You will now be assaulted by a mass force of 10-12 mechs, several of
them very mean, who will be surrounding you and jumping into your fortress
and destroying the turrets you'll need later and hurting you, probably extremely,
and you won't have any time to repair before you are crushed. You foolish
person.
If you took the Mac Daddy approach:
you should be in pretty good shape and may chuckle gleefully all the way about
your awesome skill. Just don't tie up the comm channels.
Jump in, grab both sets of turret controls and those two blessed Repair
Bays. Keep your speed up; repair anyone who needs it quickly, double-teaming
on the Bays. Study this hilltop fortress and the land outside of the Southern
point carefully.
 You should have just enough time to repair before you get a sensor contact
- it's Jason Cho following you in his Cyclops
from the river ford (South). He's slow, and he can't shoot well, so you have
plenty of time to artistically arrange your team to best destroy him with
proper humiliation and pain. After all, he did betray you... afterwards
from the same direction come a couple of Heavy Choppers
(medium mechs; tough & chewy) and several Attack
Choppers. I guess Colonel Renard didn't want to throw good after bad...
You should have just enough time to repair before you get a sensor contact
- it's Jason Cho following you in his Cyclops
from the river ford (South). He's slow, and he can't shoot well, so you have
plenty of time to artistically arrange your team to best destroy him with
proper humiliation and pain. After all, he did betray you... afterwards
from the same direction come a couple of Heavy Choppers
(medium mechs; tough & chewy) and several Attack
Choppers. I guess Colonel Renard didn't want to throw good after bad...
[Too bad that nice Mandrissa lady didn't give you
time to explain... but probably she wouldn't believe you anyway; she's crazy.
Must be all that oxy-sucking... she sends a revenge
force after you. Baxter breaks in and tells you
he's organizing a Resistance force
to help you... don't hold your breath. Stay put.]
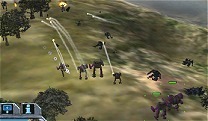
 From
the South come 3 Catapults, escorted by a pair of Sha Yu, a pair of Anubii
and a hard-to-see Men Shen pair. No doubt about it, this wave is brutal.
Beware that the Anubii, Sha Yu and Catapults may try
to jump up into the fortress and disable or capture the turret controls
(ouch!) so keep someone locked down next to them all the time. They'll try
for the right-hand (southwest) ones first.
From
the South come 3 Catapults, escorted by a pair of Sha Yu, a pair of Anubii
and a hard-to-see Men Shen pair. No doubt about it, this wave is brutal.
Beware that the Anubii, Sha Yu and Catapults may try
to jump up into the fortress and disable or capture the turret controls
(ouch!) so keep someone locked down next to them all the time. They'll try
for the right-hand (southwest) ones first.
When you make it through this hairball, repair up quickly. You'll hear Baxter
again, urging you to move North towards the Resistance and they'll help you.
Don't do this! You should have learned
by now that the Resistance is... a bunch of rilly
nice guys who unfortunately are more hindrance than help. Ahem.
Also, if you leave the base you'll be exposed on flat land with no cover.
Stay put. Rally 'round your remaining turret controls (if you have any).
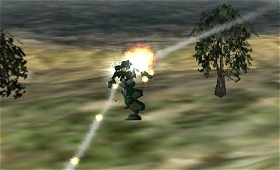
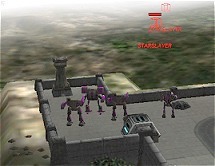 Next,
from the same direction, come two Starslayers and two Ravens, which
are very hard to track (grrr). Watch out for them. While
they keep you distracted, the last team comes; another pair of Starslayers
and a pair of Lao Hu. These bad boys will take
it right to you, jumping en masse into the fortress. It gets hot and
hairy here, so be cool as a cucumber. Take out enemies one by one; start with
the 'Hus and then the Starslayers. Watch again for a
sneaky Raven trying to get to the turret controls through a pre-opened breach
in the base's west wall while you are distracted.
Next,
from the same direction, come two Starslayers and two Ravens, which
are very hard to track (grrr). Watch out for them. While
they keep you distracted, the last team comes; another pair of Starslayers
and a pair of Lao Hu. These bad boys will take
it right to you, jumping en masse into the fortress. It gets hot and
hairy here, so be cool as a cucumber. Take out enemies one by one; start with
the 'Hus and then the Starslayers. Watch again for a
sneaky Raven trying to get to the turret controls through a pre-opened breach
in the base's west wall while you are distracted.
What can I say? This mission will surely test your chutzpah. If you
come through it, and have been following the Company B Plan, you
should easily have enough C-bills to purchase every mech that opposed you:
3 Highlanders, 2 Zeuses, 2 Lao Hu, 1 Cyclops, 3 Catapults, 4 Starslayers,
2 Men Shen, 1 Bushwacker, 2 Sha Yu, 2 Ravens, 2 Anubii, 2 Razorbacks and 2
Hollanders. Ca-ching!!!
You turn a tidy profit on this loathsome betrayal and finally have a good
reason to terminate this contract. You've had enough of deception and House
Liao.
I'm ready for my headshot now, Mr Demille!