![]()
Solution copyright © Mike Marcelais. Version 1.2, June 13, 1999.
Thanks to Andrew Becker and Mark Sunderland for providing some of the information in this solution.
Introduction
Might and Magic VI is a very loose game -- i.e., there is very little linearity. To solve the game merely means going to each location and dealing with all of the small quests in the area and exploring the local dungeons. Because of this freedom, the walkthrough will be in the style of a "tour" of the lands. Each major grid location is listed (along with a screen capture of the map from the game), and all surface locations noted.
For towns, each building is described, along with what and who can you can talk to, who to buy skills from, and what quests are available. For the outlying areas, the dungeons are listed.
Dungeon maps are not given -- they would be too extensive to fit easily into a web page and the automapping in the game is excellent. Also, every dungeon should be explored completely to get all of the loot, but only puzzles and hidden locations are described. I also skip most of the fighting because it isn't something that you can easily describe, nor does it matter in most places, except that you have to survive it. I do list the creatures that you will encounter in a dungeon or grid location to give you an idea of how difficult the location is.
Stores are listed with a "buy" and "sell". The "buy" value is multiplied by the items value to determine the price you have to pay for it. The "sell" value is divided by the item's value to determine the price you can sell it to the store for. Higher is always worse, and a "buy" or "sell" of 1 means that you are buying/selling an item at cost.
Every location has a "reset" timer. This starts when you first enter the area, and after it "goes off", the entire grid square resets: monsters reappear and random treasure is replaced. Nonrandom treasure (including most stat-gaining liquids) is not replaced. All dungeons have a reset of 2 years (24 months), unless otherwise noted. Overland areas have reset times listed with their descriptions.
Artifacts are unique items that can be found. They come in two flavors: Minor artifacts are always benificial and have a value of 20000gp. Major artifacts always have a drawback, but their benificial powers are much stronger. They have a value of 30000gp. There are 15 minor and 15 major artifacts -- some of these artifacts are placed at specific locations; others are randomly generated.
Table of Contents
- New Sorpigal
- Castle Ironfist
- The Misty Islands
- Bootleg Bay
- Free Haven
- Mire of the Damned
- Frozen Highlands
- Silver Cove
- Blackshire
- Kriegspire
- Eel Infested Waters
- Dragonsands
- Hermit's Isle
- Paradise Valley
- Sweet Water
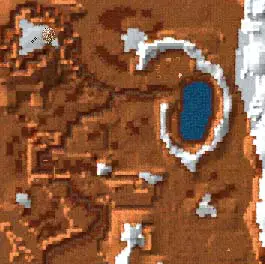

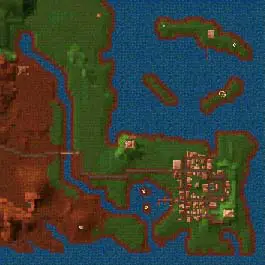


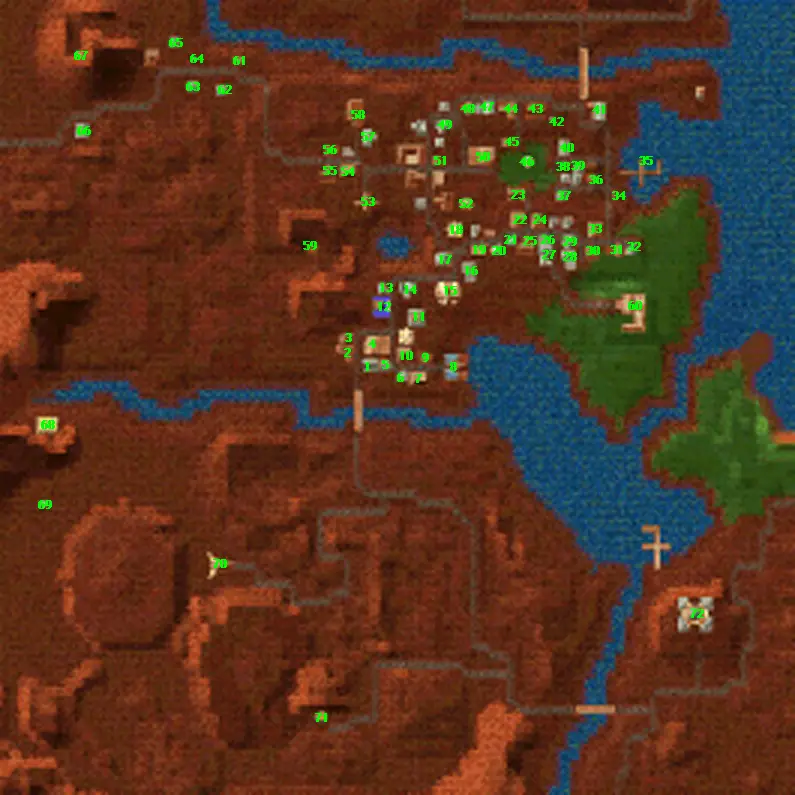
New Sorpigal
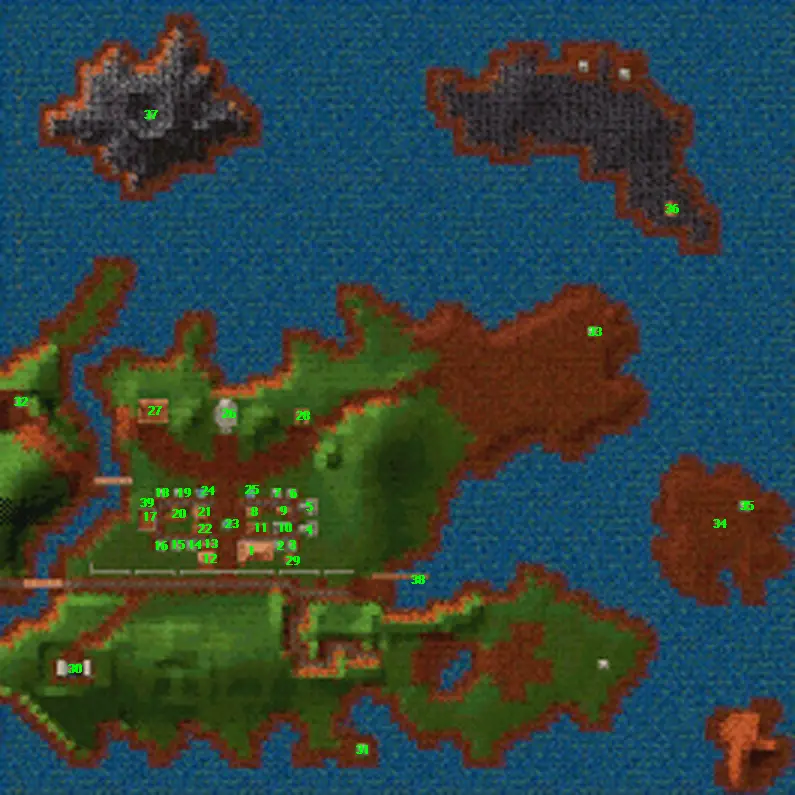
This overland area resets every 6 months.
Travel
- On foot west: 5 days to Castle Ironfist
- By boat: 3 days and 100gp to Misty Islands (Tuesday, Thursday, Saturday)
- By coach: 2 days and 25gp to Castle Ironfist (Monday, Wednesday, Friday)
Monsters
Locations
- Inn
- Night: 3gp; Food: 6 for 2gp.
- Andover Potbello
- Show him the letter you start the game with for 1000gp.
- Get quest 3.
- Found upstairs, use the ramp behind the Inn.
- Teaches Expert in Identifying Items for 500gp.
- Found upstairs, use the ramp behind the Inn.
- Teaches Expert in Perception for 500gp.
- Hejaz Mawail
- Buys Cobra Eggs for 1000gp each.
- Sells membership to the Buccaneer's Lair for 25gp.
- Harold Hess
- Sells membership to the Blade's End for 25gp.
- Erik Salzburg
- Teaches Expert in Bodybuilding for 500gp.
- Victor Hazen
- Teaches Expert in Meditation for 500gp.
- Violet Dawson
- Sells membership to the Self Guild for 100gp.
- Get quest 6.
- Buford T. Allman
- Sells membership to the Elemental Guild for 100gp.
- Get quest 4.
- Armor Store
- Buy: 1.5; Sell: 3.5
- Blade's End
- Teaches the Axe, Spear, Staff, Sword, and Leather skills for 375gp each.
- Alchemist Store
- Buy: 1.5; Sell: 3.5
- Weapon Store
- Buy: 1.5; Sell: 3.5
- Coach Travel
- General Store
- Buy: 2.0; Sell: 8.0
- Abdulai Mahgreb
- Teaches Expert in Body Magic for 1000gp.
- Virgil Holiday
- Teaches Expert in Mind Magic for 1000gp.
- Enoch Highridge
- Teaches Expert in Spirit Magic for 1000gp.
- Training Hall
- Maximum Level: 15
- Taro
- Teaches Expert in Earth magic for 1000gp.
- Isao Magistrus
- Teaches Expert in Fire magic for 1000gp.
- Buccaneer's Lair
- Teaches Merchant, Identify Item, Perception, Disarm Traps, and Dagger skills for 150gp each.
- Town Hall
- Bank
Cheryl Duncan- Found upstairs, reachable only by flying.
- Teaches Expert in Air Magic for 1000gp.
- Fountain that restores 5 hit points
- Fountain that restores 5 magic points
- Fountain that gives +10 might for a day
- Temple
- Initiate of the Self Guild
- Teaches Mind Magic, Body Magic, and Soul Magic skills for 750gp each.
- Sells spellbooks for Mind spells (1-3), Body spells (1-4), and Soul spells (1-4).
- Found upstairs, use the ramp in the back of the guild.
- Teaches Expert in Learning for 2000gp.
- Initiate Guild of the Elements
- Teaches Earth Magic, Air Magic, Water Magic, and Fire Magic skills for 750gp each.
- Sells spellbooks for Earth spells (1-4), Air spells (1-4), Water spells (1-4) and Fire spells (1-4).
- Dragon Tower
- Goblinwatch
- Dorf
- Teaches Expert in the Staff for 2000gp.
- Abandoned Temple
- Igor
- Teaches Expert in Ancient Weapons.
- Shrine of Luck
- Douglass Hill
- Teaches Expert in Water Magic for 1000gp.
- Gharik's Forge
- Obelisk #15
- Docks
- Well that gives +2 luck permanently
Goblinwatch
- Goblin, Goblin Shaman, and Goblin King
- Common Rat, Large Rat, Giant Rat
- Bat, Giant Bat, and Vampire Bat
- Blood Sucker, Brain Sucker, and Soul Sucker
Note that the outside of Goblinwatch contains quite a few goblin guards. You can get access to the upper part of the watch by taking a ramp around the backside of the keep. There is a room at the top with a goblin that refuses to talk to you.
From the entrance, head right and down. In the room at the end are several cabinets on the wall. Inside one of the cabinets is a wall safe that has a scroll describing the combination to the vault. This is the scroll required to solve quest 2.
From the entrance room, the room to the south and west has a button on the far wall. Pushing this button lowers two corner pillars that allow access to some treasure rooms.
To the east is the entrance area to the vault. In order to open it, you have to work out how to open all of the doors at once. One of the instructions will open a door without closing any. This must be the last key you press. Now, find a way to open a door that closes only the doors you will open later. And continue until all of the doors are open.
One solution is "NILBOG". (Many other solutions are possible; this one has the advantage of spelling something interesting when reversed.) Each key opens a door while not closing any of the doors you have already opened.
Pushing the Mainentance button (M), will teleport you to caves underneath the castle. When you leave this area, it will open up a new door to the east of the entrance room.
Abandoned Temple
- Spider, Giant Spider, and Huge Spider
- Cobra, King Cobra, and Queen Cobra
- Bat, Giant Bat, and Vampire Bat
- Unique: Queen Spider
At the very first intersection, to the right is a room. A chest in that room contains the candelabrum needed to solve quest 3.
Continuing down the corridor into the caverns, you will come to a room containing a chest in the middle of the room and a Spark spell containstly bashing down onto it. You can empty the chest by timing you steps correctly. Be careful, as the Spark spell seems to be a master level spark.
The next room and then north leads to where Angela is trapped. She will join your party automatically and you can return her to town to solve quest 6.
Further west and then back east, and then to the end of the passage is a teleporter that returns you to the room south of where you found Angela.
If you instead go further west is the lair of some cobras. You can find several cobra eggs scattered around this room.
To the south is the lair of the Queen of the Spiders. Kill her and you will find her heart. This will satisfy quest 4. There is also a teleporter here that will return you to the starting room.
Gharik's Forge
Note: You should complete the Silver Helm Outpost on the Misty Islands before starting this dungeon.
As you enter, you will find a huge vertical room with a spiral walkway around the edge of the room. The center opens up into a deep pit that falls into a lava field. The room is also filled with fire spirits and elementals which are not happy to see you. If you are so unfortunate as to fall into the lava, there is a tile that, when touched, will teleport you back onto the walkway. That applies in all of the other areas where you can fall into the lava in the Forge.
In the corridor outside the entranceway, there is a secret door on the right wall. This leads to a room that has a level. Pulling this lever will extend the bridge across the lava moat.
The doors in the next section are all opened by pulling a lever just to the left or right of the door to be opened. Expect a tough fight. Anyway, through the first door, turn to the right, and continue down the corridor and you should get to a balcony that overlooks another lava moat. There are eight doorways to this room and one wooden bridge. The hallways connect seven of the eight doorways -- you have to get to the eighth. There is also a lever on each balcony and each lever does something.
The upper southwest lever toggles the upper southwest door. The upper southeast lever toggles the upper northeast door. The upper northwest lever toggles the lower northeast door. The upper northeast lever (the lever at the door you're trying to get to) opens a secret room back out in the corridor where the puzzle started. The lower southwest lever toggles the upper northeast door. The lower southeast lever moves the bridge across and closes the upper southeast door. The lower northwest lever toggles the upper southeast door. The lower northeast lever toggles the lower southeast door. Both southeast, and the lower northeast doors start closed; the remaining doors start open.
To get through, flip the upper northwest lever, the lower northeast lever, the lower southeast lever, the lower northwest lever, and the upper northeast lever. Then return to the secret room and collect the loot and continue through.
The next room to the north has a chest, inside of which is a Letter to Marcus. Continuing around the corridor, through another room to the south, and in the corridor, there is a loop in the corridor. On the west side of the loop, there is a secret door that leads to a back room. In that room there are two chests, one of which contains a scrap from Gharik's Journal.
Through the door, you will reach a tiny room with a lever on both sides of the door. This is an elevator room -- pulling the lever will lower you way down to the bottom, where another door waits. This door requires that you have the key to Gharik's Laboratory. You can get this key from the Silver Helm Outpost on the Misty Islands.
In the next room (which is a nasty fight), go through the wall on the far door, and then up the spiral ramp around the edge of the next room. Up there, you need only fight your way across one more bridge and then through the last group of warlocks in the room on the far side. The chest against the far wall contains the Hourglass of Time needed to complete quest 12.
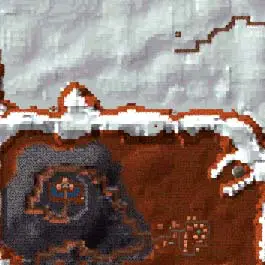
Castle Ironfist
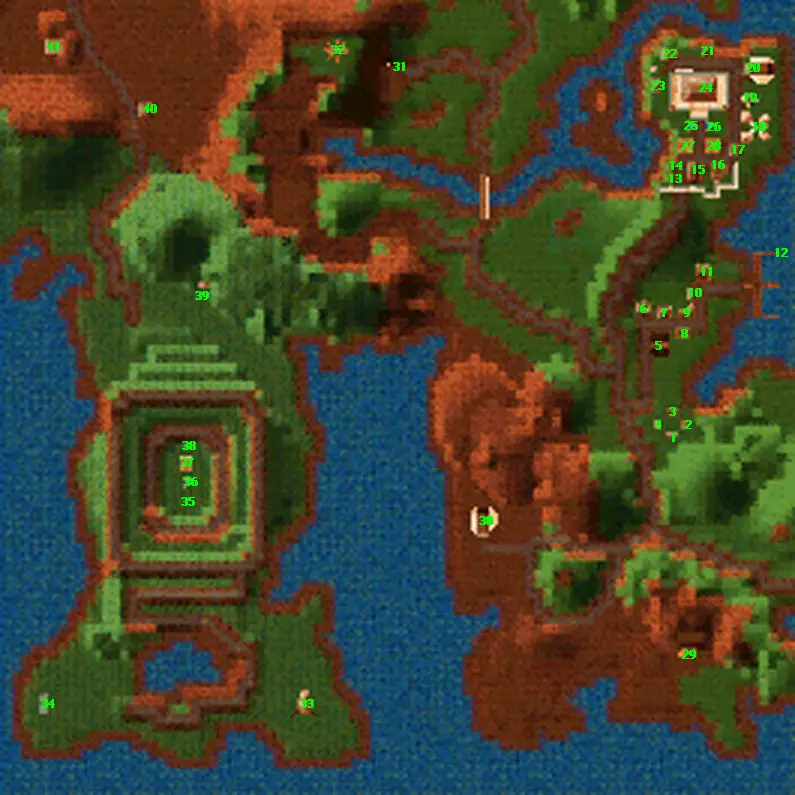
This overland area resets every 24 months.
Travel
- On foot east: 5 days to New Sorpigal
- On foot north: 5 days to Bootleg Bay
- On foot west: 5 days to the Mire of the Damned
- By boat: 2 days, 100gp to the Misty Islands (Monday, Wednesday, Friday)
- By boat: 2 days, 100gp to New Sorpigal (Tuesday, Thursday, Saturday)
- By boat: 3 days, 100gp to Bootleg Bay, East (Tuesday, Friday)
- By boat: 2 days, to Volcano, New Sorpigal, South (Sunday)
- By boat: 14 days to Volcano, Dragonsands, near Gharik's Forge (Sunday)
- By boat: 21 days to Hermit's Isle
- By coach: 1 days, 50gp to Arena (Sunday)
- By coach: 2 days, 50gp to New Sorpigal (Monday, Wednesday, Friday)
- By coach: 4 days, 50gp to Free Haven (Tuesday, Saturday)
Monsters
- Follower of Baa, Mystic of Baa, and Fanatic of Baa
- Lizard Man, Lizard Archer, and Lizard Wizard
- Blood Sucker, Brain Sucker, and Soul Sucker
Locations
- Rich Hamburg
- Teaches Expert in Chain Armor for 1000gp.
- Benito Tellman
- Teaches Expert in Plate Armor for 1000gp.
- Edgar Carpenter
- Teaches Expert in Shield for 2000gp.
- Newt Headrow
- Teaches Expert in Leather Armor for 1000gp.
- Coach Travel
- Andrew Besper
- Sells membership to the Berserker's Fury for 50gp.
- Get quest 8.
- Berserker's Fury
- Teaches Bow, Shield, Chain Armor, Plate Armor, and Repair Item skills for 500gp each.
- Armor Store
- Buy: 2.0; Sell: 4.0
- Weapon Store
- Buy: 2.0; Sell: 4.0
- Helen Teal
- Teaches Expert in the Bow for 2000gp.
- Sells membership to the Mind Guild for 50gp.
- Inn
- Night: 40gp; Food: 20 for 80gp.
- Teaches Expert in Dagger for 2000gp.
- Docks
- Leon Lazaru
- Teaches Expert in Identifying Items for 500gp.
- Tylor Tailor
- Teaches Expert in Disarming Traps for 500gp.
- Training Hall
- Maximum Level: 200
- Teaches Expert in Axe for 2000gp.
- Weapon Store
- Buy: 2.0; Sell: 4.0
- Teaches Expert in Sword for 2000gp.
- Armor Store
- Buy: 2.5; Sell: 4.5
- Initiate of the Spirit Guild
- Teaches Meditation and Spirit Magic skills for 1000gp each.
- Sells spellbooks for Spirit spells (1-7).
- Teaches Meditation and Mind Magic skills for 1000gp each.
- Sells spellbooks for Mind spells (1-7).
- Teaches Meditation and Body Magic skills for 1000gp each.
- Sells spellbooks for Body spells (1-7).
- Alchemist Store
- Buy: 2.0; Sell: 4.0
- Temple
- Olaf Berring
- Teaches Expert in Bodybuilding for 500gp.
- Bishop Inquisitorio
- Teaches Mastery in Spirit Magic to high priests.
- Sells membership to the Spirit guild for 50gp.
- Bernice Weaver
- Sells membership to the Body guild for 50gp.
- Castle Ironfist
- Wilbur Humphrey
- Nicolai Ironfist
- Upstairs, reach via a ramp in the back of the castle.
- Teaches Expert in Learning for 2000gp.
- Upstairs, reach via a ramp in the back of the castle.
- Teaches Expert in Diplomacy for 500gp.
- Fountain that gives +10 speed for a day
- Fountain that gives +10 accuracy for a day
- Teleporter to #35
- Receiver for teleporter at #37
- Dragoons' Caves
- Temple of Baa (Dungeon)
- Shadow Guild Hideout
- Seer
- Temple Baa
- Corlagon's Estate
- Receiver for teleporter at #27
- Fountain that restores 10 hit points
- Teleporter to #28
- Obelisk #12
- Shrine of Elecricity
- Inn
- Night: 10gp; Food: 10 for 10gp.
- Snergle's Caverns
Dragoons' Caverns
When you enter and get to the first fork in the corridor, take the door to the right. The door directly ahead leads to a room whose exit is jammed shut, so you can't go that way anyway. On your right, there will be a stairway leading downward (with guards at the bottom). Once down there, head south and take the north fork. This passage leads around to a switch which will open the door back on the starting room. The south fork leads to a chest which contains a flute. (What to do with flute?)
On your way back, be wary of the west exit from the bottom of the ramp: That leads down to a water channel. In the water are several kinds of oozes -- all of which will devour your items and tend to be immune to such items. Just avoid. And don't fall in the lake; you'll have plenty of chances to do so.
Back upstairs, head through the south door and continue to a platform with a lever. This lever operates an elevator down (to some more waiting guards). From here, around the corner and to the north is another switch. This switch opens a secret door back down the corridor that leads to some flour sacks containing food and a chest. In the chest is a letter linking the Dragoon raiders with the Shadow Guild. If you return with this letter to New Sorigal city hall, you will receive a 5000gp reward.
Continuing down the corridor, over the bridge, straight, and over another bridge is another button. This will open a door that you skipped by. Head back over the bridge and turn left (east) at the fork between the bridges and into the next room. The exit to this room is controlled by that switch.
Almost there -- after going down the second elevator, follow the large passage all of the way to the end. There will be six chests against the far wall. Only the middle-left chest (#2) is real; touching any of the other chests will teleport you to another area of the labyrinth. Inside this chest is a harp, which is needed to solve quest 8.
Temple of Baa
- Acolyte of Baa, Cleric of Baa, and Priest of Baa
- Skeleton, Skeleton Knight, and Skeleton Lord
- Common Rat, Large Rat, Giant Rat
- Spider, Giant Spider, and Huge Spider
When you enter the temple, there will be a very large room just in front of you, with a small room in the center and four doors leading off in the four cardinal directions. There are also tunnels that lead in each of the secondary directions (NE, SE, SW, and NW). These diagonal tunnels aren't that important, except that the critters in there should be cleared out before they distrub you at a bad time. The witches' brew that you will find in some of the corners will raise you magic resistance by 1% permanently.
Start by heading south. You'll pass by two locked doors and then the corridor will dead end in a statue. If you search the statue, you will find a key. That key will open one of the two doors you passed. Inside that room, there is a chest containing a bathhouse key. (Note: every time you open a chest around here, more skeletons and Baa clerics appear.)
Now head north into the bathhouse area. The key you found opens the room on the right. Inside that room is another chest. That key will open the other storeroom back in the south area.
Heading back to the south, open the door, then the chest, to get another key. Now, go to the east. Open the door and quickly move out of the way. A large fireball shoots down this corrdior at regular intervals. You can get around it by walking on the fountains. Head upstairs, fighting a rather difficult battle, and clear out the temple at the top. As soon as you stand on the elevated part of the room, the room will fill completely with skeletons. You have three choices:
- You can run like mad along the edge of the room and get back out to the stairs. Then you fight them one at a time as they come around the corner.
- Use the key you have to open a secret door behind the altar. The secret passage leads to two ledges along the sides of the room. From here you can pick off all the skeletons with your bow with little problems.
- Stand, fight, and die. 😊
You can also take the gong that is on the altar here; there is a fellow in Free Haven that buys temple gongs for 2000gp each.
Now, return back to the main room. You can open the main door now by opening the doors in the following order: north, east, west, then south. Inside is another chest. (There is quite a battle waiting for you when you open this chest.) Inside is a key to the other bathhouse room. Go to that room and open up the chest there to get a treasure key.
Great -- now where's the treasure room? Return to the large altar and go to the ledge on the north side of the room. At the end of the ledge (to the west), there is an invisible door in the corner. In this room, there is a chest that contains the Chime of Harmony, needed to solve quest 7, and another treasure key. The treasure key can be used to open a similar secret door in the south wall. That room opens into piles of money.
Shadow Guild Hideout
This is not a very large dungeon and there isn't much here to describe. In the first room to your right, there is a button just inside the doorway. If you push that button, then a wall section out in the corridor will open up allowing you to walk straight from the entrance deep into the hideout. The next door on the right is locked, and you can't open it now. Continue down that corridor, working your way around. The area is arranged like a large oval, with rooms on the outside.
One of the rooms on the east side of the hallway contains a chest with a letter addressed to the Prince of Thieves.
As you are working your way down the other side, you will find a large room that looks like a vault: several barrels of gain stat are here, bags of items, and lots of gold. On the north wall of this vault, there is another switch. This opens the corridor on this side of the oval, across from the first secret door that you opened.
On the next room on the right, there is a chest. In that chest, there is a guild key. That key opens the locked door back near the entrance. At the end of the corridor, there is a secret door, openable only from this side, which allows you to get back into the first room in this dungeon.
The locked room is where Sharry is being kept prisoner. She will join your party, and you should escort her back to New Sorpigal to complete quest 5.
Corlagan's Estate
This evil place is filled with undead. In particular, ghosts, specters, and other evil floating things. They have the ability to magically age you, and there is no easy way to heal from magical aging. (The only way that I know of is to use one of the black potions, but then your stats are permanently reduced, or use the fountain in the Hermit's Isle which you won't have access to until late in the game.) Save often.
In the first room, head right. Progress through the rooms. At one point you will pass through a room with a pool of water in it. Note this room as you'll return to it later.
In the long hallway around the corner, take the first right. The next room should have a narrow walkway that is suspended over a very large room. The room has lots of ghosts in it which will float up to attack you when you enter the room. Stay to the walkway and don't fall off.
The next long corridor has a teleporter on it that will instantly take you the length of the corridor. Continue all of the way down, through another room with a walkway (with more ghosts to greet you) and eventually you will get to a room with no more exits. Push the button on the wall there.
Return to the entrance and take the left exit. The door exiting this room was opened by that button you pushed. Follow the corridor around and down and around and down. You will get to another room, similar to the one I mentioned above, but instead of a pool of water, it is an empty pit. Cast Featherfall and jump into the pit.
One of the walls at the bottom of the pit is a secret door. From here, work your way through the tunnels. On one of the walls in a side passage is a button. Push it. These tunnels will connect with the large room undernearth that suspended walkway. There are some chests here. The tunnel will come out at that room with the pool -- the mural behind the pool is a secret door when opened from the inside. Return to the room with the pit.
Continue until you get to a long corridor with short side passages on the left and right, alternating. There is a secret wall at the end of the last corridor on the left. In this room, there is some nice treasure.
Go south to the end of the corridor, turn east, and then turn north. This room has a button which opens the door to the room where the Cystal is located.
The next room is the room underneath the second suspended walkway that you passed over already. Head towards the east door. Follow this down to another door that opens into the room where the Power Lich is hanging out. Yes, he's nasty. And don't try to run away because there is a trap in the corridor that will teleport you into the middle of the room. The best way to deal with the Lich is to close to melee as quick as possible -- he is either immune or highly resistant to most spells. When you're done killing him, open the chest at the far end of the room and get the Cystal out of it. This is the crystal you need to complete quest 22.
Back out in the previous room, the corridr on the west side will lead back to the room just to the east of the entrance area. Now you can leave in comfort.
Snergle's Caverns
Be sure to finish Snergle's Iron Mines first in order to get the Key to Snergle's Chamber.
The beginning of this area is very simple; walk through the corridors and kill things. There is very little branching. At most of the dead-ends, there is an exposed gold or gem vein; you can search that to either find gold or cause a cave-in. Similarly, the crystals in the open room can be harvested to get gemstones that can be sold in any shop.
West of the first chamber, there are bones that will permanently increase your resistances. The black barrels past the second room merely poison or disease you.
In the second chamber, a switch on the ground will open up a secret door to the west that leads to more barrels of stat-raising liquid and other treasure.
In the third large chamber, the door leading out of that will be locked and you need to get the Snergle's Chamber key from Snergle's Iron Mines to open it. When you open the door, the corrdior behind you will fill with Dwarves. This pins you in a corner and leads to a rather quick death. The best way I've found to deal with this is cast Lloyd's Beacon back in the second room, and then (in turn based mode), open the door and cast Lloyd's Beacon to return to the second room. Then you can fight all of the dwarves while they are all in front of you and come at you two and three at a time (rather than ten to twenty at once). One of those dwarves in the huge army that flows out of that door is Snergle himself (he isn't any tougher than a Dwarf Lord). On his body, you'll find his Axe. This is what you need to solve quest 25.
In a chest in this room, you will find a letter to Snergle. There is also a switch on the throne that opens another door leading out of this room to the southeast. This passage leads to a small corridor with glowing dinosaur bones. These bones will teleport you back to the entrance to the caverns.
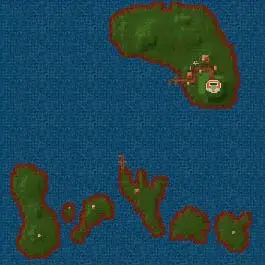
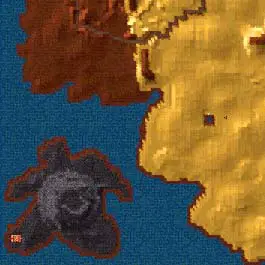
The Misty Islands
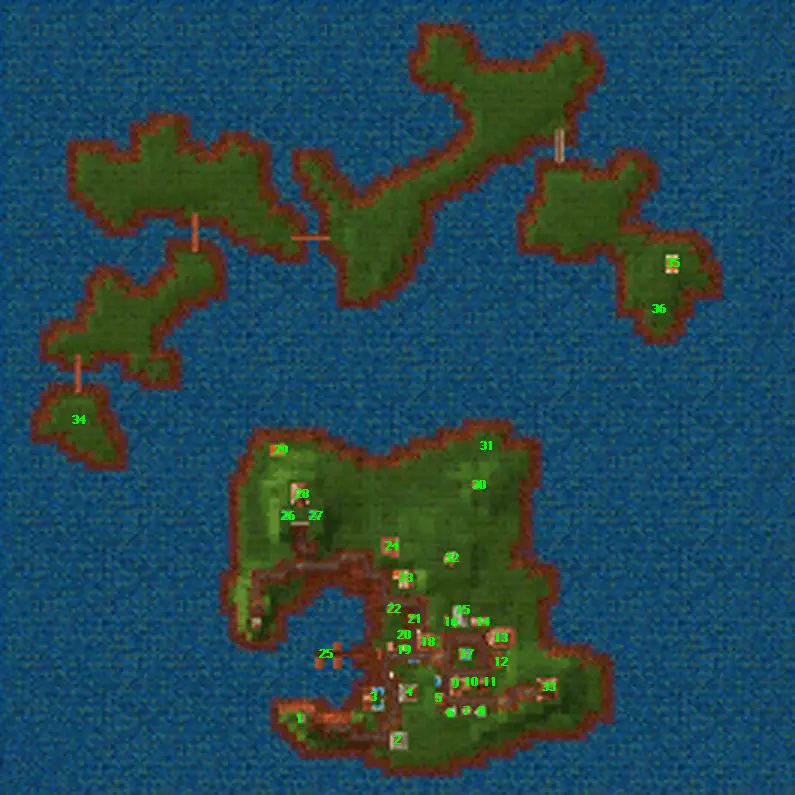
This overland area resets every 24 months.
Travel
- By boat: 2 days, 250gp to Castle Ironfist (Monday, Wednesday, Friday)
- By boat: 3 days, 250gp to Silver Cove (Monday, Thursday)
- By boat: 2 days, 250gp to Bootleg Bay, East (Tuesday, Thursday, Saturday)
Monsters
Locations
- Kathleen Mester
- She will activate the teleporter at 29.
- Initiate Guild of Fire
- Teaches Learning and Fire Magic skills for 1000gp.
- Sells spellbooks for Fire spells (1-7).
- Initiate Guild of Water
- Teaches Learning and Water Magic skills for 1000gp.
- Sells spellbooks for Water spells (1-7).
- Initiate Guild of Air
- Teaches Learning and Air Magic skills for 1000gp.
- Sells spellbooks for Air spells (1-7).
- Norio Ariganaka
- Teaches Mastery in Meditation to those with rank 7 and personality 30 for 2500gp.
- Harper Collins
- Teaches Mastery in Water Magic to those with rank 12 for 4000gp.
- Sells membership to the Water Guild for 50gp.
- Caao Salem
- Teaches Mastery in Air Magic to archmages for 4000gp.
- Sells membership to the Air Guild for 50gp.
- Jazebel
- Teaches Mastery in Fire Magic to those with rank 12 for 4000gp.
- Sells membership to the Fire Guild for 50gp.
- Bank
- General Store
- Buy: 2.0; Sell: 8.0
- Alchemist Store
- Buy: 1.5; Sell: 3.5
- Town Hall
- Charles D'Sorpigal
- Get quest 14.
- Charles D'Sorpigal
- Temple
- Training Hall
- Maximum Level: 30
- Weapon Store
- Buy: 2.0; Sell: 4.0
- Armor Store
- Buy: 1.5; Sell: 3.5
- Fountain that restores 10 spell points
- Inn
- Night: 14gp; Food: 12 for 17gp.
- Fountain that gives +20 luck for a day
- Calvin Black
- Teaches Expert in Staff for 2000gp.
- Gonzalo Ramirez
- Teaches Expert in Spear for 2000gp.
- Sells membership to the Duelist's Edge for 50gp.
- Bernard Jacobs
- Teaches Expert in Repair Items for 500gp.
- Arthur O'leary
- Teaches Expert in Leather for 1000gp.
- Sells membership to the Bucaneer's Lair for 25gp.
- Teaches Diplomacy, Leather Armor, Identify Item, Perception, and Disarm Trap skills for 200gp each.
- Duelist's Edge
- Teaches Bodybuilding, Mace, Chain Armor, Bow, and Shield skills for 500gp each.
- Docks
- Fountain that gives +10 to intelligence and personality for a day
- Fountain that gives +5 to all elemental resistances for a day
- Lord Albert Newton
- Teleporter to 34
- Shrine of Intellect
- Receiver for teleporter 35
- Dragon Tower
- Silver Helm Outpost
- Receiver for teleporter 29
- Teleporter to 31
- Obelisk #14
Silver Helm Outpost
- Guard, Lieutenant, and Captain
- Swordsman, Expert Swordsman, and Master Swordsman
- Novice Monk, Initiate Monk, and Master Monk
All of the exciting parts of this dungeon happen after you walk down the starting corridor into a large room (that almost looks like a mess hall). From this room, you will see seven different doors leading out to the south, east, and west.
The two rooms to the south are both storerooms that contain quite a bit of treasure, stat raising barrels, and food. On the west side, the northernmost door leads to a block of three cells. Inside one of those cells, you will find a prisoner that tells you there are secret passages hidden here.
If you go to the end of the passage, you can find a secret door right there. Just click on it to open it. It leads to a very high room that has pillars in the corner and no apparent way of ascending to the top. There are two ways to get to the top: You can use the Jump spell to get from one corner to the next; or you can go into the guard room and flip the switch there. This will cause two small walkways to appear. As you step onto each one, the next will appear; but ones behind you will disappear. If you stay by the wall and walk at a normal walking pace (but don't run), you can walk up the ramp all of the way around the room. At the top, Melody Silver is imprisoned in a room. She is a damsel in distress that you can rescue to satisfy quest 10.
From the large central room, head through the southern door on the east side. Through here, you will find one of the master priest's bedroom. Inside here, there is a chest that contains the key to Gharik's Laboratory and a list of enemies of the Silver Helm. This list is what you need to show Charles D'Sorpigal in order to solve quest 14. There is also a switch on the wall that opens a secret passage. This passage contains two more chests and provides a back way into the temple. (This temple can also be reached via the northeastern door from the main hall).
If you return to Lord Newton with the key, he will remember that the Mirror you're looking for for quest 12 isn't at the Silver Helm outpost at all, but at Gharik's Forge at New Sorpigal.
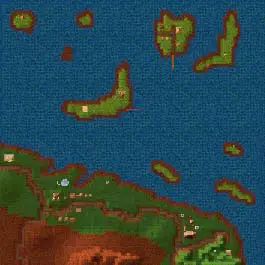
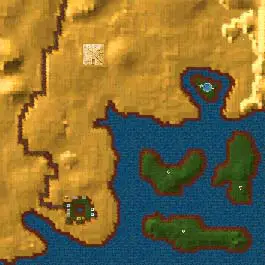
Bootleg Bay
This overland area resets every 8 months.
Travel
- By foot south: 5 days to Castle Ironfist
- By foot west: 5 days to Free Haven
- By boat (east dock): 1 day, 150gp to Bootleg Bay, West (Monday, Wednesday)
- By boat (west dock): 4 days, 150gp to Castle Ironfist (Tuesday, Thursday)
Monsters
Locations
- Obelisk #11
- Hall of the Fire Lord
- Circus (Winter)
- The circus is only here from December through March. During other seasons, it is either in the Mire of the Damned (August-November), Blackshire (April-July).
- Nicolai runs away here. You can retrieve him at the big tent to solve quest 9.
- There are six tents here that each have a game that test one of your six primary stats. (Luck is never tested.) You win either a Lodestone, a Harpy Feather, or a Four Leaf Clover, depending on how well you do. It costs 50gp to play each time.
- The big tent will let you trade in your small winnings for larger winnings. A Lodestone is worth 1 point; a Harpy Feather is worth 3 points; and a Four Leaf Clover is worth 5. You can buy a cask of wine for 10 or a golden pyramid for 30.
- The Fountain of Magic
- Drink from this to solve quest 13.
- Shoski Pertoniki
- Teaches Expert in Perception for 500gp.
- Preston Harper
- Teaches Expert in Chain Armor for 1000gp.
- Weapon Store
- Buy: 1.5; Sell: 3.5
- Inn
- Night: 10gp; Food: 10 for 10gp.
- Temple
Winston Schezar- Get quest 15
- Training Hall
- Maximum Level: 20
- Alchemist Store
- Buy: 1.5; Sell: 3.5
- Armor Store
- Buy: 2.0; Sell: 4.0
- Fountain that gives +20 might for a day
- Temple of the Fist
- Fountain that gives +2 personality permanently.
- Fountain that gives +2 intellect permanently.
- Temple of Tsantsa
- Inn
- Night: 20gp; Food: 14 for 28gp.
- East Docks
- Temple of the Sun
- Temple Baa
- West Docks
- Shrine of Might
- Pedestal
- Used in quest 38.
Temple of Tsantsa
The temple of the headhunters. Most of this dungeon is just clearing out all of the headhunters and cobras that walk the hallways. As you go in, the first side passage to your right leads to a pair of rooms. The north room has a secret closet in the northeast corner that hides some treasure.
Back in the main passage, the next room has a floor that seems to move and pulsate as you look at it. If you stand in this room, you will take continuous poison damage. You should run across this room as fast as possible.
The next section is just a loop of corridors and rooms. On the wall in several places, you will see a lever inset in the wall. These levers control the pits that you see. (If you jump into a pit, there is a lever inside the pit that will raise the pit as well.) You will also notice three other levers which are behind skull tiles -- hence, you can't flip the lever itself. In order to deal with these, head towards the very north of the map.
At the north, there is a room that contains a small altar. In the altar is a lever. Pulling this lever opens up the skull tiles and allows you to flip those switches. After you have flipped all three of them, the doors to the central altar will open (it is right in the middle of the automap).
Past the altar, there is a small cell to the left and inside that cell is Sherell Ivanaveh. She is the one you need to rescue and return to Free Haven in order to complete quest 19. The key to her cell is found in one of the chests in the cannibal's bedrooms. (I forget which one, you should clean them all out anyway.)
Temple of the Sun
The very first room of this Temple is the public altar itself, and is fiercely guarded by hordes of monks. Have protective spells ready in advance. Once you have cleaned them out, you've basically finished the tepmle. Head to the door in the northeast of the altar.
This short passage leads to a monk's quarters, and there is one more Master Monk waiting for you here. (He shouldn't be a problem if you got through the opening area.) In his cabinet is the Sacred Chalice that you need to complete quest 32.
The passage behind the door to the southwest of the altar leads to a treasure room guarded by a Minotaur King.
Temple of the Fist
From the main entrance, head down the left ramp and explore the two storage rooms. In the second room, if you pull on the torch, it opens a secret panel in the wall that reveals a switch. Flip this switch to open a locked door that is just down the right ramp from the starting area.
Return to the entrance and head down that right ramp and through the door. In the room you will find a letter from the temple acknowledging that they have found the a crystal and to stand by for a few weeks while they are on their way. Continue up the ramp.
At the top of the ramp, guarded by monks, is the evil crystal. After you have defeated the monks, click on the crystal to destroy it. This completes quest 15.
Hall of the Fire Lord
Right when you first enter, on the left side of the room, there is a molten face embedded into the wall. He is the Lord of Fire, and he will give you quest 47. Make sure you get as many pieces of amber as you can. Every one of your characters must have a piece of amber in order to use the minion teleporters for free. Also, you'll be doing a lot of falling in this dungeon, so use Featherfall.
Then go directly ahead and jump down the hole. Then jump off the center platform into one of the side chutes. Start with the southwest chute. Follow the tunnel down and into a room with two chests. After you're done looting, return to the previous room and jump down the hole in the room.
You'll be in a room now with lots of holes down and four doors. Explore the passages behind all of the doors. The second (from the left) leads to a hole -- skip that one. The rightmost door's corridor also leads (eventually) to a hole. Jump down that one. Continue exploring, jumping down pits and opening doors as appropriate. There are several stone faces on the walls that you can use to teleport back to the surface if you need to. The corridor leads back to the large room with the four doors that you just left.
Now jump down the hole behind the second-from-the-left door. You'll discover that it leads to a room you've already visited. Return to the large pit room.
Jump down the pit by stone face on east wall (both pits lead the same place), and then jump down the next ledge. Odds are, you will miss the small ledges that are by the doors on the next level down. If so, you will be rewarded by finding piles of gold on the ground, as well as the Fallen Defender. This is the creature that the Fire Lord has complained is warding the doors. On his corpse is a chest key. If you follow the corridor here you will return to the large pit room. Repeat until you do end up on the ledges by the doors.
If you walk to the end of the room on the left side, you will be teleported to a room filled with goblins. Kill them, and turn around from where you started and head up the ramp. This is the ramp you arrive in if you went down the northeast eighth opening from the starting room area. Return back down the ramp and go all of the way down. Unfortuantely, this leads to a dead end. Use one of the stone faces to return to the start, jump back down, and return to the large pit room.
Go to the end of the room on the right side now. This is the room you can also get to by going down the northwest eighth from the starting room. Follow the ramp down and you'll find a door that, when you try to open it, says "all wards must be destroyed". Move to the leftmost alcove and open the hidden door in it. This corridor leads to the place where you would go if you went into the eastern eighth from the starting room. Return back to the alcove, head back upstairs and jump in the pit. Look, you're back in the large pit room again.
From here, you should be right next to another pit (its in the northwest corner). Jump in that one. Follow the steep ramp up, and you'll find yourself back in the room you just left (the eastern-eighth room). Since you have used up all of the exits from the large pit room, return to the start and go to the room with eight pits down. If you'll notice that the in addition to the eight chutes immediately around the central piller, there is also a section missing in the corner of the floor in the southwest. Jump into that area. Unfortunately, it merely leads to a room you've already visited. Return to the start.
At this point, you've been to the areas that the northwest, northeast, west, and southwest eighths lead to. So head to the east eighth and jump down. It leads back to a door in a room that you've already been to. Return and jump down the north eighth. At the end of this corridor, you'll find a Crystal Skull in a chest. This is important. The skull allows you to unward doors. Return to the start. In order to open this chest, you need the chest key you got from the Fallen Defender earlier.
From the start, take the southeast eighth. Take the corridor all of the way down to another room that looks very similar to others you've seen. The westernmost niche contains a door in the back. Following this all of the way up, you'll discover that it leads to the southern eighth from the starting room. In the first room back down, there is a pit in the corner of the room. Jump down it. It leads back to a niche in a room you've already been to. Return to the top again.
You've been everywhere, but you have to back and open some doors now that you have the skull. Head down the northeast section from the start and open the middle niche door. Then return to the top and head to the northwest section. A door that was sealed before will now be open. Jump down the pit that is revealed behind that door.
It just leads back to a place you've been. However, you can now return to the start and talk to the Lord of Fire. He will thank you for completing the quest.
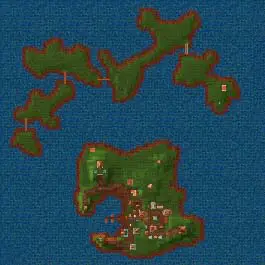
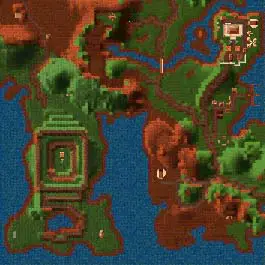
Free Haven
This overland area resets every 24 months.
Travel
- By foot north: 5 days to the Frozen Highlands
- By foot west: 5 days to Blackshire
- By foot south: 5 days to the Mire of the Damned
- By foot east: 5 days to Bootleg Bay
- By boat: 4 days, 300gp to the Misty Islands (Monday, Thursday)
- By boat: 3 days, 300gp to Silver Cove (Tuesday, Thursday)
- By boat: 5 days, 300gp to Castle Ironfist (Wednesday)
- By coach (north station): 4 days, 100gp to Silver Cove (Monday, Thursday)
- By coach (north station): 4 days, 100gp to Castle Ironfist (Tuesday, Friday)
- By coach (north station): 5 days, 100gp to Darkmoor (Wednesday, Saturday)
- By coach (south station): 3 days, 150gp to Blackshire (Monday, Thursday)
- By coach (south station): 3 days, 150gp to Kriegspire (Tuesday, Friday)
- By coach (south station): 3 days, 150gp to White Cap (Wednesday, Saturday)
Monsters
Locations
- Inn
- Night: 90gp; Food: 30 for 270gp
- Weapon Store
- Buy: 2.5; Sell: 4.5
- Armor Store
- Buy: 3.0; Sell: 5.0
- Coach Travel (South Station)
- Peggy Woods
- Sells membership to the Body Guild for 50gp.
- Wilma Rothwing
- Sells membership to the Spirit Guild for 50gp.
- Tim O'Hoolihan
- Teaches Expert in Body Magic for 1000gp.
- Teaches Expert in Spirit Magic for 1000gp.
- Adept Guild of Water
- Teaches Learning and Water Magic skills for 1500gp each.
- Sells spellbooks for all Water Magic spells.
- Mynasia
- Teaches Expert in Mind Magic for 1000gp.
- Elsie Freedman
- Sells membership to the Mind Guild for 50gp.
- Adept Guild of Fire
- Teaches Learning and Fire Magic skills for 1500gp each.
- Sells spellbooks for all Fire Magic spells.
- Adept Guild of Air
- Teaches Learning and Air Magic skills for 1500gp each.
- Sells spellbooks for all Air Magic spells.
- Geoff Southy
- Buys four leaf clovers for 25gp each.
- Dillian Robinson
- Buys amber for 500gp each.
- Adept Guild of Body
- Teaches Meditation and Body Magic skills for 1500gp each.
- Sells spellbooks for all Body Magic spells.
- Sewer entrance
- Adept Guild of Earth
- Teaches Learning and Earth Magic skills for 1500gp each.
- Sells spellbooks for all Earth Magic spells.
- Alchemist Store
- Buy: 4.0; Sell: 6.0
- Logan Dasher
- Teaches Expert in Dagger for 2000gp.
- Michael Ogilvy
- Teaches Expert in Sword for 2000gp.
- Lawrence Aleman
- Buys temple gongs for 2000gp each.
- Livia Farrel
- Teaches Expert in Merchant for 2000gp.
- Training Hall
- Maximum Level: 60
- Sylvester Moor
- Teaches Expert in Diplomacy for 500gp.
- Zoltan Phelps
- Get quest 18.
- Corey Rozburg
- Sells membership to the Fire Guild for 50gp.
- Jessica Carson
- Sells membership to the Air Guild for 50gp.
- Dominique Juarez
- Sells membership to the Water Guild for 50gp.
- Ike Pargrew
- Sells membership to the Earth Guild for 50gp.
- Bonnie Rotterdam
- Buys harpy feathers for 10gp each.
- Sewer entrance
- Hans Gifford
- Teaches Mastery in Identifying Items to those with rank 7 and Intelligence 30 for 2500gp.
- Inn
- Night: 40gp; Food: 20 for 80gp.
- Sy Roth
- Buys teeth for 500gp each.
- Docks
- Nick Fenster
- Buys kegs of wine for 300gp each.
- Bank
- Winston Historian
- Sells membership to the Duelist's Edge for 50gp.
- Carlo Tormini
- Get quest 19.
- General store
- Buy: 2.0; Sell: 8.0
- Ivan Magyar
- Teaches Expert in Disarm Traps for 500gp.
- Sells membership to the Smuggler's Guild for 50gp.
- Fountain that gives +2 might permanently.
- Duelist's Edge
- Teaches the Bow, Chain, Shield, Bodybuilding, and Mace skills for 625gp each.
- Weapon Store
- Buy: 2.5; Sell: 4.5
- Armor Store
- Buy: 2.0; Sell: 4.0
- Fountain that restores 25 hit points.
- Takao
- Teaches Expert in Shield for 2000gp.
- Adept Guild of the Mind
- Teaches Meditation and Mind Magic skills for 1500gp each.
- Sells spellbooks for all Mind Magic spells.
- Woodrow Albright
- Teaches Expert in Plate Armor for 1000gp.
- Coach Travel (North Station)
- Alchemist Store
- Buy: 3.0; Sell: 5.0
- Dragon Tower
- Adept Guild of Spirit
- Teaches Meditation and Spirit Magic skills for 1500gp each.
- Sells spellbooks for all Spirit Magic spells.
- Li Tizare
- Teaches Expert in Earth Magic for 1000gp.
- Teaches Expert in Air Magic for 1000gp.
- Jack Van Imp
- Teaches Expert in Fire Magic for 1000gp.
- Hitomi Mirumoto
- Teaches Expert in Water Magic for 1000gp.
- Gabriel Cartman
- Get quest 20.
- Temple
- Shrine of Accuracy
- High Council
- Bring the letter to Slicker Silvertongue to complete quest 42.
- Jason Traveller
- Teaches Mastery in Bodybuilding to those with rank 7 and Endurance 30 for 2500gp.
- Davis Carp
- Buys lodestones for 5gp each.
- Lon Miller
- Buys bones for 1000gp each.
- Fountain triggers ambush
- Renee Blackburn
- Buys golden pyramids for 1000gp each.
- Inn
- Night: 40gp; Food: 20 for 80gp.
- Chadwick Blackpool
- Talk to him to get nomination to complete quest 17.
- Temple of the Moon
- Tomb of Ethric the Mad
- Obelisk #8
- Temple Baa
- Dragoons' Keep
- Osric Temper
Forest Suthers
- On the roof of the castle, reachable only by flying.
- Teaches Mastery in Plate Armor to Heroes.
Temple of the Moon
- Cobra, King Cobra, and Queen Cobra
- Druid, Great Gruid, and Grand Druid
- Medusa, Medusa Enchantress, and Gorgon
The first room of this temple has a large double door at the top of the stairs with this plaque above it: "Life above all, Accuracy before Might, Endurance before Speed, and finally Luck." What this means isn't immediately obvious, but becomes obvious as you explore further. Head out the west door from the main temple.
When you go down the hallway, through the first door on the right, you will find yourself in a circle of stones with an Altar of Luck in the middle and an option to pray at the altar. Remembering the plaque, it was probably refering to the order that you need to pray at the altars. Since Luck is last, pass this altar by.
The second door leads to the Altar of Speed. The third door leads to the Altar of Accuracy.
Similarly, crossing over to the hallway on the other side of the main rooms, the three altars over there (from north to south) are the Altars of Endurance, Life, and Might.
The correct order to pray is just to follow the order the plaque states: Life must be prayed at first, followed by Accuracy, Might, Endurance, Speed, and Luck. Doing this will unlock the main door with the plaque. Procede down that corridor.
The final room contains the actual Altar of the Moon. This is where you need to pray, during a full moon, at midnight, to complete quest 31.
Tomb of Ethric the Mad
- Skeleton, Skeleton Knight, and Skeleton Lord
- Ghost, Evil Spirit, and Spectre
- Lich, Greater Lich, and Power Lich
In the first room, there are three elevators that raise you up to doors high against the wall. Merely walking onto the elevator will raise or lower it to the ground. Head to the west elevator first, as the other two doors will be locked.
All of the rooms in this area are very uninteresting. The northernmost room has a button that opens the east door in the main area. Going through that door finds another uninteresting area with a button opening the center door located in the easternmost room.
The center door leads to a room where fireballs shoot across the room constantly. There are four doors that lead out of here. The western door on the north wall, as well as the doors on the east and west walls lead to uninteresting burial rooms. The eastern door on the north wall leads to a corridor which forks to the east and west. In the first room on the east is a button that raises a gate which blocks the corridor. Past the gate is a room filled with Liches and treasure filled sarcophagi. One of the Liches in room has Ethric's Skull. This is the skull that you need to complete quest 20. The button also opens a gate that leads to a similar coffin room down the western fork.
Dragoons' Keep
Getting right down to business, open the right door. This keads to the Keep's main hall, which is filled with fighters defending the keep. After killing them all, head through the north door, up the stairs, around the corner and down the hall. As you go down the hall, stop by in all of the guard's rooms along the side and kill them off.
In the south room, there is a treasure room door on one side. Inside that treasure room is a lever. This lever is one of the two levers needed to open the door at the end of a hallway on the other side of the Keep. Flip it. Now return to the main hall.
From here, head up the corridor along the west side. The first door on the left has a passage that leads down to a cellar that contains another lever. This is the second lever that needs to be flipped to open the door at the end of the hall. Flip it, and finish off the rest of the rooms on this hall. You'll notice that the last door on the right cannot be opened.
Continue due north, and go down the stairs. Around the corner, there is a gate that can be opened by pushing the switch. A switch on the wall will open up all three doors down here. Inside each room is a lever. When all three are flipped, the door that you couldn't open before is now open. Entering the northern cell will cause the door to trap you inside. After a few minutes, a wave of rats will appear in the room; followed by another wave. A few minutes later, a group of fighters will come to open the door so you can get out.
Head back upstairs and to the newly opened door. This leads to the treasure room. Inside are several sacks of gold, and a chest that contains Mordred. This is the artifact that you have to recover for quest 18.
Free Haven Sewers
- Common Rat, Large Rat, Giant Rat
- Acolyte of Baa, Cleric of Baa, and Priest of Baa
- Catpurse, Bounty Hunter, and Assassin
- Thief, Burglar, and Rogue
Before you enter the Sewers, be sure you have completed the Shadow Guild in the Frozen Highlands.
There is very little in the Sewers except the ability to wander around, kill things, and collect treasure.
If you enter the sewers through the entrance at Sergio Carrington's house, and go down and around the corner, there will be a sewer grate on the wall directly ahead. Searching that will find you several piles of gold pieces and a sewer key. This key will unlock the door at the north end of the sewers.
At the very far west of the Sewers, there is a bedroom with several chests in it. If you are on quest 27 and you know that he has fled from the Shadow Guild, then you can find him here by clicking on the bed. You will capture him automatically. Now you can complete quest 27 by returning to Castle Stone.
Oracle of Enroth
- No monsters are in this location.
This place isn't much like a dungeon, but since it is presented in the game that way, it gets its own section. Mapping it out is fairly straightforward. The first thing you need to do is turn to the control panel at the entrance and click on it. This will turn the power on in this area. As you walk in, you will arrive in a very futuristic control room. There are passages going off in each of the four directions that lead to module altars, and there is a control panel in the center of the room. If you use the panel, a stone block slides back revealing a passageway down. In this lower room, the big, black starfield screen is the oracle.
When you first meet the Oracle, it requires that you interface the four memory crystals into the four altars. This gives you quest 43, quest 44, quest 45, and quest 46.
As you find the crystals, return them to the altars. It does not matter which crystal goes in which altar. Then visit the Oracle himself again.
The Oracle was apparently damaged by Archibald's mettling, so he can't help you directly. He mentions that the world has been invaded by Kreegan and that you will need very special weapons and armor to kill their elite guards. He has these weapons, but will only hand them over to you with a Control Cube. To this end, he gives you quest 48.
When you return with the Control Cube, you will be given access to the Control Center. (To get into the control center, click on the Oracle's black screen, and then choose Control Center, rather than Oracle when prompted for whom to talk to.) He warns that the guardians in the Control Center are not under his control. He also says that you need to find the Kreegan ship, destroy the reactor, and find some spell that would contain the explosion so that it doesn't blow up the planet. Archibald is the only one who knows such a spell. The Oracle gives you quest 49.
Control Center
From the entrance area, look on the southeast wall. There is a computer panel there that gives you the following welcome message: "Hello and welcome to this self-guided tour of the Varn Planetary Control Facility. We gladly welcome all visitors. As you arrive at each key area, be sure to check any of our display screens for more information. Enjoy your tour!".
On that note, head south and through the first door on the east. The computer terminal in this room gives you the following message: "Blaster weapons provide an effective, accurate ranged attack. To operate the blaster, hold the grip comfortably in your hand, point the barrel at your target, and gently squeeze the trigger. Should the weapon misfire, do not look into the barrel -- give the weapon to an instructor and let them fix the problem. Never point a blaster at something you do not want to vaporize.". Reading this message will give everyone in the party the "Blaster" skill.
Across the hall, there is a pair of connected rooms, each of which has a storage container against the far wall. The north chest contains a Blaster. (The south chest is empty.)
A word about Blasters: While they may seem inferior to other weapons at first, they have three advantages that make them very superior: 1) They fire very quickly. At one estimate, I could get off three shots with a Blaster Rifle for every shot from a Stellar Bow. When compared to swords or even daggers, this difference multiplies dramatically. 2) The damage that Blasters do is energy damage. There is no way to resist energy damage so you'll be dealing full damage against any target. 3) You can have a shield and a stat enhancing bow/crossbow equipped at the same time. (Note: Don't have a second weapon equipped -- the speed of an attack is determined by the slower weapon, and that weapon will never get used as long as you have the Blaster equipped.)
Continuing down the hallway to the south, the next room has this description: "The room to your left is the main meeting hall. Visiting dignitaries from around the world have feated at banquets held in their honor. In fact, it is said that at his 21st birthday party, King Sheridan nearly choked to death on a piece of mogred, but was saved by a serving girl who he later married and made his Queen. Ahh, l'amour.".
From this large meeting hall, head south. Straight ahead is a door. To the right is a tunnel that connects this room and the first room on the west back at the entrance. The tunnel isn't very interesting, so head through the door and into the room. Go through the room and then take the corridor to the west. It goes through a room that has an empty chest in it into a back room with the following tour message: "Chief Engineer Wilson's Personal Log. I have locked myself in Storage Room #6 but currently have no means of escape. The drone-bots have gone mad and have started killing everyone in sight. I was able to access the main control terminal on Level Four despite warnings of a hazardous leak, and I sent a distress signal, but since we have not had contact with any of the colonies for several weeks, I do not believe that a rescue is possible. I have also managed to seal this facility so that the drones cannot escape. It is my hope that the colonists will be able to mount some sort of defense by the time my encryption codes are broken. Tell Emma I love her. Wilson out.". The chests in this room contain a blaster rifle and two blasters.
Head east down the corridor now and enter each of the next three storage rooms. The first room has a blaster in the chest. The second room merely has lots of spark spells going in it. It isn't safe to enter and you don't need to enter it. The third room has more robot units in it. Continue to the end of the hallway and then turn north. Follow the corridor around to the next intersection and explore the room to the south.
The south area leads back to a balcony that overlooks the main meeting hall. Heading north will lead to a similar overlook on the north side of the room. Return back down the corridor you followed to get here and continue south past the storerooms.
Just before you get to a four way intercetion, there is a door on the east wall. Open that door and enter the room. The chests here have lots of good stuff: 3 blasters, a blaster rifle, a Control Cube, and one of each of the Memory Crystals (just in case you lose the first set). Return to the hallway and round the corner. To the east is a computer panel that reads: "We apologize for any inconvenience, but we ask that all personnel evacuate the facility at this time. Please do not be alarmed. Thank you." Probably because all of the 'bots are out to get you. Continue east down the corridor.
Down at the end of the hall, there is another console that says: "Before entering the Planetary Reaction Chamber, please request a pair of Safety Goggles from one of our Drones. During peak hours of operation, this facility can generate enough power to produce a light bright enough to be seen from space. Please avoid looking directly into the light." Anyway, you don't need to worry about that; just continue north and go into a large chamber filled with lots of robot units.
Since you'll probably have to leave and return several times to clear this room, you can return to this room more quickly by going due east from the main meeting hall and opening the door. When the room has been cleared, return to the main meeting hall and return to the south exit. Instead of running right through the room like you did before, explore this room and head eastward.
The passage you're in turns north, opens up into the upper part of the Planetary Reaction Chamber, and then heads back down looping around to connect with the main meeting hall again from the north. At the north side of the meeting hall, there is a doorway on the north wall. Open that door and go north through that passage.
Along the north side of the passage, skip past the first door (its partially open, but jammed) and go through the second north door. The two cells behind the first two doors are connected and each contain a Patrol Unit. Then turn your attention to the south door. It merely contains more Unit robots. Head to the end of the corridor and turn south, then go through the door. There is a door on the opposite side of the room that opens when you push the switch in the northwest corner of the room. In the second room is a chest that contains a Blaster Rifle. Then return to the hallway and continue south.
After another room of Units on the east side of the passage, the passage connects with the balcony overlooking the main meeting hall on the north side. Return back down the corridor and continue north all of the way. The passage will loop to connect with the lower half of the Planetary Reaction chamber. The computer terminal in the hallway outside the Reaction Chamber here reads: "Alert, environmental controls are offline on Level Four, Sections 18 through 96. Access restricted to drones until further notice.". From the Reaction Chamber, take the west exit.
Go through this room and take the exit in the north part of the wall. It leads to a room that has a chest which contains three copies of each of the four memory crystals. Return to the south and take the door in the southwest corner (leading east). At the bottom of the ramp is a room with a chest. The chest contains a dozen Control Cubes and a scroll which proclames you Super Goobers!. (It even shows up as an award.)
Return to the main meeting hall. Take either the south or north exits and immediately turn east. Take the ramp up to the upper half of the Planetary Reaction chamber and cross the chamber, heading for the south exit. You will be in an east-west corridor: to the east is just a dead end, so head west and enter the first room on the north (at the corner where the corridor turns northward. There are some more Terminators here in an alcove that overlooks the Reaction chamber. A computer console here reads: "Warning, intruder alert, Level Four, Section. All drones proceed to Level Four to intercept intruders. Reactor is offline. Encryption integrity at 2.064%." I wonder if it means you.
Exit the corridor and head northwards. The next room on the left has a Blaster in a chest. In the rooms around the northeast corner, there is a Blaster Rifle in the chest. The computer terminal in this room reads: "This is the main equipment storage and repair facility. By now, you may have noticed several floating Drone-bots. They are responsible both for maintaining the key systems of this facility as well as sanitation. If a unit becomes damaged, it is brought here to be repaired."
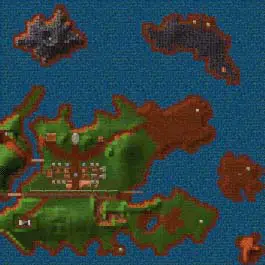
Mire of the Damned
This overland area resets every 6 months.
Travel
- By foot north: 5 days to Free Haven
- By foot east: 5 days to Castle Ironfist
- By foot west: 5 days to Dragonsands
- By coach: 5 days, 250gp to Free Haven (Monday, Friday)
Monsters
- Skeleton, Skeleton Knight, and Skeleton Lord
- Ghost, Evil Spirit, and Spectre
- Harpy, Harpy Hag, and Harpy Witch
Locations
- Circus (fall)
- The circus is only here from August through November. During other seasons, it is either at Bootleg Bay (December-March), or Blackshire (April-July).
- See the entry at Bootleg Bay.
- Inn
- Night: 10gp; Food: 10 for 10gp.
- Snergle's Iron Mines
- Fountain that gives +2 Endurance permanently.
- Temple Baa
- Obelisk #9
- Shrine of Speed
- Coach Travel
- Weapon Store
- Buy: 2.0; Sell: 4.0
- David Feather
- Teaches Mastery in Chain Armor to Crusaders with rank 10.
- Terry Ros
- Get quest 24.
- Macro Caligula
- Teaches Mastery in Perception to those with Rank 7 and Luck 30 for 2500gp.
- Jack Crow
- Teaches Expert in Mace for 2000gp.
- Casey Ludwig
- Teaches Expert in Merchant for 2000gp.
- Alchemist Store
- Buy: 2.0; Sell: 4.0
- Armor Store
- Buy: 2.0; Sell: 4.0
- Burton Rutherford
- Teaches Mastery in Spear to Cavaleers with Rank 8 for 5000gp.
- Inn
- Night: 20gp; Food: 14 for 28gp.
- Avinril Smythers
- Get quest 25.
- Teaches Mastery in the Axe.
- Connie Lettering
- Teaches Expert in Axe for 2000gp.
- Invisible Bridge
- Castle Darkmoor
- Dragon's Lair
- Pedestal
- Used in quest 38.
Snergle's Iron Mines
- Dwarf, Dwarf Warrior, and Dwarf Lord
- Ooze, Acidic Ooze, and Corrosive Ooze
- Devil Spawn, Devil Worker, and Devil Warrior
The entrance area has two pools that restore hit points and magic points. You'll need them, as the slimes and devils you'll find in this dungeon will probably try your patience.
Head North from the entrance area and enter a throne room. Take the exit to the east and follow it up and around. The first door on the right requires a high intellect to open and yields a library of spell books. Continue all of the way to the back. There are several chests and cabinets here full of stuff. The cabinet in the last room contains a Cell key. You'll need this.
Return to the entrance area and head south. To the south of here are several rooms for dwarves. Not much is down there, but this is a good time to clear them out. Then head north through the kitchen and down the corridor. At the bottom is another large vault of treasure.
Back at the top, continue east down the corridor into a room that had some beds in it. Through a door in the east wall is another area with several chests of treasure. By now, you should have the Cell key. Now, head down the north corridor.
When it straightens out, in the cell to the south, whose door requires the Cell key to open, is trapped a dwarf. In exchange for freeing him, he gives you the Key to Snergle's Chambers, which is needed to kill Snergle in Snergle's Caverns.
Continue down the hall and be prepared for the large quantities of slime through the far door. The far door has the last stash of treasure in the place.
Dragon's Lair
- Unique: Longfang Witherhide
Very simple. One room, one dragon, nine bones. Try not to make it thirteen. The dragon that lives here is called Longfang Witherhide and if you kill him, you will find his claw. If you return with this claw to Castle Ironfist, then you will have completed quest 23.
Castle Darkmoor
- Ogre, Ogre Raider, and Ogre Chieftan
- Lich, Master Lich, and Power Lich
- Flying Eye, Terrible Eye, and Maddening Eye
- Unique: Lich King
I hate eyes.
That being said, here's how you get through this castle. Either by a bug, or by design, the various Eyes can make magical attacks, such as Dispel Magic, through walls and ceilings. This means that if you "wake up" an eye above or below you, you will find all of your spells being Dispeled without being able to fight back. As such, you should probably start by just running around the castle killing things and worry about collecting loot and solving puzzles on a second pass.
That's what I did for a lot of this, which is why the descriptions of the rooms for this location won't be as complete as they are for other areas.
From the entrance, head down the corridor and then over the stairs, cleaing out the guardroom to the west. Then head down the corridor south, defeating the undead in the chamber on the west and taking the first passage to the east, directly across from that chamber. Empty out this room and collect treasure. Take the branch to the north and clean out that chamber; then return and head north. This leads to a room that (among other things) has some cauldrons of resistance raising liquid.
From here, head up the stairs behind you and you will arrive in a very large room filled with lots of eyes and ogres. The main point of coming up here now is to kill the eyes, as they have been (or will soon be) eliminating your magic through the floor.
When you have finished with the eyes (probably after a few trips), don't head up this way. Instead, from the corridor that goes south from the entrance, take it all of the way south, then turn west. At the intersection (right after the floor starts sloping up sharply), turn right (north), and then right again (east), and then right again (south). This opens up into another very large chamber with lots and lots of eyes. These are the other set of eyes that have been terrorizing your magic spells.
Now, I returned back to the northern large room, finished out the rest of the Ogres in the room and then headed for the exit near the back of the room. Open the door in the back of the room and head down that passage to the west.
Whe the corridor lets back out into a hallway, turn south and clear out the few liches hiding in the corner down there. Then return and go north up the ramp. This passage will wind around the large room you just came from. When you turn back towards the south, take the side passage to the east. Take the passage north and then turn south again at the intersection and clear out the liches hiding there. Then go back to the intersection and head north. It will lead back to the large room, although there is often an eye or two hiding in that corridor. Return back the way you came to the balcony over the large room and take the south exit (sloping up steeply).
Head west at the top of the slope and clear out that room of liches. Procede through the room, turn south and then west. Charge the band of Ogres blocking your way and procede down the ramp. You will now be at the top of the slope where you came to clear out the second room of eyes (described above). Turn north in the corridor as if you're going to the room of eyes, but keep going north. There will be a group of Liches there guarding a sign that says "The crimson embers will lead the way". A small niche will open up when you read the sign revealing a lever. Pull the lever. (If you return to the large north room, you'll notice that the large blue cube in the middle of the room has now turned red.)
Actually, return to the large north room and head through the south exit. Take the corridor south in the southeast corner of the room and clear out the cubbyhole of rooms there. Now, return to the cube. It should be red now because of the lever you flipped. Cast Jump and jump up and click the cube. This will open the wall that leads north out of this room. Head through there, and kill off the eyes and other beasts guarding the large open area to the north and west. (For those keeping score at home, there are 100 eyes around the perimeter of the building; if my corpse count is correct.)
Now head in the front door of the structure and go up the south stairs. This puts you down the hall (instead of in the face of) a group of eyes. Both stairs lead up to a large pillared room filled with more eyes. Power Liches included at no extra charge.
When you're finished with the eyes and liches, head across the room and go up the ramps on the far side of the room. Start with the north ramp. The ramp leads to a path running along the north side of the pillared room and leads to some other small rooms near the entrance on the north side. If you head down the steep incline down and to the east, you'll pass by two rooms with bone cages in them and arrive at a passage guarded by some more orgres.
Go through this room and then continue east. To the north is the largest potion bottle collection you've ever seen. Now return to the room on the west and head down the stairs. There is a wierd room here with several earthen squares and a depression in the middle. Stepping on the earth squares seems to summon Liches into the room. Anyway, cross the room, head up the stairs, and then through the east passage.
Continue east, bypassing the two rooms to the north and continue until the corridor turns to the north. At the end of that corridor are eight black potions of Rejuvenation. There is a room filled with ogres to the east; enter that room and clear it out. Then return to the two rooms you bypassed, go through them, and take the corridor on the other side to the west. As you exit that corridor, you will see a very narrow ramp going up. Take that ramp and there will be another "Glowing embers will lead the way" sign that, when read, will reveal a lever. This lever will change the cube in the pillar room to red.
Backtrack to the pair of rooms and just east of that is a steep walkway leading up. This will take you to an area that is a mirror of the north side of the pillared rooms. Explore your way through here and you should find yourself on the south walkway on the west side of the pillar room.
Return to the pillar room and click on the now crimson cube. This will open the way to the next terrible room. Now go to the room that I said summons liches and procede west from there. This is another large room filled with lots of eyes and liches. Included is a Lich King. Have fun.
When they're all dead, collect the bodies, drink the resistance cauldrons, and look at the sign underneath the cube. When read, it says "the fires of the dead shall burn forever." In the alcove to the west is Memory Crystal Delta, required to complete quest 45.
Once the cube is red, click on it and you will be teleported to a small bedroom. In this room is a chest and several piles of gold. There are also three sarcophaguses that you can pillage, but doing so will hurt your reputation. On a podium is the Book of Liches: click on it will destroy it which is what you need to do to complete quest 24.
Frozen Highlands
This overland area resets every 24 months.
Travel
- By foot east: 5 days to Silver Cove
- By foot south: 5 days to Free Haven
- By foot west: 5 days to Kriegspire
- By coach: 3 days and 200gp to Free Haven (Monday, Thursday).
Monsters
- Harpy, Harpy Hag, and Harpy Witch
- Magyar, Magyar Soldier, and Magyar Matron
- Archer, Master Archer, and Fire Archer
Locations
- Shadow Guild
- Arlen Sailor
- Teaches Mastery in Leather Armor to those with Rank 10 for 3000gp.
- Teaches Mastery in Dagger to those with Rank 8 and Speed 40 for 5000gp.
- Gabe Lester
- Teaches Mastery in Disarming Traps to those with Rank 7 and Accuracy 30 for 2500gp.
- Teaches Dagger, Merchant, Identify Item, Perception, and Disarm Traps skills for 250gp each.
- Inn
- Night: 20gp; Food: 14 for 28gp.
- Fountain that triggers an ambush by Fire Archers.
- Marcellus Lutvig
- Sells membership to Protection Services for 50gp.
- Ryan Treacle
- Teaches Mastery in Repair Items to those with Rank 7 and Accuracy 30 for 2500gp.
- Weapon Store
- Buy: 2.5; Sell: 4.5
- Armor Store
- Buy: 2.5; Sell: 4.5
- Fountain that gives +10 to level temporarily.
- Obelisk #7
- Jacques Kohl
- Teaches Mastery in Diplomacy to those with Rank 7 and Fame 200 for 2500gp.
- Dickson Parks
- Teaches Expert in Mace for 2000gp.
- Teaches Expert in Bow for 2000gp.
- Fountain that gives +30 to might temporarily.
- Shrine of Endurance
- Inn
- Night: 90gp; Food: 30 for 270gp.
- Bank
- General Store
- Buy: 2.0; Sell: 8.0
- Armor Store
- Buy: 3.0; Sell: 5.0
- Blade's End
- Teaches the Staff, Spear, Sword, Axe, and Repair Item skills for 750gp each.
- Fountain that gives +5 to might permanently (once only) and kills the drinker.
- Adept Guild of the Elements
- Teaches the Earth Magic, Air Magic, Water Magic, and Fire Magic skills for 1250gp each.
- Sells spellbooks for Earth Magic spells (1-8), Air Magic spells (1-8), Water Magic spells (1-8), and Fire Magic spells (1-8).
- Initiate Guild of Dark
- Teaches the Dark Magic skill for 1500gp.
- Sells spellbooks for Dark Magic spells (1-6).
- Fountain that gives +5 to endurance permanently (once only) and kills the drinker.
- Fredrick Piles
- Sells membership to Blade's End for 25gp.
- Weapon Store
- Buy: 3.0; Sell: 5.0
- Alchemist Store
- Buy: 2.0; Sell: 4.0
- Coach Service
- Fountain that triggers an ambush.
- Dragon Tower
- Marten Holovin
- Teaches Expert in Dark Magic for 2000gp.
- Training Hall
- Maximum Level: 50
- Rachel Herzl
- Sells membership to the Dark Guild for 1000gp.
- Warren Holms
- Sells membership to the Elemental Guild for 100gp.
- Temple
- Icewind Keep
- Fountain that grants +20 Speed and Accuracy for a day.
- Fountain that grants +20 AC for a day.
Icewind Keep
Start by charging right through the front door. You'll quickly get to a gate, which will not open for anything. Your automap should also show a large number of creatures on the other side of the gate, so you probably don't want to go through there anyway. Instead, take the corridor west.
In the first room, which is a barracks, there is a passage to a small treasure room. In that room, there is a note telling you that it is possible to leave from the Throne room quickly. That piece of information should be useful.
In the room at the end of this corridor, there are two doors. Behind the left door is a switch that opens the gate at the entrance. Flip the switch and return to the gate and defeat the army waiting behind it.
Now that all of the guards are dead, you'll notice that you have another problem. The next gate is closed. Return back to the corridor and turn east this time.
The first barracks room has another passage leading to a room of treasure. And, again, the last room has two doors in it. The one on the right has the lever behind it which opens up the second gate. Behind the left door is some gold.
Returning to that gate, proceed down that passageway to the throne room (and a second army). On the smaller throne, there is a switch in the handle which opens up a secret panel on the east wall. Procede down this passage to a treasure room containing four chests. Inside one of these chests is the set of Dragon Tower keys. Return these keys to Lord Stromgald in order to solve quest 34.
Shadow Guild
From the entrance, head west and clean out the corridor of all of the thieves and assassins lurking there. Then head through the bedroom and open the door. You open doors in this place by just walking into them; no clicking on them. (No, I don't know why it is different in this dungeon.
Follow the coridors here around clockwise until you loop back to the starting area. Along the way, you should have found a scroll that tells you that the Prince is hiding out in the Sewers under Free Haven. File that away and continue exploring.
From the bedroom again, turn the corner south and head downstairs. Down here are a few items in a bag. As you head back up the ramp, you'll notice that the floor has fallen away and leads to a spiked pit. In order to get buy it, flip the switch on the wall just on the brink of the pit, return to the room with the sacks, and follow the newly opened corridor back to the main area.
To the far north, there is a large room that is nothing more than a trap. There is nothing of use here, except an easy way to get killed by all of the magical attacks that fill the room.
Silver Cove
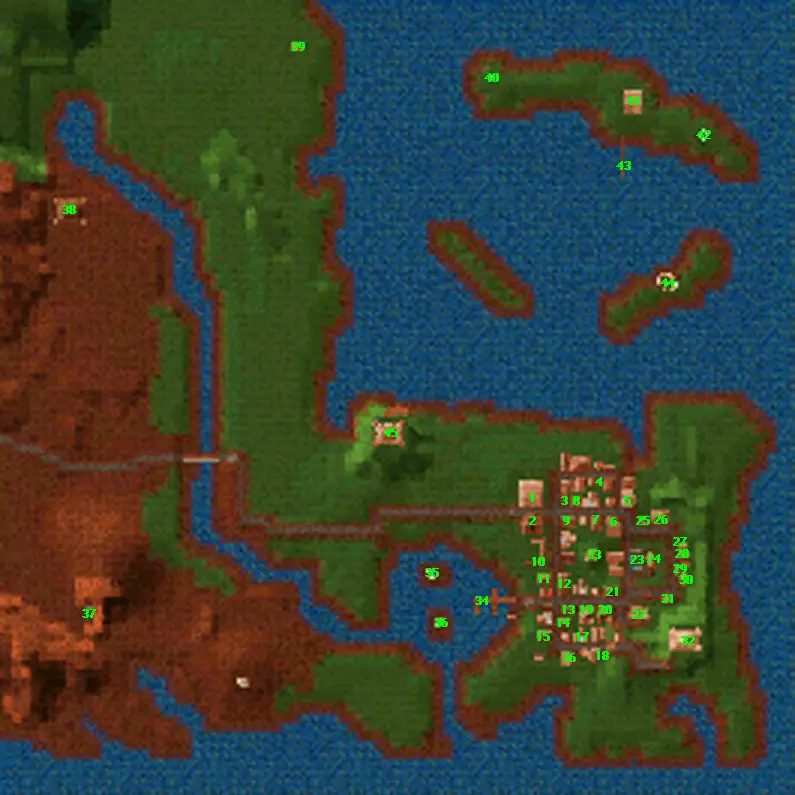
This overland area resets every 24 months.
Travel
- By foot west: 5 days to the Frozen Highlands.
- By boat (from city): 3 days, 300gp to the Misty Islands (Monday, Thursday, Saturday).
- By boat (from city): 3 days, 300gp to Free Haven (Tuesday, Friday).
- By boat (from city): 1 day, 300gp to Eel Infested Waters, North Island (Wednesday).
- By boat (from island): 2 day, 200gp to Eel Infested Waters, South Island (Thursday).
- By coach: 4 days, 200gp to Free Haven (Monday, Friday).
Monsters
Locations
- Inn
- Night: 40gp; Food: 20 for 80gp.
- Coach Travel
- General Store
- Buy: 2, Sell: 8
- Fountain that gives +20 to Intellect and Personality for a day.
- John Tuck
- Teaches Mastery in Learning to those with Rank 7 and Intellect 30 for 5000gp.
- Berserker's Fury
- Teaches Bow, Chain, Plate, Shield, and Repair Item skills for 625gp each.
- Cyrus Montebleu
- Teaches Expert in Repair Items for 500gp.
- Bank
- Armor Store
- Buy: 4.5, Sell: 2.5
- Training Hall
- Maximum Level: 40
- Sigriv
- Teaches Expert in Spear for 2000gp.
- Weapon Store
- Buy: 4.5, Sell: 2.5
- Alchemist Store
- Buy: 3.5, Sell: 1.5
- Revee Botania
- Teaches Mastery of Earth Magic to those with Rank 12 for 4000gp.
- Lucky Oster
- Sells Membership to Protection Services for 50gp.
- Adept Guild of Self
- Teaches Body Magic, Mind Magic, and Spirit Magic skills for 1250gp each.
- Sells spellbooks for Body Magic spells (1-8), Mind Magic spells (1-8), and Spirit Magic spells (1-8).
- Clyde Dagget
- Teaches Expert in Meditation for 500gp.
- Will Ottoman
- Teaches Mastery in Merchant to those with Rank 7 and Personality 30 for 4000gp.
- Initiate Guild of Earth
- Teaches Learning and Earth Magic skills for 1000gp each.
- Sells spellbooks for Earth Magic spells (1-7).
- Initiate Guild of Light
- Teaches Light Magic skill for 1500gp.
- Sells spellbooks for Light Magic spells (1-6).
- Protection Services
- Teaches Leather, Identify Item, Disarm Traps, Diplomacy, and Perception skills for 300gp each.
- Temple
- Fountain that restores 25 spell points.
- Town Hall
- Horace Rose
- Sells membership to the Berserker's Fury for 50gp.
- Thane Roper
- Teaches Mastery in Mind Magic to those with Rank 12 for 4000gp.
- Teaches Mastery in Body Magic to those with Rank 12 for 4000gp.
- Virginia Standridge
- Sells membership to the Guild of Light for 1000gp.
- Tina Shelton
- Teaches Expert in Light Magic for 2000gp.
- Holly Struthers
- Sells membership to the Guild of Earth for 50gp.
- Isaac Streetman
- Sells membership to the Guild of Self for 100gp.
- Eleanor Vanderbilt
- Get quest 30.
- Loretta Fleise
- Dragon Tower
- Docks
- Fountain that gives +2 to Accuracy permanently.
- Fountain that gives +2 to Speed permanently.
- Monolith
- Warlord's Fortress
- Shrine of Personality
- Obelisk #10
- Inn
- Night: 14gp; Food: 12 for 17gp.
- Teaches Mastery in Staff to those with Rank 8 for 5000gp.
- Fountain that causes Insanity
- Docks
- Circle of Stones
- Silver Helm Stronghold
Monolith
- Druid, Great Druid, and Grand Druid
- Rock Beast, Earth Spirit, and Earth Elemental
- Water Beast, Water Spirit, and Water Elemental
The monolith is a snaking row of corridors that connect open "nature" rooms. A scroll left in the first room tells you to look to the trees and the rocks when seeking your true path. In each of these nature rooms, if you click on the trees or rocks, you will find lots of gold or trigger the opening of a door.
After about a half-dozen rooms, there will be a room flooded with water. The water is very shallow, you don't need Water Walking or anything to get across. The exit to this room opens by clicking on the fountain in the center of the room.
Three rooms later, there will be a room with a door and four pillars. Clicking on any of the pillars will open the door.
Two rooms later is the room with the altar. When you enter this room, the door leading back whence you came closes, trapping you in the room. Clicking on the altar will deface it and give all Clerics and Druids +5 Personality permanently. This will also solve quest 30. Behind the altar is a sacred pool, which will open up a secret door behind the altar that leads back to the entrance.
Warlord's Fortress
In the first stairway down, you'll notice that there aren't any doors, except one at the end of the corridor which doesn't open. To actually get into the rest of the fortress, you either have to use the secret door on the right wall, about 2/3rds of the way down the stairs, or use the secret door on the third stair (the stair shows up as light blue if you have a master level Wizard Eye going). Both of these will pull you into a small maze of passages.
Bear east through the passages, pass two barrack rooms (the left barracks has a nice treasure room hidden through a secret door in the wall), and you'll enter a pair of large, square rooms filled with troops, capped off with a Cuisinart. In the cabinet that is off to the west of the upper room, you will find two keys -- a Warlord's key and a Storage key. Cross the room to the north corner and use the Warlord's Key to open up the door. You will find the Warlord's discharge papers. This is the proof you need to return to Castle Temper that you have indeed slain the Warlord. (I believe that he was the Cuisinart in the room.)
Now, turn back and head up the stairs north of the doubly locked door. Clean out all of the barrack's rooms. At the end of the corridor is a room with lots of cabinets. In one of them you will find a second Storage Key. Now that you have both Storage Keys, you can open the doubly locked storage area back down by the stairs.
Silver Helm Stronghold
- Swordsman, Expert Swordsman, and Master Swordsman
- Fighter, Soldier, and Veteran
- Sorcerer, Magician, and Warlock
Charge through the front door and into the first guard room, clearing out all of the guards defending the entrance. From this room there should be four doors (including the one you came in). Head through the west door. This leads to two rooms of guards.
When you're done with them, return to the start room and head east. This leads to a small church room. When the sorcerer and guards are dead, return to the start room again and head south down the corridor.
In the first room on the left, there are two rooms with a corridor leading east out of the second room. At the end of that corridor is the Ghost of John Silver. If you have completed quest 10 (recuing Melody Silver), then the ghost will open up a secret area that he has hidden from the rest of the Silver Helms. He also lets you in on the story of the order's corruption and the existance of an anhk that marks the bearer as being a friend of Baa.
Clear out the room to the north and then go through the secret door to the south which leads through a room with two chests and then out into the hall again. Head north to empty out a guardroom on the west side of the hall between the two passages you've explored and then continue south.
The room on the west is just another guardroom. The room on the east contains Gerrard Blackames himself, and on his corpse you can find his ankh.
You can return the Ankh to Loretta Fleise (in Silver Cove) and she will thank you but require that you go to Anthony Stone (in Castle Stone in the Frozen Highlands) to get your reward. When you do, you will be rewarded with 5000gp.
Blackshire
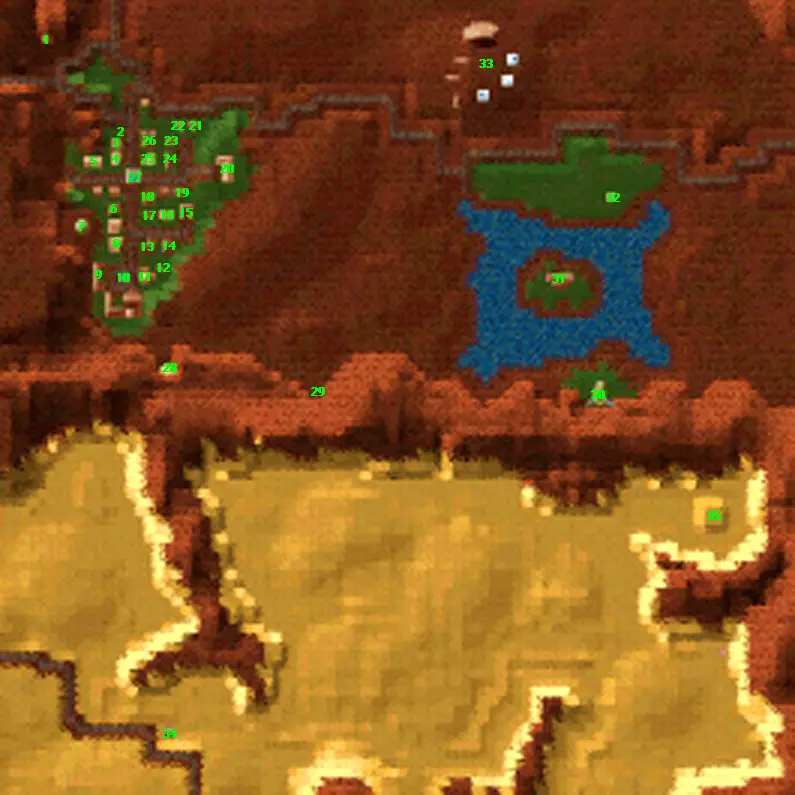
This overland area resets every 24 months.
Travel
- By foot east: 5 days to Free Haven.
- By foot north: 5 days to Kriegspire.
- By foot east: 5 days to Paraside Valley.
- By foot south: 5 days to Dragonsands.
- By coach: 3 days and 250gp to Free Haven (Tuesday, Friday).
Monsters
- Wolfman, Werewolf, and Greater Werewolf
- Dust Devil, Air Spirit, and Air Elemental
- Fire Lizard, Lightning Lizard, and Thunder Lizard
Locations
- Shrine of Magic
- Fountain that gives +50 luck for a day.
- Inn
- Night: 90gp; Food: 30 for 270gp
- Armor Store
- Buy: 2.5; Sell: 4.5
- Training Hall
- Maximum Level: 100
- Weapon Store
- Buy: 3.0; Sell: 5.0
- Dragon Tower
- Bronwyn Meck
- Teaches Mastery in Shield to those with Rank 10 for 5000gp.
- Temple
- Fountain that gives +30 magic resistance for a day and turns you to stone.
- Joanne Cravitz
- Get quest 36.
- Fountain that gives +5 magic resistance permanently and diseases you.
- Guy Hampton
- Teaches Mastery in Sword to Cavaleers with Rank 8.
- Errol Osterman
- Teaches Mastery in Mace to those with Rank 8 and Might 40 for 5000gp.
- Adept Guild of Dark
- Teaches Dark Magic skill for 2000gp.
- Sells spellbooks for Dark Magic spells (1-10).
- Adept Giuld of Light
- Teaches Light Magic skill for 2000gp.
- Sells spellbooks for Light Magic spells (1-10).
- Maria Trepan
- Get quest 37.
- Alchemist Store
- Buy: 3.0; Sell: 5.0
- Teaches the Leather Armor, Identify Item, Disarm Trap, Diplomacy, and Perception skills for 250gp each.
- Tess Tucker
- Sells membership to the Smuggler's Guild for 50gp.
- Twillen
- Get quest 38.
- Rebecca Calaway
- Sells membership to the Dark Guild for 1000gp.
- Marton Ferris
- Sells membership to the Light Guild for 1000gp.
- Ambrose Bruss
- Teaches Expert in Dark Magic for 2000gp.
- Bank
- General Store
- Buy: 2.0; Sell: 8.0
- Coach Travel
- Fountain that restores 50 spell points.
- Lair of the Wolf
- Chest
- This chest contains Lord Killburn's Shield and is needed to complete quest 11.
- Temple Baa
- Temple of the Snake
- Fountain that gives +5 to Intellect and Personality permanently and gives you a disease.
- Circus (summer)
- The circus is only here from April-July. During other seasons, it is either at Bootleg Bay (December-March), or in the Mire of the Damned (August-November).
- See the entry at Bootleg Bay.
- Inn
- Night: 360gp; Food: 60 for 2160gp.
- Obelisk #5
Lair of the Wolf
- Wolfman, Werewolf, and Greater Werewolf
- Ooze, Acidic Ooze, and Corrosive Ooze
- Swordsman, Expert Swordsman, and Master Swordsman
- Unique: Werewolf Leader
From the opening room, follow the rows of skull piles down to a large room filled with slimes. The brew pot in this room gives permanent fire resistance. Head north of this room and clear out all of the slimes lurking up there, then head south into a very large circular room that is filled with various kinds of werewolves.
When all of the werewolves are dead, notice that there is the Wolf's altar in the center of the room. This is what you need to destroy, but you can't do it quite yet. Instead, head to the side rooms to the east and west, collecting all of the loot in those rooms.
Head to the very end of the westmost chamber from the Altar. As you get close to the corner, a face appears in the wall. This is the Ghost of Balthazar. He will tell you about the Pearl of Purity, which can be used to destroy the Wolf Altar, and give you quest 39. After you have talked to him, go to the eastmost chamber and as you get near the end of that room, you will find the Pearl of Purity. Click it on the Altar to destroy it and complete quest 37.
Destroying the altar will also open up the doorway that is down the "throat" of the wolf allowing you to procede deeper into the dungeon. Head down the corridor and the east, following the passage all of the way down. When you get to the next fork, turn south and clean out the crates of treasure there. Then take the northern corridor; stopping into each of the small rooms off the corridor to clear out the Werewolves there.
Now, returning to the main entrance and taking the other corridor, it leads to a gathering room. The two corridors to the south lead to some werewolf dens. On the east side, there will be a magic door on the east wall of one of the dens. This opens up an area that contains some much nicer treasure. There is also a passage that connects to one of the cellars that you can get to normally, but there is no reason to take the "back door" in. The door to the north will lead down a corridor to a dead end. The dead end is really a secret door that opens to reveal a room of fighters.
After you are passed this room, head up the stairs. You will be teleported to a different set of stairs when this happens. Continue upwards. You will arrive in a large temple-like area filled with lots and lots of Werewolves. Among these werewolves is the Werewolf Leader and he will have a black pearl on its corpse. This is the Pearl of Putrescence that you need to complete quest 39.
At the back of the temple, enter the room to the north and take the stairs further down. Again, you get teleported. (I think the teleports aren't there to confuse you, but to make the automap more clear.) Clear out the cellar down there, as well as the swordsmen's room to the south and return to the hallway outside the temple area.
The south room is just more quarters for some swordsmen and werewolves. On your way out, remember to return the Pearl of Putrescence to the Ghost.
Temple of the Snake
As you enter, the first two rooms hold nothing of much interest. There are two peasants here which are not hostile -- harming them will seriously hurt your reputation so stay away from the massive area-effect spells. The next hallway has an ice trap that shoots down the hall at regular intervals. Duck into each of the rooms on the south to avoid it.
Don't go down the ramp at the east end of this corridor, as it will merely teleport you back into the corridor; instead jump off the ledge north (halfway down the corridor). Watch out -- there's a Gold Dragon down here and he's not pleased to see you. When he dies, push the switch in the corner of the room and that opens up a passage that leads into the main part of the temple.
At the end of the corridor, turn right and follow the corridor around, through a small room, into the main altar area. This room is filled both with Medusae and peasants. When you have killed all of the Medusae, click on the cage in the corner of the room. This is where Emmanual Cravitz is being held. You need to free him to complete quest 36.
If you're up for a challenge, you can go through a secret door near the southwest corner of the room you went through to get here (the one with two corridors leading out of it to the south). Behind the secret door is Q and he has some nasty Finger of Death and Erradication attacks. I'd estimate him at about 16,000hp. On his corpse is the Horn of Ros which (if you have it in your possession) lets you get a hit point number for creatures rather than a bar graph.
Return to the corridor and head down to the west end. Get on the platform at the end and flip the switch. Then take the corridor down to the end and flip the switch on the wall. This will open up a wall back near the entrance so you can get out of the Temple.
Kriegspire

This overland area resets every 8 months.
Travel
- By foot east: 5 days to the Frozen Highlands.
- By foot south: 5 days to Blackshire.
- By foot west: 5 days to Sweet Water.
- By coach: 3 days and 250gp to Free Haven (Wednesday, Saturday).
Monsters
- Minotaur, Minotaur Mage, and Minotaur King
- Rock Beast, Earth Spirit, and Earth Elemental
- Frost Drake, Flame Drake, and Energy Drake
Locations
- Alchemist Store
- Buy: 3.0; Sell: 5.0
- Coach Service
- Inn
- Night: 40gp; Food: 20 for 80gp.
- Fountain that gives +30 to level for a day.
- Training Hall
- Maximum Level: 80
- Armor Store
- Buy: 3.0; Sell: 5.0
- Weapon Store
- Buy: 3.0; Sell: 5.0
- Fountain that teleports you to Castle Kriegspire.
- Emil Lime
- Get quest 40.
- Fountain that gives +10 magic resistance permanently and eradicates you.
- Tower
- Fountain that trades 5000gp for 5000xp.
- Nicholas Ruth
- Teaches Expert in Light Magic for 2000gp.
- Tower
- Superior Temple of Baa
- Fountain that gives +5 elemental resistances permanently and kills you.
- Fountain that gives +40 to AC for a day.
- Shrine of Fire
- Castle Kriegspire
Desmond Weller- Teaches Mastery in Bow to Battle Mages with Rank 8.
- Devil's Outpost
- Cave of the Dragon Rider
- Obelisk #4
- Agar's Laboratory
- Shrine of Cold
- Hermit on the Mountain
- He will end winter for you, allowing you to complete quest 33.
- Pedestal
- Used in quest 38.
Devil's Outpost
Very simple; there is a single room filled with various kinds of devils. On one of them will be a set of plans, patrol schedules, and the like. Returning this to Osric will complete quest 16.
Superior Temple of Baa
- Acolyte of Baa, Cleric of Baa, and Priest of Baa
- Sorcerer, Magician, and Warlock
- Druid, Great Druid, and Grand Druid
In order to enter the Superior Temple of Baa, you need to have the Baa Cloak which is given to you by Humphrey when quest 41 begins.
Despite having the cloak, which is supposed to make you a member, the Baa clergy still attack you on sight. After clearing out the entrance, clear out the two rooms immediately to the left and right of the entrance. Then, do the two rooms in the northwest and southwest. They are just simple rooms that hold Baa clerics and magicians. One of the rooms contains a podium which informs you that you need Expert Perception to be able to open the doors in the temple.
Now take the north door. When you round the four-way intersection, you will be ambushed by Baa clerics and druids. When they are dead, continue straight ahead. On the wall on the right, there is a secret door. Skip the secret door for now and clear out a storehouse at the end of this corridor. There are lots of barrels of stat-gaining liquid there. Then return to the secret door, open it, and follow the passage around to a balcony that overlooks a large room.
I'll admit that I don't know what the best way to tackle this room is. The balcony has about a dozen druids and wizards on it. It overlooks a room with maybe fifty or so druids, wizards, and clerics in it; all of which can attack you on the balcony. Further into the room, there is a terrace; below which is another large group of spellcasters. If you turned east at four-way intersection (where the ambush was), then you'd end up on the upper terrace, but have no way of attacking the druids and wizards on this balcony. However, you do it, you should be able to clear both platforms.
Don't procede down to the lowest terrace quite yet -- this large room is symettric; there is another "upper" terrace on the south side and another balcony. Those are best cleared by finding the passages that lead to those areas. Return to the starting room and take the central western corridor, following the passage northwards. The next passage on the right leads back to the corridor you just came from. Continue straight.
Take the next corridor north (at a four-way cross). It leads to a room with an opening leading to a passage on a lower level. You should head down this lower passage. It is trapped with spark and fireball spells and all it does is loop around back to a hallway to the south, but it is the ritual that Baa priests use to prove themselves capable in the faith. (See the Head of Baa for more details below.)
Back at the crossroads, the west corridor leads to another storeroom. Go south, turning west. You'll end up in another room with lots of clerics and wizards and two large chests. One of the priests that you kill will also have a High Cleric's Key on his body. Be sure to get it.
Return down the corridor eastwards. About halfway down the hallway, there will be a secret door on the north wall leading to a vault of treasure. Continue and take the final corridor south. It leads to a druid's office. When you search the chest on the table here, you will discover that it is locked, and that will set of an ambush of several druids.
Continue out the back door, and head south. There are passages here that are mirror images of the ones to the north, including the secret passage. Skip those by for now and south and west. You'll find lots of accoylte's quarters down here, but in the far west room, there is a small temple. On the walls are four carvings that are Baa Heads 1 through 4. If you click on them all in order, they will all be "primed" and ready to go.
In the far east living quarters, there will be a High Sorcerer's Key on one of the wizards that you will have to kill in that room. With both the High Sorcerer's Key and the High Priest's Key, you can open the chest back in the room that led into this area. Inside that chest will be a letter to Slicker Silvertongue telling him to block your access to the Oracle on the council. This letter is the proof you need to complete quest 41.
Now return and finish the asault on the main temple area, using both the corridor that gains access to the terrace, and the secret passage that leads to the balcony. When you are done, notice the large Head of Baa against one wall. If you have been through the Baa test (the curved corridor on the lower level with all of the spark and fireball spells in it), then you will receive 50,000xp from the Head.
Castle Kriegspire
- Minotaur, Minotaur Mage, and Minotaur King
- Agar's Pet, Agar's Monster, and Agar's Abomination
- Flame Drake, Frost Drake, and Energy Drake
- Unique: Lurch
Go in the main door, and up the stairs, through the archway, and turn north and then keep heading east. Clear out the pen of minotaurs to the north and procede. The large circular chambers to the east of here is where you appear after drinking from the fountain in Kriegspire village.
When all four chambers have been cleared out, go to the passage between the two easternmost rooms and head further east, through the door, and then turn south, going through the first door on the left. The room will quickly fill with minotaurs. Finish them off and collect (and use) all of the magic horseshoes.
Return to the hallway and continue around south then west. You'll arrive on a ledge that goes along the edge of the four rooms. In the very center of the the rooms, there is a small alcove and a button on the column. Push that button. This opens the barred door back in the hallway.
Drop back down to the hallway, head west back past the first minotaur pen, and head up the stairs. Ignore the door that you can't open on the west wall, and charge the east wall. It opens when you run into it; quickly and run to and through it -- there are minotaur mages that can see and attack you while you are standing by the door. The corridor loops back to those pens immediately after the door, so you can kill the minotaurs at your leisure. Then, follow the passage eastwards.
In the chest to the south is the Jewelled Egg. This is the item that you need to find to compelete quest 40. The north alcove leads to an alcove high above the "arena" rooms where you can observe everything that goes on.
Return to the hallway leading to the arena rooms. The door to the south blocked with bars will now open if you approach it. Go through there, turning right, and then right again and head up the stairs. Search the empty cages to find Roland's Journal.
Head down the stairs and open the door. Inside you'll find a Minotaur King. But not just any King; its "Lurch" himself. Past the door, at the corner, you will see two openings into a room below. [The corridor you're in merely continues back to the corridor near the entrance.] Jump through one of the openings and head to the corner of the room. In an alcove is hovering Memory Crystal Epsilon. This is the crystal you need to complete quest 44. [Note: the quest does say that you're supposed to find Crystal Epsilon in Castle Alamos and that you're supposed to find Crystal Beta here, but you go with the flow! This may be fixed in a patch of the game to be released later.] If you step on the black square, you'll be returned to the corridor.
From the southwest arena room, head through the door to the west and go down that corridor. Take the stairs on the right. They wind around to an observation room for the southwest arena room. If you fall into the center of the column area, there are teleportation squares there that teleport you to the entrance of the Castle.
Return to the hallway and take the door to the east now. It leads back to an opening between the two eastern arena rooms. Return back to the hallway and take the stairs to the south. When you have killed all of the Drakes in this room, cross the room and loot the chest. The stairs merely wind around to another observation alcove.
Head towards the arena area again and turn north. When you get to the double-door gate, open it. On the wall ahead of you is the "Curator of Kriegspire". He offers the chance to heal your entire party for 10000gp. If you take his offer, be warned that it will seriously hurt your reputation.
Continuing, you will find yourself in a large room filled with many Drakes. After you cross the chasm in this room; or when you fall into it, the chasm will fill with various abominations created by Agar. After you have defeated all of them, collect the large amount of treasure on the far side of the room. At the far side of the room is the "Guardian of Kriegspire" who says he will reveal the answer for 50,000gp. All this does is teleport you to the hidden button that unlocks the gratings. I wouldn't waste your money.
When you are done, you can jump into the pit and take the corridor up, which leads back to the door that you couldn't open from the outside.
Agar's Laboratory
- Flying Eye, Terrible Eye, and Maddening Eye
- Agar's Pet, Agar's Monster, and Agar's Abomination
- Unique: Agar
After the entrnace room, you will arrive in a large circular room filled with Agar's Chickens. Take the east exit from this room. Cross the circular room you get to and push the buttom. This causes a panel in the floor to slide aside and the pit floor to rise up releasing a half-dozen Eyes into the room. When they're dead, cross to the west room (from the starting room) and repeat the process. When you return to the start room; the wall blocking off the north part of the room will have lowered.
As you step on the large blue square, it will lower down to the ground. (The switch on the pedestal just north of the square will also lower the floor.) Following the newly revealed corridor northwards leads to another room with lots of chickens in it. To the west is a rooms similar to the ones upstairs -- a switch on the far wall that releases creatures into the room. To the east is a room with another large blue tile that lowers down to a third level.
From this room, head through the west door. In the next room there is a chest on the far side of the room. As you walk near the chest (which is empty), a wall will lower, releasing some Maddening Eyes into the room. The room then continues with a corridor to the north.
At the fork in the corridor; to the west is a door that leads back outside; to the right is where Agar himself is hiding out. The room contains several chests of treasure and a cauldron that slays whomever drinks from it. The skull pile has the same effect.
Cave of the Dragon Riders
This whole area is has nothing very interesting in it, except for the monsters themselves. Great Wyrms and Cuisinarts have some of the best items in the game on their corpses; they are the main reward for going through this area. The treasure placed here is insignificant compared to the monster treasure itself.
From the main entrance, the room splits into several tunnels that wind down through the mountain. Start with the rightmost tunnel. It opens up into a room filled with Wyrms. At the back of the room are two chests filled with treasure. Since there are no other exits, return to the entrance and take the second passage.
The second tunnel also goes into the mountain and then opens into a large room with no other exits. The room has a mixture of Cuisinarts and Wyrms in it guarding a pair of chests against the far wall.
The third passage splits a short way in. Take the right fork. A room will open up on the left side of the passage that contains two chests and a barrel of treasure. The passage continues and opens into two rooms. The room on the right contains three chests -- the middle chest contains a diary that explains the Rider's plans to conquer the dragon towers. The left room contains two more chests and two piles of gold.
Returning back down the corridor, take the other fork that you passed by near the entrance of the tunnel. It leads to a large open area. On the far side of the room, there are several barrels, skull piles, and two hanging cages. The barrels and skull piles have items, but the cages are worthless.
Returning to the start, take the last passage from the entrance. It leads to a final room containing more chests and Wyrms.
Eel Infested Waters

This overland area resets every 8 months.
Travel
- By boat (north): 2 days, 400gp to Silver Cove (Monday).
- By boat (south): 1 day, 200gp to North Island (Saturday).
Monsters
- Agar's Pet, Agar's Monster, and Agar's Abomination
- Sea Serpent, Sea Monster, and Sea Terror
- Water Beast, Water Spirit, and Water Elemental
Locations
- Inn
- Night: 20gp; Food: 14 for 28gp.
- Pat Skylark
- Teaches Expert in Ancient Weapons.
- Alchemist Store
- Buy: 4.0; Sell: 6.0
- Temple
- Castle Alamos
- Excalibur is the sword in the stone here.
- Docks
- Fountain that gives +20 magic resistance for a day.
- Inn
- Night: 20gp; Food: 14 for 28gp.
- Teaches Mastery in Light Magic to those with Saintly Reputations.
- Docks
- Shrine of Poison
- Obelisk #13
- Fountain that gives +20 elemental resistances for a day.
Castle Alamos
- Magyar, Magyar Soldier, and Magyar Matron
- Sorcerer, Magician, and Warlock
- Dust Devil, Twister, and Air Elemental
At the entrance, turn left and then left again, heading up the stairs. The passage is defended by Magyars. Fight your way up to a cross-passage. Clear out the north and south rooms and continue east, turning south at the T intersection.
When the corridor turns northwards, continue past the door (its locked -- you need the Teleporter Key) and keep going downards. You will arrive in a large room with a pool. Head out the tunnel to the west side of the room and follow it all of the way around the pool room. Then take the pair of corridors to the south that branch off of the corridor going around the pool room.
Clear out this very large room of Magyars (Prismatic Light helps a lot here), and continue clearing out rooms to the southwest. In the northeast of the first room is a tree that has this message carved into it: "The third is the first of twenty-six, A through Z you'll have to mix."
Clear out the four rooms in a counterclockwise order. Then return to the western section and head through the arches on the west side. Head up the stairs and through the room. When you finish climbing stairs, turn east at the top of the stairs and head down a long hallway back to the bridge over the room you just went through.
Clear out the six side rooms on this hallway, then cross the bridge and clear out the six side rooms on the north hallway. (The north hallway also leads back to the entrance.) Then, from the north hallway, follow it east towards the center of the hub where the four rooms come together.
As you enter the room, you will be on a ledge around a room. Before jumping down, head around to the south side of the room and clear out a small room there. Then jump down the ledge. Then jump into one of the four holes in the floor here (they all lead the same place). In the lowest room, there is a tunnel running east-west which periodically shoots a fireball down its length, and a ramp to the north. Go up the ramp and take the east passage from here.
It turns and leads to a side opening on the tunnel where the fireballs shoot down. If you time it, you can get into the room where the balls are coming from. There's treasure in this room. Return and repeat this process on the west passage. The run is much longer, but you are also running the same direction as the fireballs.
The end of the corridor is a room that runs beneath a bridge that connects the north south hallways of the floor above. In the corner of this room is a tree that gives you the following riddle: "The first is half the fourth plus one, better hurry or you'll be done."
Return back down the corridor to the "hub" room, go up the ramp, turn west, except this time, don't turn into the fireball corridor but continue straight through it to a matching passage on the other side. Keep going straight until you get to a room that has another tree in it and a switch. Flip the switch. (To be honest, I'm not exactly sure what it does, but it can't be bad!) The tree gives the following riddle: "The second is next to the third, oh so pretty like a bird."
Continue straight. When the corridor ends, turn east and head up and clean out a small room of sorcerers. (If you don't, they can attack you through a hole in the wall a little later and make your life miserable). Then return back down and head through the archway west. You will end up in a room with lots of food sacks in it. Clear out the room. The north exit leads back to the room with the fireball shooter in it; take the south exit instead. The first side passage on the right leads to an opening high above the ground where the room with the "second" tree riddle is. The first passage to the left leads to a large, straight room. Procede through that, through the openings in the far wall, and head down the stairs.
The corridor will loop around and run along the previous room, but as a balcony, and then continue south through a room with Magyars, then up onto the balcony of that room, and heading west down a corridor leaving the northwest corner of this room. This corridor leads into a very large room filled with about twenty twisters and sorcerers. When they are all dead, head to the room in the southeast corner. In the upstairs section of the room, there is a letter from Archibald to Gharik demanding that he unlock the secrets in the crystal. He is refering to the Memory Crystal that you need to find.
Now head north out of the room. On the west wall, there is a section where the wall seems to swim and shimmer. If you click on the wall, you'll be teleported to a small room with some magicians in it. There is also another wall face that "swims" in this room. Clicking on that will take you to the east of the four large rooms that surrounds the "hub".
Continue down the corridor north and east to arrive in a large room filled with more warlocks, both in pits in the room and along a raised step all along the edge of the room. When you have finished with them, head out the north exit from the raised step. This path leads back to the northeast exit from the hub. Go through the hub and out the southwest side (on this same level), and procede south down the corridor.
The first door on the east leads to another (even higher off the ground) entrance to the room with the "second" tree riddle. To the south is a pool and a door that opens back to the corridor. Trying to open this door will summon a large number of air elementals into the room (and not open the door). The stairs upwards lead up to a room with a chest.
Continue south, turn east, and return back down the passage that got you to the very large room. When you return all of the way back to the curving corridor, take the passage west (turning to north) and head down the stairs and open the door.
The door leads back to the large rooms around the "hub". Go to the east section and return to the room with the ledge and the pits of warlocks. Exit through the south door. This leads to another large room, filled with more sorcerers, warlocks, and air elementals. Whew!
When you get done, look at the passage between the two rooms. There is a small passage that leads steeply down. In that room at the bottom, in a chest, is a Teleporter Key. Get that key.
Return to the south of the two rooms and raid the chests and bodies there. The chest will have another important key: a Treasure Room key. There is also a tree down here that gives the following riddle: "The fourth is eight from the end. Archibald really is your friend." Continuing down the corridor to the southwest, there is a door that requires the Treasure Room key to open. Most of the treasure (which I believe is randomly generated) was crap; but I did find a very nice Divine Dagger of Darkness in one of the chests.
Return to the hub, take the southwest exit (on the upper level) and continue down the south corridor to the large battle room. Enter the room to the west and go to the north section. That piece of flooring will rise up to a second level. Then walk towards the south and you'll see an opening that leads out to the floor below. Step over the edge carefully -- you will see a narrow support that you can walk along to get to a door up on the second level.
As you enter that doorway, you will be promted for a password. That's what all of the messages for the trees are. (If I ever design a secure fortress, I will not grow trees that tell intruders what my passwords are.) The password is "JBARD":
- The first is half the fourth plus one. "R" is the 18th letter, half that is the ninth, plus 1 is the tenth: "J".
- The second is next to the third: "B".
- The third is the first of twenty six: "A".
- The fourth is eight from the end; Archibald is really your friend. The eighth letter from the end of Archibald is "R".
- The fifth is twice the second: "D"
In the room behind it is Memory Crystal Beta. [Yes, I know the Oracle said you were supposed to find Memory Crystal Epsilon here. Epsilon is actually located in Castle Kriegspire.]
Return out towards the hub (taking the north exit from the two large battle rooms), but right before the tunnel turns to the southwest, take the north passage. The door at the end of this passage requires the Teleporter Key to open. (Opening either this door or the other door that requires the Teleporter Key will cause both doors to open.)
In the room is a teleporter pad and behind that is a chest in the wall. Loot the chest. If you have the Memory Crystal, then stepping on the teleporter pad will teleport you to the coach station at Silver Cove.
Dragonsands

This overland area resets every 6 months.
Travel
- By foot north: 5 days to Blackshire.
- By foot west: 5 days to the Hermit's Isle.
- By foot east: 5 days to the Mire of the Damned.
Monsters
- Fire Lizard, Lightning Lizard, and Thunder Lizard
- Wyrm, Giant Wyrm, and Great Wyrm
- Red Dragon, Blue Dragon, and Gold Dragon
Locations
- Najat Ramadi
- Will trade Golden Pyramids or Kegs of Wine for Armor
- Kerman Murian
- Will trade Golden Pyramids or Kegs of Wine for Weapons
- Irbil Baktarian
- Will trade Golden Pyramids or Kegs of Wine for Miscellaneous Equipment
- Bandar Jahrom
- Will trade Magic Lamps for Gems.
- Pedestal
- Used in quest 38.
- Fountain that restores 50 hit points.
- Fountain that gives +10 to all elemental resistances permanently and eradicates you.
- Fountain that gives +10 to all statistics permanently and eradicates you.
- Tomb of VARN
- Two chests
- The chests are guarded by a total of 4 fire lizards, 4 lightning lizards, 5 wyrms, 4 giant wyrms, 1 great wyrm, 7 red dragons, 15 blue dragons, and 13 gold dragons.
- Shrine of the Gods
- +20 to all statistics permanently.
- Clicking on the northwest takes you to the New World Computing world.
- Obelisk #6
- Rock
- Under this rock is a chest that rewards you 250,000gp when opened and contains a spellbook of Dark Containment, and Divine Intervention, and the artifacts Morgan, Igraine, and Guinevere.
- Due to a bug, it gives you another 250,000gp each time the chest is opened.
- The rock is the one in the center of a circle of other stones and can only be opened after you have read all fifteen Obelisks.
Tomb of VARN
- Genie, Djinn, and Efreet
- Defender of VARN, Sentinel of VARN, and Guardian of VARN
- Patrol Unit, Enforcer Unit, and Terminator Unit
At the very entrance, click on the heiroglyphs to open the door to actually get into the pyramid proper. Then turn left at the entrance. At the end of the hall is a wall tapestry which translate to:
Through the Crossing of the Void be a long and adruous journey, the land you find at the end will be sweet and unspoiled by ancestors or the Enemy. Take heart that your children's children will live in a perfect world free of war, free of famine, and free of fear. Remember your sacred duty to care for the Ship on her long Voyage and ensure her safe arrival in the Promised Land. Tend well the Guardian and house it securely away from the ship lest both be lost in a single misfortune.
Now, turn around and head down the corridor towards the east. At the end of the hall, is another tapestry that reads:
Remember our Enemy, children, and never underestimate the danger they pose. Though you will never see one during your journey, you must be forever vigilant against invasion from the Void once the Voyage has ended. Mighty beyond words, the Enemy is nonetheless vulnerable after a Crossing, for their numbers are small and their defenses weak. Use the energy weapons carried on the Ship to defeat them, and never, ever engage the Enemy with lesser weapons, or you will surely perish.
Head up the steep path and empty out that small room, then go down the ramp. In this room there will be several genies and a Sentinel of VARN. The Sentinel will have a Back Door Key on his body. Take that and go north into the next room.
After exploring this very large room, the interesting parts is a large Flame Door on the north side and a smaller door on the west side. There are also two plaques (one on each side of the pillars that are on each side of the central walkway), which read: "In case of energy leak, bathe in one of the medicated pools placed for your safety and convenience", and "Warning! Power Fluctuations! Alert Engineering immediately!" You don't have the key to the Flame Door right now, so head west through the smaller door and down the large steps. Then go through the door on the west wall. In the next room, there is a small switch near the ground on the wall that opens up a wall panel to reveal a chest. The chest contains (among other things), a Crystal Skull, a Flame Door Key, and the Captain's Code scroll. The other exit from the large steps room merely leads to a room with a table.
Return to the Flame Door and open it (using the Flame Door key). Procede up the ramp and kill off all of the guardians here. When you get near the top of the ramp, you might get radiation poisoning. Having Crystal Skulls can cause the periodic damage to sometimes be absorbed, and walking through the large cleansing pools back in the previous room will cure you of the radiation.
In the center of this room, there is a plaque on the center pillar. It reads: "The Well of VARN must be keyed last," and "Only the one bearing the key may speak the code". The blue circle on the northwest part of the room is the Well of VARN entrance, and it is where you use the Captain's Code, but you can't do that until all of the other codes have been entered. So procede instead through the north exit. (There is a cleansing pool at the end of the hallway.) Then turn west.
Take the first passage south. It forms a loop (returning to the hallway at the second south intersection). In that loop, there are three rather uninteresting rooms. Continue west down the corridor to the next room and then turn south. You will be in a large pool room, with a dozen nooks on the sides of the wall, each filled with Genies. After you kill them all, and collect their loot, you get to do it again in a second pool room.
The last nook on the west side has a passage that leads south. Follow this passage, dealing with the guardians in your way. It leads to a balcony that overlooks the room with the very large pools and the Flame Door.
Return to the pool rooms and head south and around the corner. There will be a large room filled with lots of VARN guardians. The north exit from this room leads to what looks like a large library. Each of the bookshelves along the side walls have books of learning in them. The two murals against the north wall, right next to the bookcases, each have a Code scroll in them: the Communication's Code and the Engineer's Code. There is also a chest, but it is locked and you don't have the key yet.
Return to the intersection just north of the Well of VARN room and continue east down the hallway. Go all the way to the end of the hallway; clear out that room, then return west and take the passage to the south. If you head down the stairway, it quickly ends in a dead end. Head up the spiral stairway and take it all of the way to the top. Deal with the guardians at the top of the stair, and then return to the corridor that exists half-way down. Take the south corridor (the only one) and enter into a large open area.
Once this room is secure, don't continue south; instead return a little bit north and take the passage off to the west. Follow that corridor around, making sure not to fall in the pit. After several rooms, it will dead end, but only after you've finished off a lot of Guardians.
Return to the large open room, jump into the center area, and take the passage to the south. It opens up into a room with a large pit in the center of the room. Defeat the genies hanging out here, but don't jump into the pit -- you can't get back out yet and you don't really want to explore that part of the tomb yet.
Return to the area just north of the two pool rooms, back on the west side of the pyramid and go through the door to the west. This goes around until you get to a Back Door, which is opened with the Back Door Key.
This opens onto a huge room (its width is wider than the entire rest of the pyramid you've explored so far) with a large number of genies in the near corner. The entire room is a large cleansing pool. There are two exits from here -- one is on the center of the north wall at the end of a ramp. This is the Water Temple and you need a key to get in here. The other is at the far northeast corner of the water. Take that corridor.
The corridor lets out into a vast area underneath the pyramid's surface. You can follow the large room all of the way around -- you are in the terraces above the starting area. If you go all of the way around, and then climb up the terraces themselves, you will find a doorway at the very, very top of the slope, almost directly above the radiation room. Click on the door to go through it.
In the next section, there are three buttons. The left and middle buttons cannot be used safely, and will shock you if you push them. The right button can be used safely. Push the right button and the elevator will descend to a new level; the revealed tunnel merely leads back to the pyramid "exterior" where you just came from.
Return to the "radiation" room, back downstairs, and jump in the large pit on the west side of the room. This drops you down to a lower level room. From this room, take one of the pair of exits (they meet on the other side of the wall), then head down the gauntlet hallway. The last niche on the east wall is really a ramp. Take that passageway.
You will enter a room that has three exits to the northwest (the exit you came in), the northeast, and the southwest. There are also cleansing pools here. Head through the northeast exit and follow the corridor. There will be a room of guardians about halfway along the corridor, and then a large room with a spiral ramp that goes up the outside of the room. The topmost door of the ramp leads to a corridor that has a pit (which can be jumped over easily from this direction, since the floor is uneven) and leads back to the door by the spiral stairway on the east side of the radiation room. (The pit leads to the same place that the pit in the radiation room does.)
Return to the small pool room with the three exits and take the southwest exit, and take the passage to the south when the exit splits. The first side passage is just a dead end, and the second side passage leads back to the pool room (connecting with the west fork that you didn't take). Continue west down the passage. The third side passage (which forks north) leads to a drop down to another passage. Skip this for now and continue west along the original passage.
As the passage turns back to the east, you will come across a pit that allows you to drop down to a passage on the level below. The pit spans but half of the corridor. Walk around the pit and continue east.
Take the passage to the south at the intersection -- it will end with a short west-northeast passage that is guarded. The west passage is the passage that you could jump down into using the first pit. When all of the guardians are dead, turn north and procede down the passage.
When the passage turns west, the first side passage to the south is just a short dead-end, but it is the passage that you get into by jumping into the second pit. Continue northwest. The next room has a chest located behind the partition. Inside the chest is the Water Temple Key (which you can use to open the Water Temple in the north part of the pyramid), and a First Mate's Code.
Exit this room and continue north. The passage will end with a sealed entrance to the Well of VARN. You cannot get into the Well from this point.
Now return to the northernmost part of the pyramid and go to the Water Temple door and open it. Fight all of the guardians and genies hiding in the alcoves in the entrance and then head down the ramp just inside the door to the east. Follow the ramp down to the bottom. Here there is a single Guardian of VARN defending a chest in the wall. Inside that chest is Bibliotheca Chest key and a Navigator's Code. The key opens the chest in the library. Return now to the library (its south of the two pools; going through the "back door" is the quickest way to get there) and empty out that chest.
In the library chest is the Doctor's Code and a VARN Chest key. Now that you have all of the codes, head to the radiation room. In order to key in each of the codes, you need to enter the five pools in the rooms. The pool will ask you for one of the codes and you just enter them in. The order doesn't matter. After you have done all five pools, go to the Well itself and enter in the Captain's Code. [Note: Read the codes that you have to enter backwards.] This will open the Well of VARN and let you descend into it.
In the Well, turn to the northeast and click on the "Control Room Entry" area. This opens the door and lets out a number of Patrol and Enforcer units at you. Go through this room (the lights keep turning off and on while you're here), and in the back of the room there is a chest that requires the VARN chest key to open. Inside that chest is a Control Cube -- the cube you need to complete quest 48.
New World Computing
This is an entirely unnecessary part of the game, but its kinda fun. This hidden area represents (in theory) the office space of the New World Computing employees. From the entrance, turn around and pull the lever in the alcove to operate the elevator and go up to the second floor. Heading south, go around the hallways, ducking into cubicles and collecting the armor and weapons on the ground.
Head east through the large archway and then head into the first door on the right. This looks like a library and the bookshelves contain several items of interest. Head through the door on the far side of the room and then through the door straight ahead. In this room, several employees milling around a table. Go over to that desk and search it to find some more good items. Go through the east doors and through the doors on the other side of the hallway.
In this office is a hostile goblin king . When you've killed him, leave. The aura of fear that the room places on you will pass. Head south down the corridor, emptying out the other offices. Heading down the passage to the west finds a pantry that lets you get unlimited food (although sometimes you'll get poisoned), and unlimited potion bottles from the desk. There is also a vending machine that will sell potions in this room. The next office is empty.
Return to the hallway and head north. On the left is first an empty office, then another office filled with books. In this office is a hostile goblin. The corridor continues north containing the offices of more employees. Some of them contain items. Head up the corridor following it around to the left.
After you've explored all of the offices, return to the elevator and continue west. Go through the door there and explore cubicles and offices. The office in the southwest corner seems to give an unlimited supply of herbs. When you're done looking around, return to the lobby and click on the door to get out.
Hermit's Isle

This overland area resets every 6 months.
Travel
- By foot north: 5 days to Paraside Valley.
- By foot east: 5 days to Dragonsands.
Monsters
- Sea Serpent, Sea Monster, and Sea Terror
- Hydra, Venomous Hydra, and Colossal Hydra
- Titan, Noble Titan, and Supreme Titan
Locations
- Supreme Temple of Baa
- Obelisk #3
- Fountain that cures unnatural aging.
Supreme Temple of Baa
- Acolyte of Baa, Cleric of Baa, and Priest of Baa
- Devil Spawn, Devil Worker, and Devil Warrior
- Fire Beast, Fire Spirit, and Fire Elemental
- Unique: Slicker Silvertoungue
From the entrance, the first thing you should do is take the west passage from the opening hallway. This goes around the corner and leads to a cylander object. If you click on it, the upper half will rise up. This is a teleporter pad that will take you between this room and a secret room in the Free Haven Sewers. (The teleporter doesn't work until you raise the upper part, so you can't use this as a quick way to get here the first time.) The secret room in the Sewers is best accessible through the entrance at building 16.
Now cross to the east passage and empty out the three rooms down there of treasure, then head south. The passage will turn to the east and pass by an opening that overlooks a large room with no visible floor. Continue down the corridor east, and then take the side passage to the east. You will cross over that large room that you overlooked into and then reach two bedrooms of clerics. After they are dispatched, open the door in the wall and procede to a room filled with crates. Open the door from that room and turn east, collecting the treasure in that room. Then go to the southwest room. In that room, the rightmost section of crates slides back revealing a chest. Now return to the top passage and head north. Clear out the next room of clerics and keep going.
The next room on the west side of the passage will have three altars in it: an Altar of Pain, Altar of Earth, and Altar of Fire. Click on each of the altars -- they will hurt you a bit, but they will allow you to pray at the shrines later. Then procede down the corridor, emptying out the room on the west side and then taking the west fork. Right before you get to the door, there are secret doors on the north and south walls leading to small rooms of treasure. Then procede through the door, and then through the door on the other side of that room.
The corridor will open up onto a bridge that goes across that very deep room. Instead of going straight across, take the southwestern fork. It leads to a room with a chest. While the chest is empty, opening it will lower a wall and let some elementals and devils get at you.
Return to the large room and take the bridge straight across to the west. Go through one room and then you'll get to a room with crystals. Turn around and take the other north exit from this room. Clean out the two bedchambers up here, and then return to the crystal room and head west. Head down that hallway cleaning out bedrooms that alternate on the left and right hand sides. The passage will lead to another crystal room filled with elementals, and then to another archway across the large tube room.
As you cross through the room, and through another room full of clerics, take the north fork in the passage when you get to it. If you follow it around circularly, it will lead to the other half of the fork that you passed by earlier. Instead, continue north. The first room on the east will have two chests in it and a Shrine of Air. Praying at this altar will give the active character a permanent +10 to electircal resistance; but only if the party has prayed at all three altars.
Continuing north, you will get to another room with two chests and a Shrine of Earth (Gives permanent +10 magic resistance). Retreating along the corridor to the south, past where you turned into this area, you will find the Shrine of Water (Gives permanent +10 cold resistance). And a little further to the west is the Shrine of Fire (permanent +10 fire resistance).
Continue west from the Shrine of Fire. The corridor opens into a long room with six side rooms -- three on each side. Clear out those six rooms and then procede to the doorway. This leads out to the central hub room, except that this time, you have control over the bridges.
In the hub, there is a central platform. There are four bridges extending two it: the ones on the far side and the right side are retracted, the other two are extended. There is a switch on the wall next to the bridge. This switch (and the other three switches at each other bridge) will retract one of the bridges to the left or right and extend the other.
Using the switches, cross to the north exit. On an altar here is Memory Crystal Alpha, the crystal required to compelte quest 43.
Paradise Valley
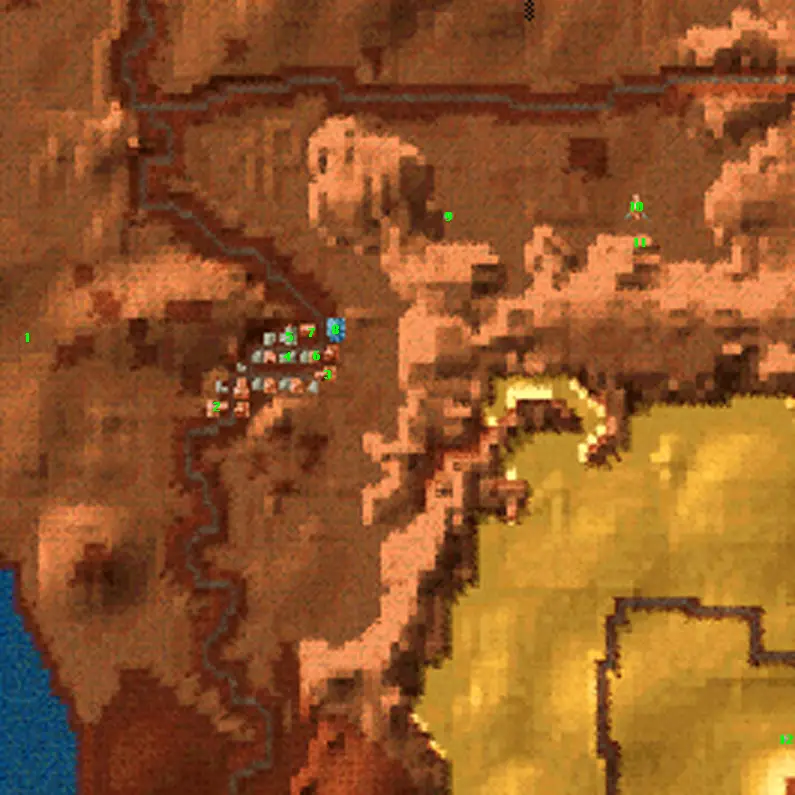
This overland area resets every 6 months.
Travel
- By foot north: 5 days to Sweet Water.
- By foot south: 5 days to the Hermit's Isle.
- By foot east: 5 days to Blackshire.
Monsters
- Red Dragon, Blue Dragon, and Gold Dragon
- Hydra, Venomous Hydra, and Colossal Hydra
- Titan, Noble Titan, and Supreme Titan
- Sea Serpent, Sea Monster, and Sea Terror
Locations
- Su Lang Manchu
- Teaches Mastery in Dark Magic to those with Notorious Reputation.
- Rexella
- Teaches Mastery in Blaster to those that possess a Blaster for 5000gp.
- Alchemist Store
- Buy: 4.0; Sell: 6.0
- Weapon Store
- Buy: 3.0; Sell: 5.0
- Armor Store
- Buy: 3.0; Sell: 5.0
- Inn
- Night: 160gp; Food: 40 for 640gp.
- Training Hall
- Maximum Level: No limit
- Obelisk #2
- Temple Baa
- Fountain that restores 100 spell points and 100 hit points.
Sweet Water

This overland area resets every 8 months.
Travel
- By foot south: 5 days to Paraside Valley.
- By foot east: 5 days to Kriegspire.
Monsters
Locations
- Fountain that gives +50 to seven statistics for a day.
- Obelisk #1
- Pedestal
- Used in quest 38.
- The Hive
The Hive
- Devil Spawn, Devil Worker, and Devil Warrior
- Devil Captain, Devil Master, and Devil King
- Uniques: Demon Queen, Reactor
This dungeon resets every 7 days.
Walk in through the main door and through the hallway. Directly ahead of you is a room filled with a very large quantity of devils of various ranks. When they're dead, jump into the hole in the floor on the southwest side of the room. (All of the doors out of this room won't budge.) From the bottom, clean out the room to the north and then follow the tube to the south.
As you're in this entire complex, you'll get message about the Flush System. When the "Flush is in progress", everyone in the party will take a small amount of damage unless they're standing on one of the blue squares that is "Protected" (that's the name you get when you hover the mouse over it).
On the side of the tube will be a room guarded with a few devils. There is a switch on the opposide side of the room that you should flip. Continuing down the tube, there is a chest a little further down.
The next door on the left leads to a room with a large red switch. This switch will teleport you back to the entrance. You won't want to push it yet. If you continue along the tube, there will be a keg in a side room that restores 20 hit points when used.
The tube now loops around back to the large central room. Cross that room and jump down the hole in the southeast side of the room. Follow that tube around the corner and then through the large green door. Behind the door is a passage that leads around to a secret door near the entrance. Yet another way to get out of here. Return to the hallway below and continue down the tube.
Skip past the next door (since it won't open) and enter the door after that on the left. Inside this room is a switch which you should flip, and a chest. Continuing down the tube, the passage will let out back into the large room.
Now head for the northeast tube and jump into it. Follow the tube. There will be set of rooms to the north and south. There is a chest of items in the corner of one of the rooms. Continue down the tube.
Around the corner is another chest. Inside this chest is the Hive Sanctum Key. Its important -- don't lose it. The tunnel continues until it reaches the backside of a door in the passage north of the large central room. Return to the large room and take the northwest pit.
In an alcove on the north side of the passage, there is a button on a ledge. Push that button. Then continue down to the next room. In that room there is a chest full of items. The tube continues back to the passage to the north of the large room.
In the large room, look at that grate in the middle of the room. If you stand in the middle of the grate, you will fall through it. In the resulting tube, follow it to a medium sized room. On the east side of that room is a door that opens only if you have the Hive Sanctum Key. Go through the door. On the wall around the corner is a switch. This switch will cause the floor to disappear and allow you to drop down in the sanctum. It will reveal a room that has a reactor in the middle.
Destroy the Reactor. (You must use ancient weapons to do this; all other weapons and spells are useless.) When it dies, you will be teleported across the room; all of your magic will be dispelled; the room will fill up with devils; and behind you will be a demon queen. Kill 'em all.
When they're all dead, head into the room where the Queen was, go to the back of the room, and click on the swirling black wall (the one labeled Exit). If you have the Ritual of the Void scroll in your inventory, you will win the game. (If you don't, you'll destroy the world.)
Tables
Quests
All of the quests that appear in the game. If the quest text doesn't contain the entire where of the solution, then more detail is printed here. For the most part, the solution to the quests is listed in the location description for where the quest should be solved.
- Bring Sulman's Letter to Regent Wilbur Humphrey at Castle Ironfist.
- Note: You start the game with this quest. You also start the game with the letter.
- Reward: 5000gp.
-
Find the combination to the vault door in Goblinwatch and return to the town
hall in New Sorpigal.
- Reward: 2000gp.
-
Retrieve the Candelabra from the Abandoned Temple
for Andover Potbello in New Sorpingal.
- Reward: 1000gp.
-
Kill the Queen of the Spiders in the Abandoned Temple
and return with her heart to Buford T. Allman in New Sorpingal.
- Reward: 1000gp.
-
Rescue Sharry from the Shadow Guild hideout and return with her to
Frank Fairchild in New Sorpingal.
- Reward: 2000gp.
-
Rescue Angela from the Abandoned Temple and return to Voilet Dawson
in New Sorpingal.
- Reward: 10 food.
-
Get the Chime of Harmony from the Temple of Baa and return to the
New Sorpingal city hall.
- Reward: 5000gp.
-
Retrieve the harp from the Dragoon's Caverns south of
Castle Ironfist and return it to Andrew Besper in Castle
Ironfist.
- Reward: 5000gp.
-
Entertain Nicolai.
- Note: When you next rest (outside of an inn), Nicolai is kidnapped and this quest becomes: "Find and return Prince Nicolai to Castle Ironfist." At this point, you cannot visit the castle because of the emergency.
- Complete: Nicolai can be found at the Circus. Go visit the circus and in the main tent and tell Nicolai to come home. He will follow you.
- Reward: None (although while this quest is in progress, you cannot visit Castle Ironfist).
-
Rescue a Damsel in Distress and return with her to Wilbur Humphrey in Castle Ironfist.
- Complete: The damsel to be rescued is Melody Silver and she is in the Silver Helm Outpost.
- Reward: Paladins are promoted to Crusaders.
-
Find Lord Kilburn's Shield and return to Wilbur Humphrey in Castle Ironfist to report.
- The shield is located in a chest south of Blackshire.
- Reward: 5000gp and Nicholai will give your support on the Council.
-
Find and return the Hourglass of Time to Lord Albert Newton in Mist.
- The Hourglass is located in Gharik's Forge.
- Reward: Albert Newton's support on the council.
-
Drink from the Fountain of Magic and return to Lord Albert Newton in Mist.
- Complete: The Fountain of Magic is located in Bootleg Bay.
- Reward: Sorcerers are promoted to Mages.
-
Storm the Silver Helm Outpost near Mist and return with evidence of their corruption
to the Constable of Mist.
- Reward: 3000gp.
-
Destroy the crystal in the Temple of the Fist and return to Winston Schezar.
- Reward: 3000gp.
-
Destroy the Devil's Outpost and return to Lord Osric Temper
at Castle Temper.
- Reward: Lord Osric Temper will give his support on the Council.
-
Get Knight's Nomination from Chadwick and return to Lord Osric at Castle Temper.
- Complete: Chadwick is located in an inn to the northwest of Free Haven.
- Reward: Knights are prompted to Cavaleers.
-
Find the lost artifact in the Dragoons' Keep near Castle Temper and return it to
Zoltan Phelps in Free Haven.
- Reward: 30000gp, and you get to keep Mordred.
-
Rescue Sherell from the cannibals on the islands east of Free Haven and return with
her to Carlo Tormini in Free Haven.
- Complete: Sherell is being held in the Temple of Tsantsa.
- Reward: 1500gp.
-
Retrieve Ethric's Skull from his Tomb west of Free Haven
for Gabriel Cartman in Free Haven.
- Reward: 7500gp.
-
Defeat the Warlord and bring proof to Osric Temper.
- The Warlord is located in his fortress at Silver Cove.
- Reward: Cavaleers are promoted to Champions.
-
Retrieve the Crystal of Terrax and return to Lord Albert Newton.
- Complete: The Crystal can be found in Corlagan's Estate.
- Reward: Wizards are promoted to Archmages.
-
Slay Longfang Witherdale in his cave near Castle Darkmoor
and return to Wilbur Humphrey in Castle Ironfist.
- Reward: Cursaders are promoted to Heroes.
-
Find and destroy the Book of Liches in Castle Darkmoor and return to
Terry Ross in Darkmoor Village.
- Reward: 5000gp.
-
Kill Snergle in Snergle's Caverns and return with his axe to Avinril Smythers
at the Haunt Tavern in the Mire of the Damned.
- Complete: Before you can get to Snergle, you will need to get the key to his chambers from Snergle's Iron Mines.
- Reward: Anvinril Smythers will teach Mastery in the Axe.
-
Hire a Stonecutter and a Carpenter, bring them to Temple Stone in Free Haven to
repair the temple and then return to Lord Anthony Stone at Castle Stone.
- Complete: Just find two NPCs whose profression is Stonecutter and Carpenter and have them join your party. Then travel to the temple.
- Reward: Clerics are promoted to Priests.
-
Capture the Prince of Thieves and bring him to Lord Anthony Stone at Castle Stone.
- Complete: The Prince is supposed to be in the Shadow Guild, but he will flee to the Free Haven Sewers.
- Reward: 10000gp, and Lord Stone will give his support to you on the council.
-
Fix the prices of all nine stables in the kingdom and return to Lady Fleise in Silver Cove.
- Complete: The nine stables are at: Silver Cove, Darkmoor in the Mire of the Damned, Kriegspire, Blackshire, Castle Ironfist, New Sorpigal, White Cap in the Frozen Highlands, and two in Free Haven. To complete the quest, just visit all nine of those stations and talk to the owner about fixing prices. They will all comply.
- Reward: 5000gp and Lady Fleise will give her support to you on the council.
-
Visit the Altar of the Sun in the Circle of Stones north of Silver Cove on an equinox
or solstice.
- Complete: The four dates that you can complete this are March 20th, June 21st, September 23rd, and December 21st.
- Reward: Druids are promoted to Grand Druids.
-
Deface the altar in the Monolith west of Silver Cove and return to
Eleanor Vanderbilt in Silver Cove.
- Reward: 3000gp
-
Visit the Altar of the Moon in the Temple of the Moon at midnight of a full moon.
- Reward: Grand Druids are promoted to Arch Druids.
-
Take the Sacred Chalice from the monks in their island temple east of Free Haven,
return it to Temple Stone in Free Haven, and then return to Lord Stone
at Castle Stone.
- Complete: The Chalice is located in the Temple of the Sun.
- Reward: Priests are promoted to High Priests
-
End winter for Lord Stromgald at Castle Stromgald and return to him with
the good news.
- Complete: Visit the Hermit's Hut in Kriegspire.
- Reward: Lord Stromgald will give his support to you on the council.
-
Retrieve the key to the Dragon Towers from Icewind Keep south of
White Cap and bring it to Lord Stromgald at Castle Stromgald.
- Reward: Archers are promoted to Battle Mages.
-
Reset all of the Dragon Towers at each town and return to Lord Stromgald in
Castle Stromgald.
- There are six Dragon Towers at the following cities: White Cap in the Frozen Wastes, Silver Cove, Free Haven, Misty Islands, New Sorpigal, and Kriegspire.
- Reward: Battle Mages are promoted to Warrior Mages.
-
Rescue Emmanual from the Temple of the Snake near Blackshire
and return him to Joanne Cravitz in Blackshire.
- Reward: 500gp.
-
Destroy the werewolf's altar in the Lair of the Wolf and return to Maria
Trepan in Blackshire.
- Reward: 4000gp.
-
Place the statuettes in Sweet Water, Kriegspire,
Dragonsands, Mire of the Damned, and Bootleg Bay
and return to Twillen in Blackshire.
- Complete: The statuettes each go onto pedestals that are on each of those grid squares. The statuettes that Twillen gives you are incorrect; despite what he says, the Eagle goes in the Mire of the Damned, the Dragon in Bootleg Bay, the Bear in Kriegspire, the ??? in Sweet Water, and the Wolf in Dragonsands.
- Reward: Chest of random items.
-
Find the Pearl of Putrescence in the Lair of the Wolf and bring it to
the Ghost of Balthazar, also in the Lair of the Wolf.
- Reward: None
-
Retrieve the Jewelled Egg from Castle Kriegspire and return it to
Emil Lime in Kriegspire Village.
- Reward: 5000gp.
-
Find a cure for Slicker Silvertongue in the Superior Temple of Baa
east of Castle Kriegspire and return to Wilbur Humphrey with the good news.
- Complete: Completing this quest actually requires that you reveal that Slicker is a traitor to Wilbur Humphrey. You can find proof of this in the Superior Temple.
- Reward: Get quest 42.
-
Bring the letter detailing Silvertongue's treason to the High Council in Free Haven.
- Reward: Silvertongue leaves the council. You can visit the Oracle if you have the support of the other five lords.
- Also: If you return to Castle Ironfist, Humphrey will let you use the Royal Yacht.
-
Find Memory Crystal Alpha in the Supreme Temple of Baa and restore it
to a module altar at the Oracle beneath Free Haven.
- Reward: 100,000xp. Also, one of the four quests requires to awaken the Oracle.
-
Find Memory Crystal Beta in Castle Kriegspire and restore it
to a module altar at the Oracle beneath Free Haven.
- Complete: Due to a dug, Crystal Beta is actually located in Castle Alamos.
- Reward: 100,000xp. Also, one of the four quests requires to awaken the Oracle.
-
Find Memory Crystal Delta in Castle Darkmoor and restore it
to a module altar at the Oracle beneath Free Haven.
- Reward: 100,000xp. Also, one of the four quests requires to awaken the Oracle.
-
Find Memory Crystal Epsilon in Castle Alamos and restore it
to a module altar at the Oracle beneath Free Haven.
- Complete: Due to a bug, Crystal Epsilon is actually located in Castle Kriegspire.
- Reward: 100,000xp. Also, one of the four quests required to awaken the Oracle.
-
Unward the doors in the Hall of the Fire Lord and return to the Lord
of Fire, also in the Hall of the Fire Lord.
- Reward: None
-
Retrieve the Control Cube from the Tomb of VARN in Dragonsand and return to
the Oracle beneath the High Council.
- Reward: Access to the Control Center.
-
Obtain Ancient Magic from Archibald in the Royal Library in Castle Ironfist
- Complete: Do quest 50 and then visit the library in the top of the castle.
- Reward: You get the Ritual of the Void.
-
Find the Third Eye and bring it to Prince Nicolai in Castle Ironfist.
- Complete: The Eye is located in the well just northwest of Castle Ironfist..
- Reward: You get Tanir's Bell, which can be used to free Archibald.
Skills
The key for the classes column below: A = Class always has this skill and begins with it. I = Class can choose to have this skill as an initial skill. L = Class can learn this skill but cannot begin with it. N = Class cannot learn this skill.
Where skills can be learned: (Note that the table may miss some locations near the end of the game, as the game doesn't offer to teach you skills you already know.)
| Skill | Classes | Guild | Location | Cost | |||||
|---|---|---|---|---|---|---|---|---|---|
| Kn | Pa | Ar | Cl | So | Dr | ||||
| Axe | I | I | I | N | N | N | Blade's End | New Sorpigal | 375 |
| Blade's End | Frozen Highlands | 750 | |||||||
| Blaster | L | L | L | L | L | L | Control Center | Free Haven | 0 |
| Bow | I | I | A | L | L | L | Berserker's Fury | Castle Ironfist | 500 |
| Duelist's Edge | Misty Islands | 500 | |||||||
| Berserker's Fury | Silver Cove | 625 | |||||||
| Duelist's Edge | Free Haven | 625 | |||||||
| Dagger | I | I | I | N | A | N | Buccaneer's Lair | New Sorpigal | 150 |
| Protection Services | Frozen Highlands | 250 | |||||||
| Mace | L | L | L | A | N | I | Duelist's Edge | Misty Islands | 500 |
| Duelist's Edge | Free Haven | 625 | |||||||
| Spear | I | I | L | N | N | N | Blade's End | New Sorpigal | 375 |
| Blade's End | Frozen Highlands | 750 | |||||||
| Staff | L | L | L | I | I | A | Blade's End | New Sorpigal | 375 |
| Blade's End | Frozen Highlands | 750 | |||||||
| Sword | A | A | I | N | N | N | Blade's End | New Sorpigal | 375 |
| Blade's End | Frozen Highlands | 750 | |||||||
| Leather Armor | A | I | I | I | I | I | Buccaneer's Lair | Misty Islands | 200 |
| Smuggler's Guid | Blackshire | 250 | |||||||
| Protection Services | Silver Cove | 300 | |||||||
| Blade's End | New Sorpigal | 375 | |||||||
| Chain Armor | I | I | L | L | N | N | Berserker's Fury | Castle Ironfist | 500 |
| Duelist's Edge | Misty Islands | 500 | |||||||
| Berserker's Fury | Silver Cove | 625 | |||||||
| Duelist's Edge | Free Haven | 625 | |||||||
| Plate Armor | L | L | N | N | N | N | Berserker's Fury | Castle Ironfist | 500 |
| Berserker's Fury | Silver Cove | 625 | |||||||
| Shield | I | L | N | L | N | N | Berserker's Fury | Castle Ironfist | 500 |
| Duelist's Edge | Misty Islands | 500 | |||||||
| Berserker's Fury | Silver Cove | 625 | |||||||
| Duelist's Edge | Free Haven | 625 | |||||||
| Air Magic | N | N | A | N | I | L | Initiate of the Elements | New Sorpigal | 750 |
| Initiate of Air | Misty Islands | 1000 | |||||||
| Adept of the Elements | Frozen Highlands | 1250 | |||||||
| Adept of Air | Free Haven | 1500 | |||||||
| Earth Magic | N | N | L | N | I | A | Initiate of the Elements | New Sorpigal | 750 |
| Initiate of Earth | Silver Cove | 1000 | |||||||
| Adept of the Elements | Frozen Highlands | 1250 | |||||||
| Adept of Earth | Free Haven | 1500 | |||||||
| Fire Magic | N | N | I | N | A | L | Initiate of the Elements | New Sorpigal | 750 |
| Initiate of Fire | Misty Islands | 1000 | |||||||
| Adept of the Elements | Frozen Highlands | 1250 | |||||||
| Adept of Fire | Free Haven | 1500 | |||||||
| Water Magic | N | N | L | N | L | I | Initiate of the Elements | New Sorpigal | 750 |
| Initiate of Water | Misty Islands | 1000 | |||||||
| Adept of the Elements | Frozen Highlands | 1250 | |||||||
| Adept of Water | Free Haven | 1500 | |||||||
| Body Magic | N | L | N | A | N | I | Initiate of the Self | New Sorpigal | 750 |
| Initiate of the Body | Castle Ironfist | 1000 | |||||||
| Adept of the Self | Silver Cove | 1250 | |||||||
| Adept of the Body | Free Haven | 1500 | |||||||
| Mind Magic | N | L | N | I | N | I | Initiate of the Self | New Sorpigal | 750 |
| Initiate of the Mind | Castle Ironfist | 1000 | |||||||
| Adept of the Self | Silver Cove | 1250 | |||||||
| Adept of the Mind | Free Haven | 1500 | |||||||
| Spirit Magic | N | A | N | I | N | L | Initiate of the Self | New Sorpigal | 750 |
| Initiate of the Spirit | Castle Ironfist | 1000 | |||||||
| Adept of the Self | Silver Cove | 1250 | |||||||
| Adept of the Spirit | Free Haven | 1500 | |||||||
| Dark Magic | N | N | N | L | L | N | Initiate of Dark | Frozen Highlands | 1500 |
| Adept of Dark | Blackshire | 2000 | |||||||
| Light Magic | N | N | N | L | L | N | Initiate of Light | Silver Cove | 1500 |
| Adept of Light | Blackshire | 2000 | |||||||
| Bodybuilding | I | L | L | L | L | L | Duelist's Edge | Misty Islands | 500 |
| Duelist's Edge | Free Haven | 625 | |||||||
| Diplomacy | L | I | I | I | I | L | Buccaneer's Lair | Misty Islands | 200 |
| Smuggler's Guild | Blackshire | 250 | |||||||
| Protection Services | Silver Cove | 300 | |||||||
| Disarm Traps | I | I | I | L | L | L | Buccaneer's Lair | New Sorpigal | 150 |
| Buccaneer's Lair | Misty Islands | 200 | |||||||
| Smugger's Guild | Blackshire | 250 | |||||||
| Protection Services | Frozen Highlands | 250 | |||||||
| Protection Services | Silver Cove | 300 | |||||||
| Identify Item | L | L | L | L | L | L | Buccaneer's Lair | New Sorpigal | 150 |
| Buccaneer's Lair | Misty Islands | 200 | |||||||
| Smuggler's Guild | Blackshire | 250 | |||||||
| Protection Services | Frozen Highlands | 250 | |||||||
| Protection Services | Silver Cove | 300 | |||||||
| Learning | L | L | L | L | L | I | Initiate of Air | Misty Islands | 1000 |
| Initiate of Earth | Silver Cove | 1000 | |||||||
| Initiate of Fire | Misty Islands | 1000 | |||||||
| Initiate of Water | Misty Islands | 1000 | |||||||
| Adept of Air | Free Haven | 1500 | |||||||
| Adept of Earth | Free Haven | 1500 | |||||||
| Adept of Fire | Free Haven | 1500 | |||||||
| Adept of Water | Free Haven | 1500 | |||||||
| Meditation | N | L | L | I | I | I | Initiate of the Body | Castle Ironfist | 1000 |
| Initiate of the Mind | Castle Ironfist | 1000 | |||||||
| Initiate of the Spirit | Castle Ironfist | 1000 | |||||||
| Adept of the Body | Free Haven | 1500 | |||||||
| Adept of the Mind | Free Haven | 1500 | |||||||
| Adept of the Spirit | Free Haven | 1500 | |||||||
| Merchant | L | L | L | L | L | L | Buccaneer's Lair | New Sorpigal | 150 |
| Protection Services | Frozen Highlands | 250 | |||||||
| Perception | I | I | I | L | L | L | Buccaneer's Lair | New Sorpigal | 150 |
| Buccaneer's Lair | Misty Islands | 200 | |||||||
| Smuggler's Guild | Blackshire | 250 | |||||||
| Protection Services | Frozen Highlands | 250 | |||||||
| Protection Services | Silver Cove | 300 | |||||||
| Repair Item | L | L | L | I | I | I | Berserker's Fury | Castle Ironfist | 500 |
| Berserker's Fury | Silver Cove | 625 | |||||||
| Blade's End | Frozen Highlands | 750 | |||||||
Expert and Master instructors.
To become an Expert in the skill, you need to have at least rank 4 in that skill. To become a Master in the skill, you must be an Expert, plus meet additional requirements specific to each skill.
| Skill | Expert Trainer (Location) | Fee (gp) | Master Trainer (Location) | Requirement | Fee (gp) |
|---|---|---|---|---|---|
| Axe | Stephan Biggs (Castle Ironfist) | 2000 | Avinril Smythers (Mire of the Damned) | Quest 25 | 0 |
| Connie Lettering (Mire of the Damned) | 2000 | ||||
| Blaster | Igor (New Sorpigal) | 2000 | Rexella (Paradise Valley) | Possess Blaster | 5000 |
| Pat skylark (Eel Infested Waters) | 2000 | ||||
| Bow | Helen Teal (Castle Ironfist) | 2000 | Desmond Weller (Kriegspire) | Rank 8 Battle Mage | 0 |
| Jed Morrison (Frozen Highlands) | 2000 | ||||
| Dagger | Terrance Smith (Castle Ironfist) | 2000 | Jules Miles (Frozen Highlands) | Rank 8 Speed 40 | 5000 |
| Logan Dasher (Free Haven) | 2000 | ||||
| Mace | Jack Crow (Mire of the Damned) | 2000 | Errol Ostermann (Blackshire) | Rank 8 Might 40 | 5000 |
| Dickson Parks (Frozen Highlands) | 2000 | ||||
| Spear | Gonzalo Ramirez (Misty Islands) | 2000 | Burton Rutherford (Mire of the Damned) | Rank 8 Cavaleer | 5000 |
| Sigriv (Silver Cove) | 2000 | ||||
| Staff | Dorf (New Sorpigal) | 2000 | Jasper Rice (Silver Cove) | Rank 8 | 5000 |
| Calvin Black (Misty Islands) | 2000 | ||||
| Sword | Aaron Strongmun (Castle Ironfist) | 2000 | Guy Hampton (Blackshire) | Rank 8 Cavaleer | 0 |
| Michael Ogilvy (Free Haven) | 2000 | ||||
| Leather Armor | Newt Headrow (Castle Ironfist) | 1000 | Arlen Sailor (Frozen Highlands) | Rank 10 | 3000 |
| Arthur O'leary (Misty Islands) | 1000 | ||||
| Chain Armor | Rich Hamburg (Castle Ironfist) | 1000 | David Feather (Mire of the Damned) | Rank 10 Crusader | 0 |
| Preston Harper (Bootleg Bay) | 1000 | ||||
| Plate Armor | Benito Tellmen (Castle Ironfist) | 1000 | Forest Suthers (Free Haven) | Hero | 0 |
| Woodrow Albright (Free Haven) | 1000 | ||||
| Shield | Edgar Carpenter (Castle Ironfist) | 2000 | Bronwyn Meck (Blackshire) | Rank 10 | 5000 |
| Takao (Free Haven) | 2000 | ||||
| Air Magic | Cheryl Duncan (New Sorpigal) | 1000 | Caao Salem (Misty Islands) | Archmage | 4000 |
| Zodahn Delphi (Free Haven) | 1000 | ||||
| Earth Magic | Taro (New Sorpigal) | 1000 | Revee Botania (Silver Cove) | Rank 12 | 4000 |
| Li Tizare (Free Haven) | 1000 | ||||
| Fire Magic | Isao Magistrus (New Sorpigal) | 1000 | Jezebel (Misty Islands) | Rank 12 | 4000 |
| Jack Van Imp (Free Haven) | 1000 | ||||
| Water Magic | Douglass Hill (New Sorpigal) | 1000 | Harper Collins (Misty Islands) | Rank 12 | 4000 |
| Hitomi Mirumoto (Free Haven) | 1000 | ||||
| Body Magic | Abdulai Mahgreb (New Sorpigal) | 1000 | Gilbert Hammer (Silver Cove) | Rank 12 | 4000 |
| Tim O'Hollihan (Free Haven) | 1000 | ||||
| Mind Magic | Virgil Holiday (New Sorpigal) | 1000 | Thane Reper (Silver Cove) | Rank 12 | 4000 |
| Mynasia (Free Haven) | 1000 | ||||
| Spirit Magic | Enoch Highridge (New Sorpigal) | 1000 | Bishop Inquisitorio (Castle Ironfist) | High Priest | 0 |
| Michele Blackshire (Free Haven) | 1000 | ||||
| Dark Magic | Morton Holovin (Frozen Highlands) | 2000 | Su Lang Manchu (Paraside Valley) | Notorious Reputation | 0 |
| Ambrose Bruss (Blackshire) | 2000 | ||||
| Light Magic | Tina Sheltan (Silver Cove) | 2000 | Ki Lo Nee (Eel Infested Waters) | Saintly Reputation | 0 |
| Nicholas Roth (Kriegspire) | 2000 | ||||
| Bodybuilding | Erik Salzburg (New Sorpigal) | 500 | Jason Traveller (Free Haven) | Rank 7 Endurance 30 | 2500 |
| Olaf Berring (Castle Ironfist) | 500 | ||||
| Diplomacy | Walter Hargreaves (Castle Ironfist) | 500 | Jacques Khol (Frozen Highlands) | Rank 7 Fame 200 | 2500 |
| Sylvester Moor (Free Haven) | 500 | ||||
| Disarm Traps | Tylor Tailor (Castle Ironfist) | 500 | Gabe Lester (Frozen Highlands) | Rank 7 Accuracy 30 | 2500 |
| Ivan Magyar (Free Haven) | 500 | ||||
| Identify Item | Shelia Loumpus (New Sorpigal) | 500 | Hans Clifford (Free Haven) | Rank 7 Intellect 30 | 2500 |
| Leon Lazaru (Castle Ironfist) | 500 | ||||
| Learning | Donald Retzer (New Sorpigal) | 2000 | John Tuck (Silver Cove) | Rank 7 Intellect 30 | 5000 |
| Elton Astrogate (Castle Ironfist) | 2000 | ||||
| Meditation | Victor Hazen (New Sorpigal) | 500 | Norio Ariganaka (Misty Islands) | Rank 7 Personality 30 | 2500 |
| Clyde Dagget (Silver Cove) | 500 | ||||
| Merchant | Livia Farrel (Free Haven) | 2000 | Will Ottoman (Silver Cove) | Rank 7 Personality 30 | 4000 |
| Casey Ludwig (Mire of the Damned) | 2000 | ||||
| Preception | Tara D'Cathay (New Sorpigal) | 500 | Macro Galigulia (Mire of the Damned) | Rank 7 Luck 30 | 2500 |
| Shoshi Pertoniki (Bootleg Bay) | 500 | ||||
| Repair Item | Bernard Jacobs (Misty Islands) | 500 | Ryan Tracle (Frozen Highlands) | Rank 7 Accuracy 30 | 2500 |
| Cyrus Montebleu (Silver Cove) | 500 |
Seer
Here is the list of all of the things that the Seer tells you through the course of the game.
Pilgrimages
When you visit the Seer and ask for a pilgrimage, she will send you to one of the twelve shrines and ask you to pray there. The shrine you are sent to is based on the month. A shrine will not reward you if you are not on a pilgrimage, but you do not have to visit the shrine that the Seer mentions -- you can wait until a subsequent month and then visit the shrine for that month.
The first time you do a pilgrimage, you get a permanent +10 to the attribute or resistance that the shrine is dedicated to. Future pilgrimages earn you a permanent +3 to that attribute or resistance.
| Month | Shrine | Location |
|---|---|---|
| January | Might | Bootleg Bay |
| February | Intellect | Misty Islands |
| March | Personality | Silver Cove |
| April | Endurance | Frozen Highlands |
| May | Accuracy | Free Haven |
| June | Speed | Mire of the Damned |
| July | Luck | New Sorpigal |
| August | Fire | Kriegspire |
| September | Electricity | Castle Ironfist |
| October | Cold | Kriegspire |
| November | Poison | Eel Infested Waters |
| December | Magic | Blackshire |
The Seer will also give you advice as to what you should do next in the game. These hints are listed below.
- You should probably show the sixth letter to Andover Potbello in New Sorpigal.
- You need to give The Letter to Regent Wilbur Humphrey in Castle Ironfist.
- I would advise that you perform the promotion quests for the six lords of Enroth until you have advanced a little further.
- You must satisfy the six High Council members in Free Haven to visit the Oracle. Each lord will request a task of you to earn their favor. Preform each of these tasks and then talk to the Council member of that Lord to gain their approval. Once all the members of the High Council gave their permission, you will be allowed to visit the Oracle.
- It appears that Slicker Silvertongue is a traitor on the council. You will need proof to convince Regent Humphrey and have Slicker removed from the Council. Go to the Superior Temple of Baa in Kriegspire and return with proof associating Slicker with the Temple of Baa.
- The Oracle has been asleep since Archibald performed his mischief on it. You will need the four memory crystals to revive the Oracle. They can be found on Hermit's Isle, in Castle Alamos, in Castle Kriegspire, and in Castle Darkmoor.
- To gain access to the Control Center, you will need the Control Cube located in the Temple of VARN in Dragonsands. Bring the Cube back to the Oracle to gain admittance into the Control Center. The Kreegan reactor is immune to all attacks. Only the ancient weapons from the Control Center will harm the reactor. Make sure you have these weapons and the skill to use them.
- Before you destroy the reactor, you will need a spell capable of containing the resulting explosions. You must free Archibald from his stone prison. Talk to Nicholai and bring him the Third Eye -- he will allow you to use Tanir's Bell to turn Archibald back to normal. From there, you should be able to convince Archibald to give you the knowledge you need.
- Now you must destroy the Kreegan Hive. Destroy the reactor, defeat their queen, and make sure to escape with the Ritual of the Void and you will succeed in your task.
Obelisks
This is a list of all of the messages that you find on the Obelisks. Note that they spell out their message when you read vertically down the column.
- Itotecthothesaip
- nhrh_aherheatvdi
- _etecpe__ersoede
- t_haat_lt__en_lc
- hd_scawehSfdewee
- erbthieaeuu_,o'd
- _ay,enis_nn_ans_
- lg____gtS_cln;__
- aoflo'h.hbtid_p_
- nnaifnt_ieif_tu_
- d_re_e_Hpfotyhz_
- _t_staoi_on_oiz_
- oon_htfdorstusl_
- f_oteh__fe_h__e_
- _nrh__tf__cehr__
When read vertically, they reveal the following message:
In the land of the dragon to north by far northeast,
lies the cache of the captain 'neath the weight of the least.
Hid for the Ship of the Sun before her functions ceased,
lift the stone and you have won; this riddle's puzzle pieced.
Items
All of the items in the game are listed here, along with their base stats and value. The value determines the buy and sell price, although this is adjusted by the store's "markup" value, and your Merchant skill.
Items are sorted by the skill that you need to use them with; weapons (Ancient, Axe, Bow, etc); armor (leather, chain, plate, sheields); then all miscellaneous equipable items, and then all other items.
Enchantments on an item add the value of the enchantment to the item. If there is an "X" in the effect of an enchantment, then the value is "per X". Eg, an item "of Charm" has a listed value of 100. Its effect is "+X to Personality", so the value increases by 100gp per point of Personality that it adds.
|
| ||||||||||||||||||||||||||||||||||||||||||||||||||||||||||||||||||||||||||||||||||||||||||||||||||||||||||||||||||||||||||||||||||||||||||||||||||||||||||||||||||||||||||||||||||||||||||||||||||||||||||||||||||||||||||||||||||||||||||||||||||||||||||||||||||||||||||||||||||||||||||||||||||||||||||||||||||||||||||||||||||||||||||||||||||||||||||||||||||||||||||||||||||||||||||||||||||||||||||||||||||||||||||||||||||||||||||||||||||||||||||||||||||||||||||||||||||||||||||||||||||||||||||||||||||||||||||||||||||||||||||||||||||||||||||||||||||||||||||||||||||||||||||||||||||||||||||||||||||||||||||||||||||||||||||||||||||||||||||||||||||||||||||||||||||||||||||||||||||||||||||||||||||||||||||||||||||||||||||||||||||||||||||||||||||||||||||||||||||||||||||||||||||||||||||||||||||||||||||||||||||||||||||
| Artifact Name | Item Type | Damg/AC | Value | Abilities |
|---|---|---|---|---|
| Aegis | Large Shield | 29 | 30000 | Immune to Flesh to Stone effects, Shielding, +20 Luck, and -20 Speed |
| Aphrodite | Ring | 4 | 30000 | +100 Personality and -40 Luck |
| Apollo | Chain Armor | 46 | 30000 | +20 to Resistances, +20 Luck, and -30 Endurance |
| Ares | Mace | 2d4+14 | 30000 | +30 Fire Damage, +25 Fire Resistance |
| Artemis | Longbow | 5d2+12 | 30000 | +20 Electricity damage, -10 to Resistances |
| Arthur | Helm | 5 | 20000 | 'of the Gods' and +25 Spell Points |
| Athena | Ring | 4 | 30000 | +100 Intellect and -40 Might |
| Atlas | Cloak | 16 | 30000 | +100 Might and -40 Speed |
| Conan | Poleax | 3d7+10 | 20000 | Devil and Dragon Slaying |
| Cronos | Axe | 4d2+14 | 30000 | +100 Hit Points and -50 Luck |
| Excalibur | Broadsword | 3d4+12 | 20000 | +30 Might |
| Galahad | Chain Armor | 38 | 20000 | Protection and +25 Hit Points |
| Guinevere | Ring | 2 | 20000 | +30 Spell Points, 'of Light Magic', and 'of Dark Magic' |
| Hades | Longsword | 3d3+15 | 30000 | +20 Poison Damage, +20 Luck, Thievery, and Negative Regeneration |
| Hera | Amulet | 6 | 30000 | +50 Hit Points, +50 Spell Points, +50 Luck, and -50 Intellect |
| Hercules | 2-Handed Sword | 4d5+12 | 30000 | +50 Might, +20 Endurance, -30 Intellect |
| Hermes | Boots | 17 | 30000 | +100 Speed and -40 Accuracy |
| Igraine | Ring | 2 | 20000 | +25 Spell Points and 'of Body, Mind, and Spirit Magic' |
| Lucius | Boots | 14 | 20000 | +30 Speed |
| Merlin | Staff | 2d4+8 | 20000 | Swiftness and +40 Spell Points |
| Mordred | Long Dagger | 2d3+8 | 20000 | Vampiric |
| Morgan | Amulet | 3 | 20000 | +20 Spell Points and 'of Fire, Air, Water, and Earth Magic' |
| Odin | Crown | 10 | 30000 | +50 to Resistances and -40 Speed |
| Pellinore | Plate Armor | 56 | 20000 | +30 Endurance, Hit Recovery, and Hit Point Regeneration |
| Pendragon | Cloak | 11 | 20000 | +30 Luck, Thievery, Immunity to Poison |
| Percival | Longbow | 5d2+10 | 20000 | Swiftness and Carnage |
| Poseidon | Trident | 2d6+15 | 30000 | +20 Might, +20 Endurance, +20 Accuracy, -10 Armor, -10 Speed |
| Thor | Hammer | 2d5+12 | 20000 | of Force |
| Valeria | Small Shield | 20 | 20000 | Shielding and +30 Accuracy |
| Zeus | Plate Armor | 64 | 30000 | +50 Hit Points, +50 Spell Points, +50 Luck, -50 Intellect |
Potions
Potions in Might and Magic VI are created by mixing two herbs or existing potions together. While the simpler potions are very weak, and mostly useless in the game except at the very beginning; the more potent potions are well worth mixing.
| Potion | Color | Effect | Ingredients | |
|---|---|---|---|---|
| Phirna Root | Blue | Restores 2 hit points. | ||
| Widoweeps Berries | Red | Restores 2 spell points. | ||
| Poppysnaps | Green | Causes Poison. | ||
| Cure Poison | Purple | Cures poison. | Blue | Red |
| Cure Wounds | Red | Restores 10 hit points. | Widoweeps Berries | Empty Bottle |
| Energy | Yellow | Adds 10 to primary statistics temporarily. | Poppysnaps | Empty Bottle |
| Magic Potion | Blue | Restores 10 spell points. | Phirna Root | Empty Bottle |
| Protection | Orange | Adds to 10 armor class temporarily. | Red | Yellow |
| Resistance | Green | Adds 10 to resistances temporarily. | Blue | Yellow |
| Bless | White | Grants Bless (as the spell) for 6 hours. | Blue | Purple |
| Extreme Energy | White | Adds 20 to primary statistics temporarily. | Orange | Yellow |
| Haste | White | Grants Haste (as the spell) for 6 hours. | Green | Yellow |
| Heroism | White | Grants Heroism (as the spell) for 6 hours. | Orange | Red |
| Restoration | White | Cures all conditions except dead or stone. | Green | Purple |
| Stone Skin | White | Grants Stone Skin (as the spell) for 6 hours. | Blue | Orange |
| Super Resistance | White | Adds 20 to resistances temporarily. | Blue | Green |
| Supreme Protection | White | Adds 20 to armor class temporarily. | Green | Orange |
| Divine Cure | Black | Adds 100 hit points if at or below maximum and adds one year of age. | Orange | Restoration |
| Divine Magic | Black | Adds 100 spell points if at or below maximum and adds one year of age. | Green | Super Resistance |
| Divine Power | Black | Adds 20 to level temporarily and adds 1 year of age. | Purple | Extreme Energy |
| Essence of Accuracy | Black | Once only: Adds 15 to Accuracy and subtracts 5 from Luck permanently. | Yellow | Bless |
| Essence of Endurance | Black | Once only: Adds 15 to Endurance and subtracts 1 from all other statistics permanently. | Yellow | Supreme Protection |
| Essence of Intellect | Black | Once only: Adds 15 to Intellect and subtracts 5 from Might permanently. | Blue | Stone Skin |
| Essence of Luck | Black | Once only: Adds 15 to Luck and subtracts 5 from Accuracy permanently. | Purple | Super Resistance |
| Essence of Might | Black | Once only: Adds 15 to Might and subtracts 5 from Intellect permanently. | Red | Heroism |
| Essence of Personality | Black | Once only: Adds 15 to Personality and subtracts 5 from Speed permanently. | Blue | Restoration |
| Essence of Speed | Black | Once only: Adds 15 to Speed and subtracts 5 from Personality permanently. | Red | Haste |
| Rejuvenation | Black | Removes all magical aging effects and subtracts 1 from all 7 primary statistics permanently. | Green | Extreme Energy |
Miscellaneous
Other random information: The ranks of Reputation (in order from good to bad) is: Saintly, Angelic, Glorious, Honorable, Respectable, Average, Bad, Vile, Despicable, Monstrous, Notorious.
Spells
It isn't always obvious from the spell description, which of the six "categories" that creatures use to resist against a given magic spell. This table lists all of the offensive spells in the game and how they are resisted: Fire, Cold, Elec(ricity), Pois(on), Magic, Phys(ical damage), or None (ie, not resistable).
| Fire | Resist | Air | Resist | Water | Resist |
|---|---|---|---|---|---|
| Flame Arrow | Fire | Static Charge | Elec | Cold Beam | Cold |
| Fire Bolt | Fire | Sparks | Elec | Poison Spray | Pois |
| Fireball | Fire | Lightning Bolt | Elec | Ice Bolt | Cold |
| Ring of Fire | Fire | Implosion | Phys | Acid Burst | Pois |
| Fire Blast | Fire | Starburst | Elec | Ice Blast | Cold |
| Meteor Shower | Fire | ||||
| Inferno | Fire | ||||
| Incinerate | Fire | ||||
| Earth | Resist | Spirit | Resist | Mind | Resist |
| Stun | Magic | Spirit Arrow | Magic | Mind Blast | Magic |
| Magic Arrow | Phys | Turn Undead | Magic | Charm | Magic |
| Deadly Swarm | Phys | Mass Fear | Magic | ||
| Blades | Phys | Feeblemind | Magic | ||
| Rock Blast | Phys | Psychic Shock | Magic | ||
| Turn to Stone | Magic | ||||
| Death Blossom | Phys | ||||
| Mass Distortion | Magic | ||||
| Body | Resist | Light | Resist | Dark | Resist |
| Harm | Magic | Dispel Magic | None | Toxic Cloud | Pois |
| Flying Fist | Magic | Slow | Magic | Mass Curse | Magic |
| Destroy Undead | Magic | Shrapmetal | Phys | ||
| Prismatic Light | Magic | Shrinking Ray | Magic | ||
| Paralyze | Magic | Finger of Death | Magic | ||
| Sunray | Fire | Moon Ray | Magic | ||
| Dragon Breath | Pois | ||||
| Armageddon | Magic | ||||
| Dark Containment | Magic |
Monsters
This table of information about monsters was gleaned from an internal data structure in the game. The "Special" column is an extra effect on a successful attack. The attacks are listed by the type of damage that they do: If a "-R" follows the attack type, it means that the attack is a ranged attack. For spells, if an "M" follows the skill level, it means that the spell is cast at Master level of ability.
In the game, creatures always come in a set of three types. This table is sorted by the "common name" of the group. When it is unclear what the common name is, I used the name of the weakest member of the group.
| Resistances | ||||||||||||||
|---|---|---|---|---|---|---|---|---|---|---|---|---|---|---|
| Name | HP | AC | XP | Special | Attacks | Spell | Skill | Fire | Elec | Cold | Pois | Mag | Phys | |
| Agar's Pet | 55 | 13 | 299 | Paralyze | Phys (1d12) | Mind Blast | 10 | 10 | 10 | 10 | 10 | Imm | 0 | |
| Agar's Monster | 67 | 15 | 375 | Paralyze | Phys (1d12+6) | Mind Blast | 15 | 20 | 20 | 20 | 20 | Imm | 0 | |
| Agar's Abomination | 79 | 17 | 459 | Stone | Phys (2d12+6) | Mind Blast | 20 | 30 | 30 | 30 | 30 | Imm | 0 | |
| Dust Devil | 73 | 10 | 416 | Elec-R (3d6) | 10 | Imm | 10 | Imm | Imm | 10 | ||||
| Twister | 114 | 12 | 704 | Elec-R (5d6) | 10 | Imm | 10 | Imm | Imm | 10 | ||||
| Air Elemental | 207 | 14 | 1,419 | Break Item | Elec-R (8d6) | 10 | Imm | 10 | Imm | Imm | 10 | |||
| Archer | 35 | 14 | 171 | Phys-R (1d6+1) | 10 | 10 | 10 | 10 | 0 | 0 | ||||
| Master Archer | 93 | 16 | 551 | Phys-R (2d6+2) | Fire-R (3d6) | 20 | 20 | 20 | 20 | 0 | 0 | |||
| Fire Archer | 171 | 22 | 1,131 | Phys-R (3d6+3) | Fire-R (4d6) | Fireball | 5 | 30 | 30 | 30 | 30 | 10 | 0 | |
| Name | HP | AC | XP | Special | Attacks | Spell | Skill | Fire | Elec | Cold | Pois | Mag | Phys | |
| Follower of Baa | 9 | 3 | 39 | Phys (2d4) | 0 | 0 | 0 | 0 | 0 | 0 | ||||
| Mystic of Baa | 17 | 5 | 75 | Phys (2d4+2) | Mind Blast | 1 | 0 | 0 | 0 | 0 | 0 | 0 | ||
| Fanatic of Baa | 25 | 6 | 119 | Phys (2d4+4) | 0 | 0 | 0 | 0 | 0 | 0 | ||||
| Acolyte of Baa | 30 | 14 | 144 | Elec-R (2d4) | 0 | 0 | 0 | 0 | 0 | 0 | ||||
| Cleric of Baa | 67 | 18 | 375 | Elec-R (2d4+4) | Harm | 3 | 0 | 0 | 0 | 0 | 0 | 0 | ||
| Priest of Baa | 137 | 22 | 875 | Elec-R (2d4+8) | Flying Fist | 5 | 0 | 0 | 0 | 0 | 0 | 0 | ||
| Bat | 9 | 5 | 39 | Disease | Phys (1d3) | 0 | 0 | 0 | 0 | 0 | 0 | |||
| Giant Bat | 21 | 8 | 96 | Disease | Phys (1d3+2) | 0 | 0 | 0 | 0 | 0 | 0 | |||
| Vampire Bat | 35 | 10 | 171 | Disease | Phys (2d3+2) | 0 | 0 | 0 | 0 | 0 | 0 | |||
| Name | HP | AC | XP | Special | Attacks | Spell | Skill | Fire | Elec | Cold | Pois | Mag | Phys | |
| Cannibal | 21 | 5 | 96 | Phys (3d3+2) | 0 | 0 | 0 | 0 | 0 | 0 | ||||
| Head Hunter | 30 | 7 | 144 | Weak | Phys (3d3+4) | 0 | 0 | 0 | 0 | 0 | 0 | |||
| Witch Doctor | 40 | 9 | 200 | Phys (3d3+6) | Deadly Swarm | 2 | 5 | 5 | 5 | 5 | 5 | 0 | ||
| Cannibal | 21 | 5 | 96 | Phys (1d9+2) | 0 | 0 | 0 | 0 | 0 | 0 | ||||
| Head Hunter | 30 | 7 | 144 | Poison | Phys (1d9+4) | 0 | 0 | 0 | 0 | 0 | 0 | |||
| Witch Doctor | 40 | 9 | 200 | Phys (1d9+6) | Fire Bolt | 2 | 5 | 5 | 5 | 5 | 5 | 0 | ||
| Cobra | 17 | 10 | 75 | Poison | Phys (1d3+6) | Pois (2d6) | 0 | 0 | 0 | Imm | 0 | 0 | ||
| King Cobra | 40 | 12 | 200 | Poison | Phys (2d3+6) | Pois (3d6) | 0 | 0 | 0 | Imm | 0 | 0 | ||
| Queen Cobra | 61 | 16 | 336 | Poison | Phys (3d3+6) | Pois (4d6) | 0 | 0 | 0 | Imm | 0 | 0 | ||
| Name | HP | AC | XP | Special | Attacks | Spell | Skill | Fire | Elec | Cold | Pois | Mag | Phys | |
| Cutpurse | 9 | 3 | 39 | Steal Item | Phys (2d2+3) | 0 | 0 | 0 | 0 | 0 | 0 | |||
| Bounty Hunter | 17 | 5 | 75 | Steal Item | Phys (2d2+5) | 0 | 0 | 0 | 0 | 0 | 0 | |||
| Assassin | 25 | 10 | 119 | Kill | Phys (2d2+10) | 0 | 0 | 0 | 0 | 0 | 0 | |||
| Devil Spawn | 100 | 20 | 600 | Disease | Phys (2d6+8) | Fire-R (3d6) | Fire Bolt | 4 | Imm | 20 | 20 | 20 | 20 | 50 |
| Devil Worker | 280 | 30 | 2,000 | Disease | Phys (2d6+14) | Fire-R (4d6) | Fire Bolt | 8 | Imm | 30 | 30 | 30 | 30 | 50 |
| Devil Warrior | 540 | 40 | 4,200 | Drain SP | Phys (2d6+20) | Fire-R (5d6) | Fireball | 12 | Imm | 50 | 50 | 50 | Imm | 50 |
| Devil Captain | 180 | 25 | 1,200 | Disease | Phys (2d8+10) | Fire-R (3d8) | Fireball | 6 | Imm | 30 | 30 | 30 | 30 | 50 |
| Devil Master | 400 | 35 | 3,000 | Disease | Phys (2d8+15) | Fire-R (4d8) | Meteor Shower | 10M | Imm | 40 | 40 | 40 | 40 | 50 |
| Devil King | 700 | 45 | 5,600 | Drain SP | Phys (2d8+20) | Fire-R (5d8) | Incinerate | 14M | Imm | 50 | 50 | 50 | Imm | 50 |
| Name | HP | AC | XP | Special | Attacks | Spell | Skill | Fire | Elec | Cold | Pois | Mag | Phys | |
| Red Dragon | 880 | 60 | 7,200 | Fire-R (12d8) | Imm | 50 | 30 | 50 | 50 | 50 | ||||
| Blue Dragon | 1,080 | 80 | 9,000 | Break Item | Cold-R (14d8) | 30 | 70 | Imm | 70 | 70 | 70 | |||
| Gold Dragon | 1,300 | 100 | 11,000 | Break Item | Ener-R (16d8) | 90 | 90 | 90 | 90 | Imm | 90 | |||
| Flame Drake | 129 | 20 | 816 | Fire-R (10d4) | Imm | 10 | 10 | 30 | 10 | 20 | ||||
| Frost Drake | 162 | 25 | 1,064 | Cold-R (12d4) | 10 | 10 | Imm | 10 | 10 | 30 | ||||
| Energy Drake | 198 | 30 | 1,344 | Break Item | Ener-R (15d4) | 20 | 20 | 20 | 10 | 10 | 40 | |||
| Druid | 40 | 12 | 200 | Fire-R (2d4+3) | Harm | 2 | 10 | 10 | 10 | 10 | 10 | 0 | ||
| Great Druid | 73 | 16 | 416 | Cold-R (2d4+6) | Deadly Swarm | 3 | 20 | 20 | 20 | 20 | 20 | 0 | ||
| Grand Druid | 162 | 22 | 1,064 | Drain SP | Magic-R (2d4+12) | Fireball | 6M | 30 | 30 | 30 | 30 | 30 | 0 | |
| Name | HP | AC | XP | Special | Attacks | Spell | Skill | Fire | Elec | Cold | Pois | Mag | Phys | |
| Dwarf | 40 | 6 | 200 | Phys (4d2+4) | Phys (8d2+8) | 20 | 20 | 20 | Imm | 30 | 0 | |||
| Dwarf Warrior | 100 | 12 | 600 | Phys (4d2+8) | Phys (8d2+16) | 30 | 30 | 30 | Imm | 40 | 0 | |||
| Dwarf Lord | 180 | 20 | 1,200 | Break Armor | Phys (4d2+16) | Phys (8d2+32) | 40 | 40 | 40 | Imm | 50 | 0 | ||
| Rock Beast | 137 | 20 | 875 | Phys (10d3) | Phys-R (8d3) | 10 | 10 | 10 | Imm | Imm | 10 | |||
| Earth Spirit | 180 | 25 | 1,200 | Break Armor | Phys (15d3) | Phys-R (12d3) | 10 | 10 | 10 | Imm | Imm | 10 | ||
| Earth Elemental | 280 | 30 | 2,000 | KO | Phys (25d3) | Phys-R (20d3) | 10 | 10 | 10 | Imm | Imm | 10 | ||
| Flying Eye | 180 | 25 | 1,200 | Sleep | Cold-R (5d6) | 20 | 20 | Imm | 0 | Imm | 30 | |||
| Terrible Eye | 280 | 30 | 2,000 | Fear | Fire-R (6d6) | Fireball | 8 | Imm | 30 | 30 | 0 | Imm | 40 | |
| Maddening Eye | 400 | 35 | 3,000 | Insanity | Elec-R (7d6) | Dispel Magic | 10 | 50 | Imm | 50 | 0 | Imm | 50 | |
| Name | HP | AC | XP | Special | Attacks | Spell | Skill | Fire | Elec | Cold | Pois | Mag | Phys | |
| Fighter | 61 | 18 | 336 | Phys (3d3+6) | 10 | 10 | 10 | 10 | 10 | 10 | ||||
| Soldier | 129 | 24 | 816 | Phys (3d3+10) | 20 | 20 | 20 | 20 | 10 | 20 | ||||
| Veteran | 227 | 30 | 1,575 | Break Weapon | Phys (3d3+14) | Phys (3d3+45) | 30 | 30 | 30 | 30 | 10 | 30 | ||
| Fire Beast | 55 | 12 | 299 | Fire-R (2d8) | Imm | 10 | 10 | Imm | Imm | 10 | ||||
| Fire Spirit | 145 | 15 | 936 | Fire-R (5d8) | Imm | 10 | 10 | Imm | Imm | 10 | ||||
| Fire Elemental | 269 | 18 | 1,911 | Break Item | Fire-R (8d8) | Imm | 10 | 10 | Imm | Imm | 10 | |||
| Stone Gargoyle | 73 | 18 | 416 | Weak | Phys (2d12) | 10 | 10 | 10 | Imm | 10 | 20 | |||
| Marble Gargoyle | 114 | 22 | 704 | Paralyze | Phys (2d12+4) | 10 | 10 | 10 | Imm | 15 | 30 | |||
| Diamond Gargoyle | 207 | 26 | 1,419 | Paralyze | Phys (2d12+8) | 10 | 10 | 10 | Imm | 20 | Imm | |||
| Name | HP | AC | XP | Special | Attacks | Spell | Skill | Fire | Elec | Cold | Pois | Mag | Phys | |
| Genie | 207 | 35 | 1,419 | Cold-R (8d4+8) | Ice Bolt | 10M | 0 | 30 | Imm | 30 | Imm | 30 | ||
| Djinn | 325 | 45 | 2,376 | Sleep | Elec-R (10d4+10) | Lightning Bolt | 12M | 30 | Imm | 30 | 0 | Imm | 30 | |
| Efreet | 467 | 55 | 3,575 | Fear | Fire-R (12d4+12) | Fireball | 15M | Imm | 30 | 0 | 30 | Imm | 30 | |
| Ghost | 35 | 25 | 171 | Fear | Magic (1d6+6) | 10 | 10 | 10 | Imm | Imm | 10 | |||
| Evil Spirit | 55 | 30 | 299 | Age | Magic (2d6+6) | 15 | 15 | 15 | Imm | Imm | 15 | |||
| Specter | 93 | 35 | 551 | KO | Magic (3d6+6) | 20 | 20 | 20 | Imm | Imm | 20 | |||
| Goblin | 13 | 6 | 56 | Phys (1d9) | 0 | 0 | 0 | 0 | 0 | 0 | ||||
| Goblin Shaman | 21 | 10 | 96 | Phys (1d9+2) | Fire Bolt | 1 | 0 | 0 | 0 | 0 | 0 | 0 | ||
| Goblin King | 40 | 14 | 200 | Break Item | Phys (1d9+4) | Fire Bolt | 2 | 10 | 10 | 10 | 10 | 10 | 10 | |
| Name | HP | AC | XP | Special | Attacks | Spell | Skill | Fire | Elec | Cold | Pois | Mag | Phys | |
| Guard | 45 | 16 | 231 | Phys (3d3+5) | 5 | 5 | 5 | 5 | 5 | 5 | ||||
| Lieutenant | 93 | 24 | 551 | Phys (3d3+10) | Phys (3d3+20) | 10 | 10 | 10 | 10 | 10 | 10 | |||
| Captain | 207 | 32 | 1,419 | Break Armor | Phys (3d3+20) | Phys (3d3+40) | 20 | 20 | 20 | 20 | 20 | 20 | ||
| Harpy | 61 | 12 | 336 | Drunk | Phys (2d7+2) | 0 | 0 | 0 | 0 | 10 | 0 | |||
| Harpy Hag | 79 | 14 | 459 | Curse | Phys (2d7+5) | 0 | 0 | 0 | 0 | 20 | 0 | |||
| Harpy Witch | 93 | 16 | 551 | Age | Phys (2d7+10) | Mass Curse | 3 | 0 | 0 | 0 | 0 | 30 | 0 | |
| Hydra | 337 | 22 | 2,475 | Phys (15d5) | Fire-R (8d5) | Imm | 10 | 10 | 10 | 10 | 10 | |||
| Venomous Hydra | 467 | 44 | 3,575 | Poison | Phys (20d5) | Pois-R (10d5) | 20 | 20 | 20 | Imm | 20 | 20 | ||
| Colossal Hydra | 617 | 66 | 4,875 | Break Item | Phys (20d5) | Ener-R (10d5) | 30 | 30 | 30 | 30 | 30 | 30 | ||
| Name | HP | AC | XP | Special | Attacks | Spell | Skill | Fire | Elec | Cold | Pois | Mag | Phys | |
| Death Knight | 280 | 45 | 2,000 | Fear | Phys (4d5+20) | Magic-R (4d6) | 20 | 20 | 20 | 20 | 20 | 10 | ||
| Doom Knight | 540 | 65 | 4,200 | Fear | Phys (4d5+30) | Magic-R (6d6) | 30 | 30 | 30 | 30 | 30 | 20 | ||
| Cuisinart | 880 | 85 | 7,200 | Fear | Phys (4d5+40) | Magic-R (8d6) | 50 | 50 | 50 | 50 | 50 | 30 | ||
| Lich | 100 | 15 | 600 | Elec-R (3d8+6) | Dispel Magic | 10 | 10 | 10 | 10 | Imm | Imm | 0 | ||
| Greater Lich | 180 | 20 | 1,200 | Fire-R (4d8+12) | Dispel Magic | 10 | 15 | 15 | 15 | Imm | Imm | 5 | ||
| Power Lich | 280 | 25 | 2,000 | Ener-R (5d8+20) | 20 | 20 | 20 | Imm | Imm | 10 | ||||
| Lizard Man | 13 | 10 | 56 | Phys-R (1d6) | 0 | 0 | 0 | 0 | 0 | 0 | ||||
| Lizard Archer | 25 | 15 | 119 | Phys-R (1d6+2) | Fire-R (2d6) | 0 | 0 | 0 | 0 | 0 | 0 | |||
| Lizard Wizard | 45 | 20 | 231 | Phys-R (1d6+5) | Lightning Bolt | 2 | 10 | 10 | 10 | 10 | 0 | 0 | ||
| Name | HP | AC | XP | Special | Attacks | Spell | Skill | Fire | Elec | Cold | Pois | Mag | Phys | |
| Fire Lizard | 280 | 40 | 2,000 | Fire-R (10d6) | Imm | 30 | 30 | 30 | 30 | 20 | ||||
| Lightning Lizard | 400 | 50 | 3,000 | Break Item | Elec-R (12d6) | 40 | Imm | 40 | 40 | 40 | 30 | |||
| Thunder Lizard | 540 | 60 | 4,200 | Break Item | Cold-R (14d6) | 50 | 50 | Imm | 50 | 50 | 40 | |||
| Apprentice Mage | 6 | 3 | 24 | Phys (2d4) | Flame Arrow | 1 | 0 | 0 | 0 | 0 | 0 | 0 | ||
| Journeyman Mage | 21 | 5 | 96 | Phys (2d4+2) | Cold Beam | 1 | 0 | 0 | 0 | 0 | 0 | 0 | ||
| Mage | 40 | 7 | 200 | Phys (2d4+6) | Lightning Bolt | 2 | 0 | 0 | 0 | 0 | 0 | 0 | ||
| Magyar | 61 | 16 | 336 | Phys (3d7+3) | 20 | 20 | 20 | 20 | 0 | 10 | ||||
| Magyar Soldier | 137 | 22 | 875 | Phys (3d7+6) | Phys (3d7+18) | 30 | 30 | 30 | 30 | 0 | 20 | |||
| Magyar Matron | 247 | 28 | 1,739 | Phys (3d7+12) | Elec-R (7d8) | 50 | 50 | 50 | 50 | 0 | 30 | |||
| Name | HP | AC | XP | Special | Attacks | Spell | Skill | Fire | Elec | Cold | Pois | Mag | Phys | |
| Medusa | 227 | 20 | 1,575 | Stone | Magic (4d4+8) | Harm | 12M | 0 | 0 | 0 | 0 | Imm | 0 | |
| Medusa Enchantress | 280 | 25 | 2,000 | Stone | Magic (5d4+10) | Paralyze | 8M | 0 | 0 | 0 | 0 | Imm | 0 | |
| Gorgon | 337 | 30 | 2,475 | Stone | Magic (6d4+12) | Psychic Shock | 9M | 0 | 0 | 0 | 0 | Imm | 0 | |
| Minotaur | 269 | 30 | 1,911 | Phys (3d7+25) | 10 | 10 | 10 | 10 | Imm | 10 | ||||
| Minotaur Mage | 525 | 35 | 4,071 | Phys (3d7+40) | Lightning Bolt | 12M | 20 | 20 | 20 | 20 | Imm | 20 | ||
| Minotaur King | 861 | 40 | 7,031 | Phys (3d7+60) | Finger of Death | 14 | 30 | 30 | 30 | 30 | Imm | 30 | ||
| Novice Monk | 30 | 16 | 144 | Fire-R (2d4+2) | Fire Bolt | 2 | 10 | 0 | 0 | 0 | 0 | 0 | ||
| Initiate Monk | 73 | 19 | 416 | Elec-R (2d4+8) | Lightning Bolt | 3 | 0 | 10 | 0 | 0 | 0 | 0 | ||
| Master Monk | 153 | 28 | 999 | Weak | Cold-R (2d4+16) | Ice Bolt | 6M | 5 | 5 | 20 | 5 | Imm | 0 | |
| Name | HP | AC | XP | Special | Attacks | Spell | Skill | Fire | Elec | Cold | Pois | Mag | Phys | |
| Ogre | 67 | 12 | 375 | Phys (2d5+10) | 0 | 0 | 0 | 0 | 0 | 0 | ||||
| Ogre Raider | 100 | 14 | 600 | Phys (2d5+15) | 10 | 10 | 10 | 10 | 10 | 10 | ||||
| Ogre Chieftain | 162 | 16 | 1,064 | Poison | Phys (2d5+25) | 20 | 20 | 20 | 20 | 20 | 20 | |||
| Ooze | 50 | 8 | 264 | Poison | Pois (1d6) | 0 | 0 | 0 | Imm | Imm | Imm | |||
| Acidic Ooze | 86 | 10 | 504 | Break Item | Pois (3d6) | Poison Spray | 4 | 0 | 0 | 0 | Imm | Imm | Imm | |
| Corrosive Ooze | 137 | 12 | 875 | Break Item | Pois (5d6) | Toxic Cloud | 5M | 0 | 0 | 0 | Imm | Imm | Imm | |
| Peasant | 3 | 3 | 11 | Phys (2d2) | 0 | 0 | 0 | 0 | 0 | 0 | ||||
| Peasant | 6 | 5 | 24 | Phys (2d2) | 0 | 0 | 0 | 0 | 0 | 0 | ||||
| Peasant | 9 | 6 | 39 | Phys (2d2) | 0 | 0 | 0 | 0 | 0 | 0 | ||||
| Name | HP | AC | XP | Special | Attacks | Spell | Skill | Fire | Elec | Cold | Pois | Mag | Phys | |
| Peasant | 13 | 4 | 56 | Phys (2d2) | 0 | 0 | 0 | 0 | 0 | 0 | ||||
| Peasant | 17 | 6 | 75 | Phys (2d2+2) | 0 | 0 | 0 | 0 | 0 | 0 | ||||
| Peasant | 21 | 8 | 96 | Phys (2d2+4) | 0 | 0 | 0 | 0 | 0 | 0 | ||||
| Common Rat | 6 | 4 | 24 | Disease | Phys (1d8) | 0 | 0 | 0 | 0 | 0 | 0 | |||
| Large Rat | 13 | 5 | 56 | Disease | Phys (1d8+2) | 0 | 0 | 0 | 0 | 0 | 0 | |||
| Giant Rat | 21 | 8 | 96 | Disease | Phys (1d8+6) | 0 | 0 | 0 | 0 | 0 | 0 | |||
| Sea Serpent | 162 | 30 | 1,064 | Cold-R (1d20+25) | 5 | 0 | Imm | 0 | 5 | 0 | ||||
| Sea Monster | 237 | 35 | 1,656 | Cold-R (1d20+35) | 10 | 0 | Imm | 0 | 10 | 0 | ||||
| Sea Terror | 374 | 40 | 2,784 | Fear | Cold-R (1d20+45) | 20 | 0 | Imm | 0 | 10 | 0 | |||
| Name | HP | AC | XP | Special | Attacks | Spell | Skill | Fire | Elec | Cold | Pois | Mag | Phys | |
| Skeleton | 21 | 8 | 96 | Phys (3d4) | 0 | 0 | 0 | Imm | Imm | 0 | ||||
| Skeleton Knight | 40 | 10 | 200 | Fear | Phys (3d4+2) | 0 | 0 | 0 | Imm | Imm | 0 | |||
| Skeleton Lord | 61 | 14 | 336 | Curse | Phys (3d4+6) | 0 | 0 | 0 | Imm | Imm | 0 | |||
| Sorcerer | 137 | 14 | 875 | Elec-R (9d4) | Lightning Bolt | 8M | 10 | Imm | 10 | 10 | 10 | 0 | ||
| Magician | 227 | 18 | 1,575 | Elec-R (12d4) | Lightning Bolt | 12M | 20 | Imm | 20 | 20 | 20 | 0 | ||
| Warlock | 400 | 30 | 3,000 | Insanity | Ener-R (16d4) | Lightning Bolt | 16M | 30 | Imm | 30 | 30 | 30 | 0 | |
| Spider | 17 | 10 | 75 | Poison | Phys (3d2) | 0 | 0 | 0 | Imm | 0 | 0 | |||
| Giant Spider | 30 | 12 | 144 | Poison | Phys (3d2+3) | Pois-R (3d2) | 0 | 0 | 0 | Imm | 0 | 0 | ||
| Huge Spider | 50 | 16 | 264 | Poison | Phys (3d2+6) | Pois-R (4d2) | 0 | 5 | 5 | Imm | 5 | 0 | ||
| Name | HP | AC | XP | Special | Attacks | Spell | Skill | Fire | Elec | Cold | Pois | Mag | Phys | |
| Blood Sucker | 6 | 6 | 24 | Disease | Phys (1d2) | 0 | 0 | 0 | 0 | 0 | 0 | |||
| Brain Sucker | 13 | 8 | 56 | Disease | Phys (1d2+2) | 0 | 0 | 0 | 0 | 0 | 0 | |||
| Soul Sucker | 30 | 10 | 144 | Disease | Phys (2d2+2) | 0 | 0 | 0 | 0 | 0 | 0 | |||
| Swordsman | 40 | 10 | 200 | Phys (3d7+4) | 5 | 5 | 5 | 5 | 5 | 5 | ||||
| Expert Swordsman | 79 | 15 | 459 | Phys (3d7+6) | 10 | 5 | 5 | 5 | 5 | 5 | ||||
| Master Swordsman | 129 | 20 | 816 | Break Weapon | Phys (3d7+8) | Phys (3d7+20) | 15 | 10 | 10 | 10 | 10 | 10 | ||
| Thief | 30 | 10 | 144 | Steal Item | Phys (3d4+3) | Phys-R (3d4+1) | 0 | 0 | 0 | 0 | 0 | 0 | ||
| Burglar | 50 | 14 | 264 | Steal Item | Phys (3d4+6) | Phys-R (3d4+3) | 0 | 0 | 0 | 0 | 0 | 0 | ||
| Rogue | 86 | 20 | 504 | Steal Item | Phys (3d4+12) | Phys-R (3d4+6) | 0 | 0 | 0 | 0 | 0 | 0 | ||
| Name | HP | AC | XP | Special | Attacks | Spell | Skill | Fire | Elec | Cold | Pois | Mag | Phys | |
| Thug | 30 | 12 | 144 | Phys (2d4+1) | 0 | 0 | 0 | 0 | 0 | 0 | ||||
| Ruffian | 61 | 14 | 336 | Phys (2d4+5) | 0 | 0 | 0 | 0 | 0 | 0 | ||||
| Brigand | 114 | 16 | 704 | Phys (2d4+10) | Phys (2d4+20) | 5 | 5 | 5 | 5 | 5 | 5 | |||
| Titan | 617 | 60 | 4,875 | Break Item | Elec-R (2d20+60) | Psychic Shock | 15M | 30 | Imm | 30 | 30 | Imm | 30 | |
| Noble Titan | 787 | 70 | 6,375 | Break Item | Elec-R (2d20+80) | Psychic Shock | 18M | 50 | Imm | 50 | 50 | Imm | 50 | |
| Supreme Titan | 1,187 | 80 | 9,975 | Kill | Elec-R (2d20+120) | Psychic Shock | 25M | 80 | Imm | 80 | 80 | Imm | 80 | |
| Patrol Unit | 400 | 60 | 3,000 | Break Item | Ener-R (10d5+10) | 30 | 10 | 30 | Imm | Imm | 20 | |||
| Enforcer Unit | 700 | 80 | 5,600 | Break Item | Ener-R (12d5+15) | 40 | 20 | 40 | Imm | Imm | 30 | |||
| Terminator Unit | 1,080 | 100 | 9,000 | Erradicate | Ener-R (20d5+20) | 60 | 30 | 60 | Imm | Imm | 50 | |||
| Name | HP | AC | XP | Special | Attacks | Spell | Skill | Fire | Elec | Cold | Pois | Mag | Phys | |
| Defender of VARN | 227 | 40 | 1,575 | Phys (3d6+20) | Ener-R (5d6) | Psychic Shock | 7M | 20 | 20 | 20 | 20 | Imm | 10 | |
| Sentinel of VARN | 467 | 50 | 3,575 | Phys (3d6+35) | Ener-R (6d6) | Psychic Shock | 11M | 30 | 30 | 30 | 30 | Imm | 20 | |
| Guardian of VARN | 617 | 60 | 4,875 | Break Weapon | Phys (3d6+50) | Ener-R (8d6) | Psychic Shock | 13M | Imm | Imm | Imm | Imm | Imm | 30 |
| Water Beast | 61 | 10 | 336 | Phys (3d12) | Ice Bolt | 3 | 10 | 10 | Imm | Imm | Imm | 10 | ||
| Water Spirit | 129 | 13 | 816 | Phys (4d12) | Ice Bolt | 5 | 10 | 10 | Imm | Imm | Imm | 10 | ||
| Water Elemental | 237 | 16 | 1,656 | Break Item | Phys (6d12) | Ice Bolt | 7 | 10 | 10 | Imm | Imm | Imm | 10 | |
| Wolfman | 100 | 20 | 600 | Disease | Phys (2d12+12) | 5 | 5 | 5 | 5 | 5 | 5 | |||
| Werewolf | 180 | 25 | 1,200 | Disease | Phys (2d12+16) | 10 | 10 | 10 | 10 | 10 | 10 | |||
| Greater Werewolf | 280 | 30 | 2,000 | KO | Phys (2d12+20) | 15 | 15 | 15 | 15 | 15 | 15 | |||
| Wyrm | 400 | 40 | 3,000 | Poison | Pois-R (10d10) | 30 | 30 | 30 | Imm | 30 | 30 | |||
| Giant Wyrm | 540 | 50 | 4,200 | Poison | Pois-R (10d10) | 40 | 40 | 40 | Imm | 40 | 40 | |||
| Great Wyrm | 700 | 60 | 5,600 | Poison | Pois-R (10d10) | 50 | 50 | 50 | Imm | 50 | 50 | |||
| Unique Creatures | ||||||||||||||
| Name | HP | AC | XP | Special | Attacks | Spell | Skill | Fire | Elec | Cold | Pois | Mag | Phys | |
| Agar | 320 | 25 | 11,000 | Phys (5d9+30) | 20 | 20 | 20 | 20 | 10 | Imm | ||||
| Devil of Baa | 540 | 40 | 0 | Drain SP | Phys (2d6+20) | Fire (5d6+0) | 30 | 30 | 30 | 30 | 0 | 30 | ||
| Demon Queen | 1,300 | 40 | 11,000 | Drain SP | Phys (2d8+20) | Incinerate | 14M | Imm | 50 | 50 | 50 | 50 | Imm | |
| Fallen Defender | 227 | 40 | 0 | Phys (3d6+20) | Energy (5d6+0) | 20 | 20 | 20 | 20 | 0 | Imm | |||
| Lesser Genie | 136 | 35 | 0 | Cold (6d4+8) | 0 | 0 | Imm | 0 | 0 | 75 | ||||
| Lich King | 600 | 60 | 2,000 | Phys (5d8+20) | 20 | 20 | 20 | Imm | 10 | Imm | ||||
| Longfang Witherhide | 880 | 60 | 7,200 | Fire-R (12d8+0) | Imm | 50 | 30 | 50 | 50 | 50 | ||||
| Lurch | 2,000 | 40 | 7,031 | Phys (3d7+60) | 30 | 30 | 30 | 30 | 30 | Imm | ||||
| Name | HP | AC | XP | Special | Attacks | Spell | Skill | Fire | Elec | Cold | Pois | Mag | Phys | |
| Q | 16,000 | 60 | 75 | Magic-R (10d5+2) | Magic (10d5+2) | Finger of Death | 10 | 0 | 0 | 0 | 0 | 0 | Imm | |
| Queen Spider | 50 | 16 | 0 | Poison | Phys (3d2+6) | Pois (4d2+0) | 0 | 0 | 0 | Imm | 0 | 0 | ||
| Reactor | 1,300 | 40 | 11,000 | Energy-R (20d5+20) | Imm | Imm | Imm | Imm | Imm | Imm | ||||
| Rogue Leader | 133 | 20 | 0 | Steal | Phys (2d10+12) | Magic (3d4+6) | 0 | 0 | 0 | 0 | 0 | 0 | ||
| Slicker Silvertongue | 137 | 22 | 875 | Phys (2d4+8) | 0 | 0 | 0 | 0 | 0 | 0 | ||||
| Snergle | 150 | 20 | 0 | Break Armor | Phys (4d2+10) | Magic (8d2+20) | 40 | 40 | 40 | Imm | 0 | 50 | ||
| Werewolf Leader | 420 | 30 | 0 | KO | Phys (3d12+25) | 10 | 10 | 10 | 10 | 15 | 10 | |||
| Name | HP | AC | XP | Special | Attacks | Spell | Skill | Fire | Elec | Cold | Pois | Mag | Phys | |
| Resistances | ||||||||||||||
Winning Party
This is a summary of what my winning party had at the end of the game. The three columns for each of the stats represents the stat counting everything, counting only equipment, and "naked".
| Roberts | Nalakas | Serena | Raye | |||||||||
|---|---|---|---|---|---|---|---|---|---|---|---|---|
| (Knight) | (Paladin) | (Cleric) | (Sorcerer) | |||||||||
| Might | 307 | 185 | 88 | 255 | 133 | 89 | 250 | 128 | 79 | 203 | 81 | 81 |
| Intellect | 195 | 73 | 73 | 144 | 22 | 72 | 195 | 73 | 73 | 386 | 264 | 105 |
| Personality | 194 | 72 | 72 | 293 | 171 | 110 | 404 | 282 | 96 | 199 | 77 | 77 |
| Endurance | 303 | 181 | 93 | 238 | 116 | 81 | 217 | 95 | 100 | 223 | 101 | 91 |
| Accuracy | 212 | 90 | 68 | 204 | 82 | 72 | 205 | 83 | 83 | 218 | 96 | 71 |
| Speed | 230 | 108 | 78 | 233 | 111 | 73 | 206 | 84 | 84 | 214 | 92 | 82 |
| Luck | 206 | 84 | 84 | 258 | 136 | 71 | 175 | 53 | 73 | 213 | 91 | 81 |
| Hit Points | 1128 | 1088 | 1046 | 775 | 750 | 660 | 589 | 569 | 532 | 558 | 542 | 528 |
| Spell Points | 0 | 0 | 0 | 500 | 485 | 389 | 785 | 750 | 645 | 735 | 720 | 650 |
| Armor Class | 240 | 202 | 10 | 210 | 172 | 9 | 216 | 178 | 10 | 138 | 100 | 10 |
| Level | 96 | 96 | 96 | 101 | 101 | 96 | 96 | 96 | 96 | 96 | 96 | 96 |
| Experience | 4756919 | 4756413 | 4762019 | 4753750 | ||||||||
| Fire | 181 | 101 | 51 | 129 | 49 | 49 | 151 | 71 | 51 | 171 | 91 | 61 |
| Electricity | 178 | 98 | 48 | 152 | 72 | 48 | 158 | 78 | 58 | 128 | 48 | 48 |
| Cold | 179 | 99 | 49 | 115 | 35 | 35 | 135 | 55 | 35 | 115 | 35 | 35 |
| Poison | 165 | 85 | 35 | 120 | 40 | 40 | 135 | 55 | 35 | 115 | 35 | 35 |
| Magic | 135 | 55 | 55 | 126 | 46 | 46 | 136 | 56 | 56 | 126 | 46 | 46 |
| Weapon | Blaster Rifle | Blaster Rifle | Blaster Rifle | Blaster Rifle | ||||||||
| Shield | Astral Shield of Defense (+24) | Olympian Shield of Elec Resistance (+24) | Olympian Shield of Health (+21) | |||||||||
| Armor | Golden Plate Armor of Earth | Golden Plate Armor Zues | Majestic Chain Mail Apollo | Imperial Leather of the Phoenix | ||||||||
| Belt | Soverign Belt of Might (+25) | Soverign Belt of Speed (+18) | Soverign Belt of Earth | Warlord Belt of Thought (+15) | ||||||||
| Cloak | Doom's Day Cloak of Might (+24) | Doom's Day Cloak of Charm (+17) | Doom's Day Cloak of the Eclipse | Doom's Day Cloak of Thought (+23) | ||||||||
| Helm | Almighty Crown Odin | Almighty Crown of Power | Angelic Helm of Charm (+24) | Angelic Helm of Precision (+25) | ||||||||
| Bow | Stellar Bow of the Dragon | Precision Bow of the Sun | Stellar Bow of the Dragon | Stellar Bow of the Sky | ||||||||
| Boots | Ultimate Boots Lucius | Ultimate Boots of the Sun | Ultimate Boots of Might (+24) | Ultimate Boots of Thought (+19) | ||||||||
| Gauntlets | Ultimate Gauntlets of Vigor (+24) | Cavalier Gauntlets of the Troll | Ultimate Gauntlets of Charm (+20) | Cavalier Gauntlets of Thought (+21) | ||||||||
| Amulet | Ancient Amulet of Vigor (+24) | Ruby Star Amulet of Might (+24) | Ancient Amulet of Charm (+17) | Ruby Star Amulet Morgan | ||||||||
| Rings | Scarab Ring of Precision (+22) | Exquisite Ring of Speed (+20) | Lunar Ring Aphrodite | Scarab Ring of Earth | ||||||||
| Exquisite Ring of Might (+23) | Scarab Ring Igraine | Scarab Ring of Charm (+25) | Valuable Ring of the Eclipse | |||||||||
| Precious Ring of Speed (+20) | Lunar Ring of the Stars | Scarab Ring of Life | Exquisite Ring of Thought (+23) | |||||||||
| Witch Ring of the Golem | Lunar Ring of the Sun | Scarab Ring Igraine | Valuable Ring of Thought (+15) | |||||||||
| Scarab Ring of Speed (+20) | Scarab Ring of Charm (+24) | Lunar Ring Guinevere | Lunar Ring of the Moon | |||||||||
| Sparkeling Ring of the Troll | Scarab Ring of Earth | Valuable Ring of the Troll | Scarab Ring of Thought (+23) | |||||||||