Introduction

Welcome to Onimusha Warlords: Sinjin's Ultimate Warlord Strategy Guide. You are about to take part in an amazing adventure taking you from ancient temples and fortresses to the very bowels of the underworld. Along the way you will fight armies of undead and other demonic monsters sent to stop you from saving the princess and fulfilling your destiny.
There are several weapons you will find during your adventure and knowing which one to use at the right time is crucial to your success. Your three primary weapons are the Raizan, Enryuu, and Shippuu. These three blades are infused with Elemental Magic and are directly linked with their corresponding Orbs. Throughout the game you will need to upgrade both the Orbs and these Swords using the Soul Energy you collect from your defeated foes.
During your travels you will find many items that will assist you in completing your quest. There are common items that can be found often, and unique items that only appear in one location and serve a specific purpose. Below is a complete list of all these items with basic descriptions of their functions. Common items are color-coded throughout the text of this guide. The Unique Item List is keyed to link back to the text describing the location where that item is found. These items all appear in white text.
Scattered about the levels are several Magic Mirrors. These mirrors allow you to SAVE your game as well as use your Soul Energy to ENHANCE Swords, Orbs, or various intentory items. These mirror locations are color-coded in the text and also shown on the maps as a purple dot.
We join our heroes just as they are forced to part ways. Kaede heads down one path while you choose to investigate the other. Your instincts are flawless as you quickly encounter a pair of devilish creatures dragging the limp body of the princess toward a gate. You engage in combat and after a few successful attacks they flew to the top of a nearby tower.
At the top of the steps you can just make out a chest hidden behind the bushes to the right. Open the chest and get the Magic Jewel. No sense in saving it so go into your inventory and use it to increase your magic bar. Now head down the other path that ends at a door sealed with a blue magic lock. Before you enter you may want to use the Magic Mirror and check out the Trick Box. This is a different type of box that requires you to enter a phrase. You can obtain the information by reading the books and other notes you have collected, or you can just pick phrases 1-3-6 (ordered left to right) then confirm your selection to open the box and get a Power Jewel.
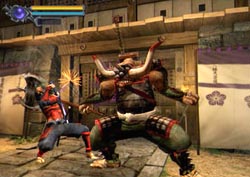
The Keep is a complex multi-level structure with plenty of places to explore and plenty of demons to kill. You can start with the ones in the main room as you enter. Watch out for the Samurai - he is very tough and can even grab you by the throat and hold you up choking you for several points of damage. When the room is cleaned out you have your choice of several doors.
Take the first right turn you come to. If you go straight you will come to a door blocked by cursed spirits and cannot pass. Follow the branching path back around to a door and enter the next room. Just inside the door is a Magic Mirror and the nearby chest hold a Herb.
Now is your first chance to play as Kaede. Exit the Keep and get the Red Key from the injured soldier along the way. You will encounter plenty of demons and zombies as you exit the Keep and even more outside. Kaede isn't nearly as strong or powerful as Samanosuke so you may want to avoid some encounters. Remember you are trying to stockpile healing items so you don't want to be using a lot of them on Kaede.
The East Area has several branching paths that are unique to Samanosuke and Kaede. Ultimately you will be reunited for the boss encounter at the end of this area. For now, follow the walkway around to the north then turn east and continue past the branching path to the left to end up at a green locked door. Samurai will guard the upcoming sections of walkway so be ready for them.
This is a very short level with some intense combat. When you first enter you will meet that crazy Demon Scientist from the beginning of the game. He will summon Marcellus, an enhanced version of the warrior you faced on the rooftop of the keep earlier in the game. This time he is much more powerful and also has a large shield that protects him.
This is a very challenging set of 20 levels where you will fight every type of monster in the game. After you complete each level you are offered the choice to continue deeper into the Dark Realm or return to the surface. If you return you will have to start the entire challenge over. You will fight dozens of deadly monsters so it is very important to have a good supply of health items. You will find a few of these items as you go deeper into the Dark Realm but you should have at least 2 Medkits and at least 5-7 Herbs.
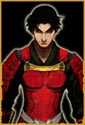 You play as the mighty warlord and master swordsman Samanosuke in search of your kidnapped cousin Yuki. During your last battle she was captured by demons for some unknown and unspeakable purpose. It is your mission to find and rescue the princess at all costs. You will have to use all the resources and skills you have mastered over the years. The quest is long and difficult but you are not alone.
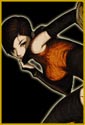 You are joined by Kaede; an expert kunoichi (female ninja) who was originally sent to assassinate you. Instead, she develops absolute trust in you and joins you on your quest to save the princess. While not as powerful as Samanosuke, she does have excellent fighting skills and will offer much assistance to you during your quest. Throughout the adventure you will be able to play as each of these characters, sometimes even working together to solve puzzles and disarm traps.
Onimusha Warlords also has a few secrets hidden throughout the levels. There are 20 pieces of Flourite that you can find and collect. If you manage to get all 20 pieces you will unlock a Bonus mini-game called Oni Spirits, an arena based challenge that if successfully completed with unlock an Ultimate Mode for the regular game. These pieces of Flourite are virtually invisible on the screen. In fact, until you get the Vision Staff much later in the game you really have no way of locating these secrets without checking every square inch of each level manually. Naturally, Sinjin is here to help, so I will be providing you with the locations for all 20 pieces of Flourite throughout the walkthrough. I've also indicated the locations of all Flourite on the level maps, and there is a Hidden Flourite Index at the end of this walkthrough that you can refer to if you are just missing a few pieces and need to quickly locate them.
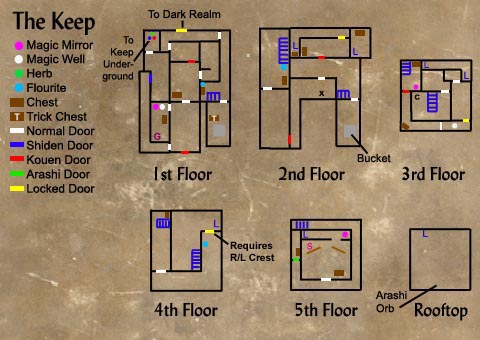
I've included detailed level maps that show all of the locations with items and the various color-coded doors. These maps are based on the maps you will find while playing Onimusha, however I have taken some creative liberties and rearranged some things as well as providing much more detail. These maps are intended as a visual aid, so items shown on the map may not always be exactly where they are in the game. Refer to the text for more exact descriptions and when all else fails - look around and search your surroundings.
Combat and Inventory
Samanosuke and Kaede have two unique fighting styles and various attack abilities. Samanosuke is a powerful swordsman with the added ability of various magical attacks enabling him to deliver swift punishment to his foes. Kaede is armed with only a dagger and some throwing knives, so her attacks are not as deadly. She is more agile and is able to dodge attacks and maneuver into strategic positions for a one-slash fatal attack.
These two characters are also limited in the items they are allowed to use. While they both share a "common inventory" certain items may be inaccessible while playing as either person. Using the resources and your own specific talents is just part of the challenge.
Here are the shared basic movements and attack commands for each character:
D-Pad: Basic Movement
UP - Move forward in facing direction
R1 - Readies weapon/Locks on nearest enemy
DOWN - Quick leap backward
L/R - Pivot left or right
R2 - Quick 180 turn
L1 - Block Attack
L2 - Not used
 - Use Item/Open Door
 - Attack (Can be combined with D-pad for special attacks)
 - Hold down to Absorb Souls
 - Magical Attack
R1+Left/Right - Circle strafes the current enemy
R1+Down - Kick enemy
R1+Up+ - Quick sword jab
R1+ - Lock on for magical attack
Special Note: Both warriors can deliver a fatal finishing blow to any fallen enemy by standing over them and pressing attack.
Kaede's Special Attacks
R1+Up+ - Forward flip with a reverse twist. Move in close for one-hit fatality
- Throw Kunai (knives) at enemy
Weapons
Upgrading the swords increases the power of their attacks while upgrading the Orbs allows you to dispel the magical locks on many of the door granting you access to other parts of the game. These upgrades (or enhancements) can only be done at special Magic Mirrors scattered about the levels. It's up to you to decide how to spend your Soul Energy. I recommend keeping your Orbs upgraded at all times as you will require higher level Orbs to advance to new sections of the game. Both Swords and Orbs can be upgraded to a maximum of Level 3.
Here is a list of weapons and their various upgrades:
Swords
Range Weapons
Ammo
Inventory Items
Common Items
Unique Items - (Alphabetical Order)
Arashi Orb - Opens sealed Green Doors and enables Wind Magic.
Bishamon Ocarina - Flute to open secret chamber with Bishamon Sword.
Blue Key - Opens locked door in Keep Underground.
Crest Piece (Left) - Part of key to access upper levels of the Keep.
Crest Piece (Right) - Part of key to access upper levels of the Keep.
Decorated Arrow - Used to get Great Arrow and Green Key.
Decorated Sword - Used to open door to East Area.
Evil Plate - Missing half of the key to access the Dark Realm.
Gear - Missing cog in secret door mechanism.
Gold Plate - Part of key to access West Prison.
Great Arrow - Used to destroy barrier to Dark Realm.
Great Bow - Used to destroy barrier to Dark Realm.
Green Key - Open locked door leading to boat dock in East Area.
Kouen Orb - Opens sealed Red Doors and enables Fire Magic.
Purifier Bell - Dispels evil spirits.
Red Key - Opens locked door leading to West Area.
Rope Ladder - Grants access to dried moat.
Rosary of Com - Allows you to communicate with the dead.
Shiden Orb - Opens sealed Blue Doors and enables Thunder Magic.
Silver Plate - Part of key to access West Prison.
Soul Absorber 1 - Automatically consumes souls while you continue to fight.
Soul Absorber 2 - Automatically consumes souls while you continue to fight.
Statue Head - Used to open passage to Matchlock.
Talisman - Restores you to full health when killed.
Vision Staff - Illuminates hidden Flourite pieces when you are near.
Wood Ladder - Allows escape from Keep Underground.
Magic Mirrors, Wells, and Soul Energy
Magic Wells are also scatter about (although not as frequent as mirrors) and will allow you to replenish your magical attack meter. These wells have an infinite supply of energy so return as often as necessary to keep your blades fully powered. They are shown on the maps as a white dot.
Whenever you kill a demon their Soul Energy is released. It will only linger in the immediate area for a few moments, so you have to absorb it quickly before if floats out of range. There are three types of energy and the amount if each is shown by the size of the sphere. Healing energy is yellow, while magical energy is blue and normal soul energy is red. Make sure to distance yourself from enemies if you try to collect this energy during combat. You are unable to attack or defend yourself while absorbing Soul Energy.
TIP: Collecting the yellow energy whenever possible will greatly reduce your consumption of Herbs and Medicine. You will need as many of these healing items as you can spare for the challenging trip to the Dark Realm Arena.
That's about all I can tell you before the adventure begins. It is now time for you to begin your quest and fulfill your destiny as an Onimusha Warlord.
Nanamagari
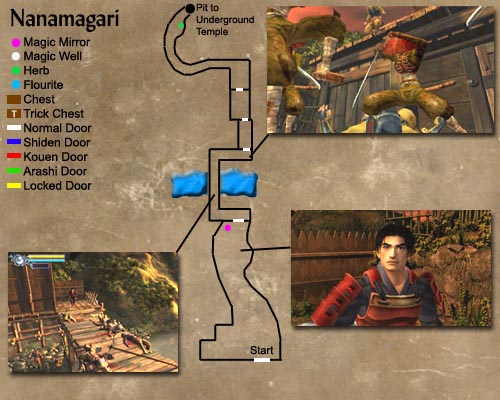
As you comfort the princess and wonder how the game can be over so quickly a giant horned demon warrior bursts through the trees. Your feeble attacks only annoy the monster as he bashes you with his club sending you into the rocks. As you slip into unconsciousness the demon grabs Yuki and leaves the area.
While in your unconscious state you are visited by Spirits of the Ogre Clan. This clan was recently defeated by the very same demons that kidnapped Yuki, and they offer their assistance. They give you a Gauntlet that has the ability to absorb the souls of your defeated foes and channel that energy into your weapons and other items. Before you can refuse their offer you return to the "real world" with the Gauntlet firmly attached to your right arm.
Before exiting through the large gate you will want to investigate the Magic Mirror nearby.
You can't enhance anything at this time, but you may want to save your game as things are going to get challenging very fast. When you are ready you can go through the gate.
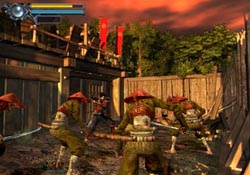 Turn right and head across the bridge where crows are chewing on some fallen corpses. Continue to the other side and take note of a small group of demonic creatures attacking the villagers. Attack the group repeating pressing the attack key and the R1 to change targets after one falls. This is quicker than doing the 180-spin and lines you up for your next target. Enter the first room and then the next where you will be ambushed by more demons. The villagers lock you in so you are forced to defend yourself.
When the villagers finally let you out and apologize they will reveal the location of a hidden path leading to the keep. Follow the path through the woods where you are ambushed by a few more demons. Grab the Herb to the right of the cave entrance then enter as a small cave-in erupts and a bunch of bats fly into your face. Confirm your decision to drop into the hole to end this short level.
Underground Temple
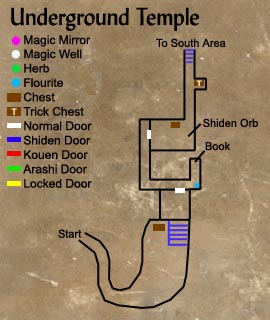 Follow the twisting passage and kill the demon that attacks you from the first blind turn in the cave. The cave opens into a large underground temple where more demons pounce in from the sides. To the left of the stairs is a chest with a Temple Map. Head up the steps and check out the mummified monk. When you move the green scroll the entire pedestal slides away revealing a door.
More demons are waiting inside and they attack from both sides as you enter. Kill them all then head to the right to search the short dead end hall. Open the cabinet at the end of the hall to get the Seiryu and locate hidden Flourite #1 in the opposite corner. Now head around to the door around the next corner and enter the long room lines with pottery. Smashing the urns with your sword will reveal a chest that contains Journal #1.
At the end of this room is blue sphere. Touch the Shiden Orb to infuse your blade with the power of thunder and lightning. Take the passage leading north and note the chest in the alcove to the right. This is your first Trick Box. To open the box you need to arrange the numbers in sequential order using a limited amount of moves. The numbers are grouped in sets of four and rotate clockwise. In this case you will need to move the LEFT group then the RIGHT and then the LEFT one more time. Your reward is the Rope Ladder. Proceed up the stairs at the end of this passage to exit the level.
South Area
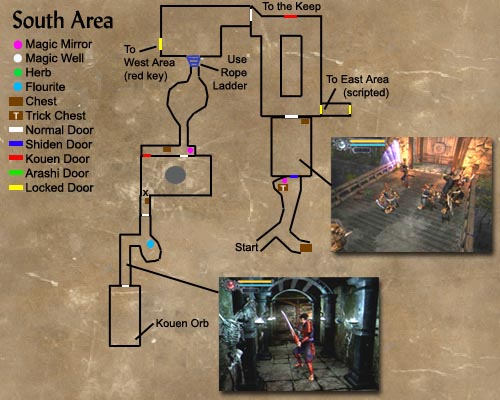
Deactivate the lock then open the door and enter. You are now on a wide and empty bridge, but as soon as you start to cross all sorts of demons start warping in. Fight them all until they are no longer appearing then head to the north side and smash the wood to the right of the door to reveal a chest. Inside is the South Area Map that you can grab before going through the next door.
You are now in the courtyard. This is a very busy place, as monsters will warp in wave after wave. While they will eventually stop spawning you are probably not powerful enough to fight them all at this time. Fight as many as you can handle then head through the door in the NW corner. Make sure to save some strength for the Bull Ogre who guards this door and watch out for his giant axe that he can throw at you.
 The next area has several demons attacking a soldier. Kill them and save the soldier and he will give you a Herb and a clue that leads you to the section of broken wall. Using your rope ladder you can reach the dried moat below. A couple more demons will attack you in the area just outside the cave entrance. Kill them both then enter to find another Magic Mirror and a Trick Box. The phrase is 6-1-4 and your prize is a Power Jewel that will come in handy in a moment so go ahead and use it. Before entering the
door head down the side passage and smash the crate to reveal a chest with some Medicine.
The next area has several demons attacking a soldier. Kill them and save the soldier and he will give you a Herb and a clue that leads you to the section of broken wall. Using your rope ladder you can reach the dried moat below. A couple more demons will attack you in the area just outside the cave entrance. Kill them both then enter to find another Magic Mirror and a Trick Box. The phrase is 6-1-4 and your prize is a Power Jewel that will come in handy in a moment so go ahead and use it. Before entering the
door head down the side passage and smash the crate to reveal a chest with some Medicine.
Enter the next large room and face the large demon you met earlier who knocked you out and kidnapped Yuki. He's not too hard to beat. Wait for him to charge then circle-strafe around and attack for a side or back attack. Keep your distance from his powerful club and always back up a good distance before trying to absorb any Soul Energy he releases as you beat on him. A few strikes with your Thunder attack should drop him and as he falls he crashes through a door revealing your next destination.
Inside the first room is a chest with Journal #2. Go through the door into the next area where
the passage turns right. To the left are several of those large urns. Smash them to get Flourite #2. Remember, the Flourite isn't visible so press X as you move around until you grab it. Now head down the spooky hall lined with skeletons and enter the next room.
This is the laboratory of some mad Demon Scientist who is playing with somebody's liver. After a brief conversation he summons Reynaldo and leaves. Watch out for his tentacle attacks that can literally come up through the floor and grab you.
One or two blasts with your Thunder attack should send this creature back to the underworld and you are free to take the
Kouen Orb, which gives you the new Fire attack and the ability to open red magical locks.
It's time to return to the courtyard but many more demons will spawn in to make this a difficult journey. As you pass through the large room where you defeated the Bull Ogre you will notice many floating creatures sucking up any Soul Energy.
These creatures can be annoying in several ways. First they can grab and immobilize you while other creatures beat on you. While they are holding you they are also slowly sucking your magical energy. And finally, if any of these creatures are present while you are fighting other monsters they will absorb their Soul Energy before you can. My advice is to avoid these creatures and give them a wide berth. If they start to move toward you, run away - especially if other monsters are nearby. If you are daring and decide to fight these creatures they are quite easy to kill (usually just one hit), but they are hard to hit since they are floating, and when you kill them you will get a lot of Soul Energy as your reward.
 Use your new Kouen Orb to open the red magic lock and return to the dry moat where more of those creepy ninja with the green glowing eyes attack. Head back up the rope ladder to find another Bull Ogre guarding the door and one of those soul suckers floating over him. Lead him away from the door and kill him quickly. If you are closer to him than the soul sucker you may be able to absorb his energy before it does. Return to the courtyard where more demons appear including another Bull Ogre who guards the door to the Keep.
The Keep
The door in the SW corner leads to a demon-filled hall that ends at a double-blue locked door. The large doors on the north wall lead further into the keep, but first make a quick side trip into the NW door where you will find a Magic Mirror and your first Magic Well. There is also a chest with a Keep Map and in the south part of the room is something really weird. Some crazy looking
man drops down from the ceiling. He says nothing then vanishes. This is the guy who can send you to the Dark Realm Arena when you are ready - much later in the game. Make a note of this location and return here later when instructed.
After you have finished saving and enhancing you can return to the large room, which is freshly populated with new demons. Get used to it as this room always has a fresh crop of monsters each time you enter. Kill them or ignore them then head through the north doors to witness a struggle between a short little man and a small boy. The boy manages to escape when you enter and you will talk with the man who we learn is Kinoshita. When he leaves you can search the nearby chest to get
Journal #3.
Unlock and go through the next red door where you encounter the small boy and meet up with Kaede. After another brief conversation you can go through the next door that leads to long hall. A strange door on the north wall is sealed with a strange symbolic plate with part of it missing. This door leads to the end of the game so don't worry about it now. Keep going killing all demons that attack. You will soon come to some stairs leading up.
Before going up, head through the door on the south wall and open the Trick Box. It's one of those number locks so move the groups in this order: LEFT-RIGHT-LEFT-RIGHT and you will get the Bow. Grab the Suzaku (book) and make sure not to swing the sword near the rope. Head back to the stairs and open the chest to get another Herb. Right above the chest hidden in the shelf is Flourite #3.
Now go upstairs and enter the door to the right. Head toward the rope and look in the bucket to get a Power Jewel. Return to the L-shaped hall and go around the corner where you get to fight demons, samurai, and ninja. This is one of those locations that will respawn each time you visit so always be prepared; especially for those ninja that love to jump at you from off-screen.
The door on the north requires a Level 2 Orb. If your Kouen Orb is powerful enough you can enter this room and get the Red Book from the table and the Right Crest Piece from the chest. If not; return here later when you are able to unlock the door.
Now head across the hall and go through the door to arrive on the balcony overlooking the room below where a small battle is going on between some soldiers and demons. Assist the soldiers by sniping at the demons with your new bow from the marked location (x). Reposition yourself as necessary to shoot the demon who tries to hide under the balcony. When you have killed the demons and saved the soldiers they will reward you with a Herb and a Magic Jewel. The only trick is that you have to go down and get them which means fighting all sorts of demons going down and coming back to this location.
Head around the balcony to the west door and unlock it. Continue to the stairs killing all the demons who stand in your way. Smash the crates to reveal a chest that contains Arrows and also search under the stairs to find Flourite #4. Head up the stairs to level 3 of the Keep.
This is a very difficult level with three puzzles and no way to save until after you have finished all three. The final puzzle is on a strict timer and can end your game, so I highly recommend using the Magic Mirror to save your game. Also check out the chest for more Arrows and grab the Byakko before going through the double-red locked door.
You meet up with Kaede just in time to solve a crafty puzzle that just so happens to require two people. After the first gate slams shut you can pull the lever to open it and then take control of Kaede to go to the next set of levers and pull the right one. Now you can follow and pull the left lever allowing her to go to the next group of three. DO NOT PULL THE MIDDLE LEVER! Have Kaede pull the left lever then you can access the chest in the corner with the Holy Armor. This is not an automatic upgrade so go into your inventory and equip the new armor. Now follow Kaede and pull the right lever. Finally have Kaede go and either pull the next lever or open the door - either action gets you both into the next room.
Who turned out the lights? It's so dark in here you can't even figure out how to open the door. Use the Magic Well to power-up your sword then do a Flame attack to light the candles. Now you can continue to the next room.
This room is not as hard as it looks, but the pattern is random so I cannot give you a solution. Once you know the "rules" it is quite easy to get across. Note the symbols on the floor. There are some x's and some +'s and one o in the back corner. Whenever you stand on an x you will be trapped and all of the tiles will drop away diagonal to your current square. Stepping on a + tile will cause the tiles to drop away in straight lines to each side, behind and in front of you. As each character steps on a symbol the other character is free to continue. Knowing these rules you need to alternate moving each character until Samanosuke is able to step on the o tile to disarm the entire floor. The x tiles seem to cause fewer conflicts between characters. Always plan ahead and you should have no problem getting through this room.
As you enter the next room you sense a trap and shove Kaede through the door just as it slams shut sealing you in a water-tight chamber that begins to fill with...you guessed it - WATER! It's up to Kaede to save you and depending on the skill level of the game (Easy/Normal) you have anywhere from 30-90 seconds to solve this puzzle.
Note: I've numbered my pieces to explain this puzzle. You will have to keep track of the actual game pieces. If you get confused you can always reset the puzzle.
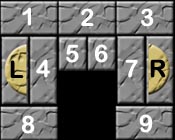
This is the starting layout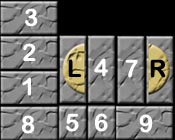
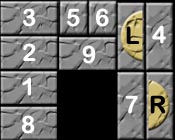
Slide 5 & 6 down
Bring L & 4 over to right
Bring 1-3 around to left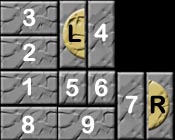
Slide L,4,5,6 to top
Slide 9 left to middle
Bring 7 & R down
Slide L & 4 to right corner
Move 5,6,9 to top middle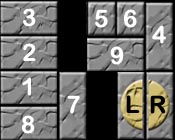
Slide 7 left twice
Bring L down
Move 5,6,9 to the right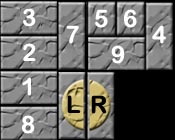
Move 7 to top
Slide L & R to middle
YOU WIN!
Once Samanosuke is free you can exit through the south door. Go to the opposite corner of this room and pull the cord (c) to deactivate all the previous traps and lower some stairs leading up to level 4. Kaede will go off to explore on her own leaving you to explore the rest of the Keep by yourself. At the top of the stairs you will locate a large door with a circular indentation. It appears to be a perfect match for the Crest piece you found earlier but you are still missing the left half.
In the corner is a ladder leading back down to level 3. You can continue down from this point once more to a hidden room on level 2 where you will find a chest with the Left Crest Piece.
You can also smash the wooden panel on the wall to reveal Journal #4. Climb up
the ladder and exit on level 3. Follow the hall until you reach another ladder leading back down to level 2.
At the bottom you will find a chest with a Power Jewel and a passage that leads
around to a secret door you can open leading back to the room where you found the first half of the Crest.
Make your way back to the door on level 4 and insert both halves of the Crest to unlock the door. Open and enter. Grab the Seiryu along the east wall and the invisible Flourite #5 directly across from it. Continue around to the next room and get the Suzaku then go to the narrow gap behind the stairs to find a chest with some Arrows. Head up the stairs.
Follow the perimeter walkway killing the ninja's that leap at you from all directions. Enter the door on the
south side and search this large room. Get the Seiryu and open the chest to add some Medicine to your inventory. Smash the decorative screens to reveal an altar on the left and a concealed passage on the right. Use the altar to suck up some additional Soul Energy then head into the passage to find a Magic Mirror. The ladder at the opposite end of this passage leads to a powerful boss battle, so I recommend saving your game at this time.
When you reach the roof you must battle a really big warrior with a devastating wind attack. Circle strafing is your best tactic for this battle. Wait for him to charge then dodge out of the way and slash at him from the sides or from behind. Use your block (L1) to deflect his wind and sword attacks and use your Fire and Thunder attacks to take him out. Make sure back up to a safe distance before absorbing any Soul Energy during combat. When he dies he will leave large amounts of energy and the Arashi Orb.
Now you have the power of Wind and the ability to open green doors. Start with the one on this level. Exit the roof via the ladder and head back outside. Continue along the walkway past this door to reach a door locked with a green seal. Use your new power to open this door and enter. Make a note of the chest in this room and then watch the movie. When it is over you will all be downstairs on the main floor.
You now have the option to go all the way back to the 5th floor and open that chest. Inside are some Burst Bullets, which aren't that great, but you will gain valuable amounts of Soul Energy by killing all those demons between you and that chest. Plus there are a few other surprises waiting for you if you decide to make the trip.
Your next goal (whether you get the chest or not) is to get to the Keep Underground. Return to the main room of the Keep (when you first entered) and take that SW door that leads to the double-blue locked door. By now you should have your Shiden Orb powered to level 2 and can easily open this door. Continue through the next
room and enter another where a pedestal with three colored orbs rests. You will need to cycle through all three of your weapons to activate each orb and gain access to the Keep Underground. Head down the stairs to end this level.
Keep Underground
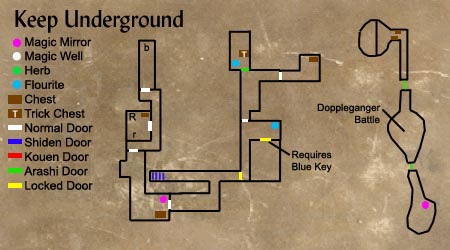
Slash your way through the tentacles and collect the Byakko, Orange Book, and Green Book then go through the door. Kill the tentacle creatures that roam these halls then enter the first door on the left. Open the chest and get the Keep Underground Map. Go to the south wall and locate the rope (r) and slash it with your sword to cause the scales to tip. Now you can go around to the other side and get the Rosary of Com (R).
Exit this room and continue north fighting more tentacle creatures and go through the next door. Go to the far side of this long room and get the Purifier Bell (b) from the chest. This triggers several swinging blade traps that you must get past to leave the room. The trick is to stay to one side or the other giving you the most time before the blade returns. Only move past one blade at a time and pause between blades to get the timing right.
Now retrace your path all the way back to the beginning fighting off all the monsters that spawn in to replace the ones you already killed. When you get back to the cursed spirit door use the Purifier Bell to soothe the haunted spirits allowing you pass. You are now in a hall lined with glass cases containing Samurai. As you move down the hall several of them will burst open and Samurai will attack. Who didn't see that one coming?
Ignore the path to the right and go through the door directly ahead. More tentacle creatures populate this room. Watch for the moving mist/fog to know where the tentacles will pop-up out of the ground. Unlock and enter the green door and get Flourite #6 from the iron maiden. Talk to the man and get the Byakko and then check out the Trick Box. This one has three sets of moveable numbers. Rotate them MIDDLE-RIGHT-LEFT to open the box and get the Blue Key.
Exit this room and fight more tentacle creatures as you head to the door to the east. Enter and get the White Book and the Herb from inside the chest. Then head back to the hall of Samurai and go to the east. The locked door that requires the Blue Key is on the south wall, but first go to the end of this hall and grab Flourite #7 from the NE corner. Now unlock and go through the blue-key door. Watch the movie that ends this level.
West Area
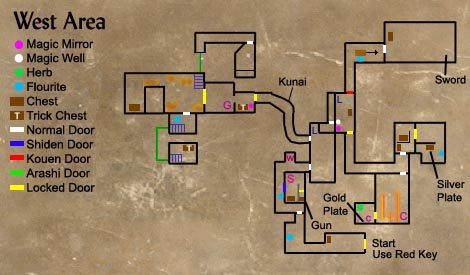
Return to the area where Samanosuke used the rope ladder much earlier in the game and go to the door with the red ink. Several of those green-eyed ninja will jump into the area. Use your new Red Key on the door and enter the West Area. One or two ninja may jump over the wall in pursuit. Kill them if they get too annoying then check out the chest to get the Herb.
Continue around and go through the next door and follow that path. The section near the triple-locked blue door is heavily guarded with at least one Samurai. Use the flip/twist/slash move to kill them quickly. Just to the right of the blue door is Flourite #8. Continue following the path past the well (w). The well is another access point to the Dark Realm Arena, but that is a mission for Samanosuke.
Go through the door into the next area, which turns out to be a target range for zombie archers perched on a balcony to the north. There are also demons and a Samurai down on the ground level. You may want to quickly climb the ladder to the north and kill the archers so they don't shoot you from above. When you save the soldier below he will give you a Soul Absorber. Now you can head through the door in the west wall just south of the ladder.
The calm of this enchanted glade complete with fireflies is broken when more of those green-eyed ninja leap at you from the trees. Kill them quickly and follow the path making sure to get the Kunai on the outside of the turn. You should be able to spot the sparkle but you may have to move around to find the right spot to actually pick them up. Continue to the locked door and use the Shinobi Kit to pick the lock (this is automatic) and enter.
Inside is a Magic Mirror so save your progress then check out the Trick Box. Use the phrases 5-7-2 to open the box and get the Magic Jewel. You can't use this but Samanosuke can when you regain control over him. Head out the back door and search the body in the SE corner to get the Gear (G).
You cannot go any further to the west at this time so retrace your steps back to the balcony with the archers killing (or avoiding) anyone who gets in your way. Climb the ladder to the balcony and go in the door. Cross the catwalk and climb down the ladder where there is a Magic Mirror and a Magic Well. Search the chest for a West Area Map then head to the south door and open it with your Shinobi Kit.
 Follow the street as it leads south then turns east. There are several zombies you will have to fight and maybe even a Samurai. Make your way to the far east end then enter the door to the left/north. Just inside the door on the right is a cleverly concealed chest hidden by the screen. Open it to get the Herb then move to the back of the room where you will find a Suzaku on the top of a bookshelf and another chest that contains Journal #5. Locate the shelf on the east wall to reveal a secret compartment with several gears. It looks like one is missing so insert yours and pull the string to reveal a secret room. Search the statue on the east wall to get hidden Flourite #9 and then open the chest to get the Silver Plate. On your way out grab the Byakko.
Return to the street and head across to the south door and enter. Stick close to the east wall to avoid the shooting jets of fire. Locate the chain (C) in the corner and pull it to see the door open across the way. This door is on a timer and will close in a few moments. Now that you have a good camera angle you will need to watch the pattern of fire and time the pull on the chain so you can open the door then run across and enter the room. The game animation tends to pause between each jet of fire so keep the D-pad pressed forward. Once inside you can get the Gold Plate and smash the crates to reveal another Herb in the corner. Finally, pull the chain (c) to open the door and turn off the fire jets permanently.
You now get to make the lengthy trip back to the prison area. This is the area where you obtained the Gear from the dead soldier. Plenty of demons will try to stop you. Fight or avoid as necessary until you get to the large door blocked with a gate. Use the Silver and Gold Plates on either side of the door to raise the gate and enter the prison area.
The interior has several large fires you must avoid as you explore the rooms and fight a few demons. Forcing the demons into the flames is a great way to kill them with very little combat. Make your way down the long
hall to the west to search the back room where you can get the Genbu and some Kunai from the chest. Return to the main room and go through the south door.
Search the barrels near the bottom of the stairs to get Flourite #10 then go up the stairs to find the Trick Box. Rotate the groups in this order MIDDLE-LEFT-LEFT-RIGHT-RIGHT to open the box and get the Sacred Dagger - your only additional weapon for Kaede. Go to your inventory to equip this new blade and enjoy the glowing red effects as you swing it around. Head back downstairs then go down the other stairs leading to the dungeon.
Follow the passage and slice through the tentacles blocking your path then enter the large room. Go to the back and try to open the cell door to start a movie. This will quickly turn into a difficult fight with a new enemy; the Cloaked Ninja. He has the power to go partially invisible and teleport around making it very hard for you to lock-on for attacks. Always try to follow his ghostly image and manually turn to face his new location then quickly attack. Block as necessary and you should kill him shortly.
We now rejoin our other hero who is in some spooky caverns beneath the Keep. While you probably won't need a map for this short encounter I have included the three areas on the Keep Underground Map in the previous section.
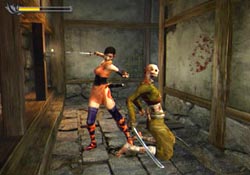
I highly recommend using the Magic Mirror to save your game at this point. You are about to fight a very challenging opponent - YOURSELF! I would also use any magic or power jewels that you or Kaede have collected up to this point and enhance your weapons and maybe turn an Herb into a Medkit. When you are ready you can head north into the combat cavern and face yourself.
This battle is simply a matter of patience. Do not go for the frontal assault as your Doppelganger will block just about all frontal attacks. Instead, wait for him to charge then circle strafe and attack from the sides and rear. Use your magic attacks until the power is gone then switch to another weapon and repeat. You can also block his magic attacks, which release Soul Energy you can absorb.
After you have defeated your "evil self" you can head into the next chamber and get the Wooden Ladder and the Evil Plate from the two chests. Go into
the circular area and use the ladder to return to the Keep.
You now have a decision to make. Now that you have the Evil Plate you now have access to the Dark Realm Arena. To access the Dark Realm you can return to the save room in the first floor of the Keep or visit the Well over in the West Area. Read the section on the Dark Realm Arena to see if you are ready for this challenge. Meanwhile, I will continue with the mission at hand.
It's now Samanosuke's turn to explore the West Area. Head to the red-ink door and enter. Plenty of demons and zombies are waiting to ambush you including several archer zombies on the rooftops. You can shoot them down with your own arrows. Save the soldier being attacked by demons and he will give you some Burst Bullets.
Head to the blue triple-lock door and enter. There is one of those glowing statues (S) where you can absorb some Soul Energy. Make a note of the headless statue then get the Herb, Genbu, and the Vision Staff from the chest. Now that you have the staff in your possession all Flourite will now glow making it much easier to locate. In fact, head back outside and backtrack down the path a bit to find Flourite #11 in the previous section of this level hiding along the right wall.
Head to the archery area and kill more demons then climb the ladder and slash your way to the door. Enter and
climb down the ladder inside to reach the room with the Magic Mirror and the Magic Well from before. Crack the seal on the red door and head north. As the path widens you will spot four zombies at the bottom of the hill. Cut the rope on the catapult to send it rolling down and killing all but one of the zombies. This also reveals the location of Flourite #12.
Finish off the remaining zombie then enter the door into the next area where you face off against several large Bull Ogres and one REALLY large one. Whip out your Enryuu and unleash the power of fire on the three smaller Bull Ogres. It may take two or three strikes to kill them all. Now you can devote all your attention to the remaining giant. Switch off to your Raizan to unleash devastating lighting attacks until he is dead. Now search the area to claim your treasures that include; Decorated Sword, Statue Head, and some Bullets.
Now start to make your way back to the keep killing plenty of monsters along the way. When you reach the blue triple-lock door from before go inside and fit the statue head onto the headless statue to disarm the trap. You can now go into the back passage and open the chest to get the Matchlock. Have some fun shooting down the zombie archers from the rooftops as you return to the keep.
Enter the keep and make your way to the entrance to the Dark Realm where you can fit the Evil Plate into the door and enter. After a pretty cool movie you and Kaede must once again part company to search for a way to get past this supernatural barrier preventing you from entering the underworld. Exit the Keep and head down to the SE corner to witness an encounter with some soldiers and several giant insects that crash through the door. Kill these creatures then approach the pedestal and fit the Decorated Sword into the socket to lower the stone and reveal the door leading to the East Area.
East Area
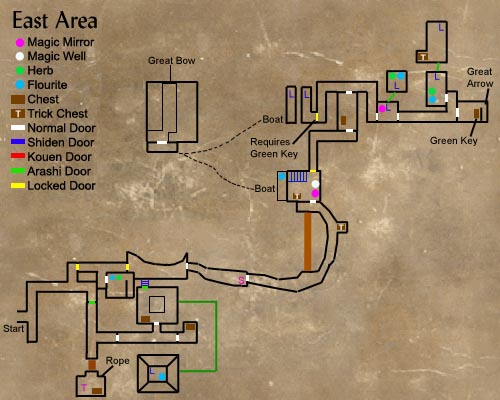
Continue south past another left branch and arrive at a raised bridge. Shoot the rope to Samanosuke's left to snap it and lower the bridge so you may cross over. Search the area for a chest containing Bullets and smash the board that conceals a very valuable Talisman. Return back to the previous branch and head east. Get Journal #6 and go through the door to the next section.
Kill or avoid the Samurai on the walkway then head to the door at the far end of this walkway. Enter and get the Genbu then open the chest for some Bullets and smash the wood panel to find the East Area Map. Return to the walkway and head into the door you passed a moment ago and enter the bell tower.
A chest just inside the door contains some Bullets. Head up the spiral ramp leading to the roof. Make sure to block the arrows of the archers as you advance up the ramp until you are in striking range. Once on the roof you will have to fight off several ninja. Go through the broken railing to get onto the roof and finish off the remaining ninja in one of the coolest moonlight battles ever. Search the rooftop to get a Soul Absorber, Magic Jewel, and make sure to get Flourite #13 on your way back to the ladder.
Head back down the ramp and go through the green locked door in the rear. You are now on the bank of a small pond complete with swimming fish and deadly ninja. Head east, fighting off the ninja and go through the first gate. More ninja attack. When they are dead you can go over to the idol (S) and energize your Gauntlet with Soul Energy. Continue through the next gate and follow the path leading to the roaring waterfall.
More enemies attack. Ignore the bridge and follow the path behind the falls. Duck into the alcove to the right and open the Trick Box. This one features four sets of four moveable numbers. Use the combination: BOTTOM-LEFT - TOP-RIGHT - BOTTOM-RIGHT - BOTTOM-LEFT - BOTTOM-RIGHT to get the Great Armor. Remember to go into your inventory to equip this new item. Now continue to the door and fight the Samurai. Swinging your sword near the bridge will cut the ropes and cause the bridge to fall.
Enter the nearby door to find a Magic Mirror and a Magic Well. Another Trick Box requires a two-phrase solution this time. Enter phrases 3-6 to open the box and get a Magic Jewel. If you have been using all the jewels as you find them both your magic and health bars should now be maximum length. Get the Medicine from the chest and head down to the dock where you can get Flourite #14 before getting on the boat.
After a short trip you arrive at the building in the middle of the lake. Enter and cross the planks to the other side to take the Great Bow from the altar. This triggers a movie segment that turns control over to Kaede.
Kaede starts at the beginning of the East Area map. Take the first path to the left and pick the lock on the door. Follow the walkway killing the insects that leap out of the water and attack. Take the first branch to the right and enter the east door. Inside is Flourite #15 and a large statue that conceals a Herb. Apocalypse #2 is hidden in the small area behind the statue. Return to the walkway and kill more insects as you make your way to the next locked door. Pick the lock and enter.
You are now outside near the fish pond from earlier. More insects and ninja attack as you make your way to the waterfall area. When you arrive in the building where Samanosuke got on the boat you can pick the lock on the north door and enter a new section. Zombies rise out of the water and attack as you make your way around to the door to the right. Enter and deal with more zombies and a Samurai then search the chest for some Arrows.
Go through the next door. The hall branches off with the left ending at a locked door that you cannot pick. Take the right path to search for the key. The first small room has a Magic Mirror and a ladder that leads up to a loft with Flourite #16. Smash the crates to find the Herb then climb down and go through the next door.
As soon as you enter press L1 to block. An archer at the far end of this walkway is shooting arrows. Another zombie attacks from the side. If you time it right you can have the archer shoot the zombie in the back as he tries to attack you. Make your way to the other end blocking as necessary until you are in dagger-range of the archer. Ignore the door on the east wall for the moment and go north and enter the west door.
Grab the Herb and Flourite #17 (the final Flourite in the main game) then climb the ladder and locate the Trick Box. This one has three sets of numbers so rotate the LEFT - LEFT - MIDDLE - RIGHT - RIGHT - MIDDLE - MIDDLE to open the box and get the Decorated Arrow. Climb down and return to the door you just skipped. A fresh archer and zombie are now on the walkway. Ignore them or they will be replaced when you come back a third time.
A large statue is at the far end of this room and a locked chest is at its feet. Head to the rear chamber behind the statue and take the Great Arrow. The door locks! Put the Decorated Arrow on the pedestal to fool the trap, and the door will unlock as well as the chest. Open the chest to get the Green Key then exit this room. Make your way back to the locked door and use the Green Key to exit to the dock. Climb down the ladder and get on the boat to ride out to the building in the lake.
Kaede is forced to watch Samanosuke battle the hideous Insect Queen through the window. This battle isn't as hard as you might think. The trick is to switch between the Matchlock and the Shippuu. When the insects get close use your Wind attack to rip them apart or at least blow them back. You can never kill them all as the Queen will always summon new monsters. For this reason, make sure to concentrate all your attacks on the Queen using your Matchlock. You should have plenty of ammo by now but if you do run out you can always use normal or fire arrows.
When the Queen is dead another exciting movie will play and you can then take your new Great Bow and Great Arrow and return to the Demon Gate. Use the Great Bow to shoot the center of the barrier and dispel the force field. You can now enter the giant doors and enter the Dark Realm.
Dark Realm
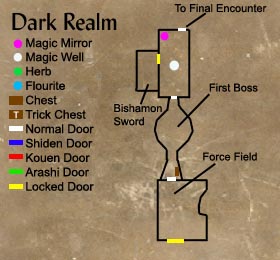
The first thing to do is launch a few Fire attacks to knock out his shield. With his protection gone, Marcellus will start to do charging attacks. Block his charges and combos and unleash your Thunder attacks and any remaining Fire attacks to finish him off. Head back to the door where you entered and open the chest to get some Medicine then go to the opposite door and enter the next room.
This creepy room has a Magic Mirror and a Magic Well. You can also get the Dark Realm Map although you probably won't even need to look at it. Assuming you have already finished the Dark Realm Arena and have the Bishamon Ocarina now is the time to play it and open the secret door. Enter this hidden room and receive your reward - the powerful Bishamon Sword.
Head out through the only remaining door and start down the spiral ramp leading into the depths of the demon underworld. Fight several tentacle creatures as you make your way to the bottom. Pick up the pair of Medicine kits then enter the long hall leading to the final battle...
As expected, the final boss is extremely difficult and you must put all of your skills to the test to defeat him. The serpent has several attacks and each is preceding with a visual clue so you can take the appropriate defensive action. When he lowers his head he is about to breath fire so get ready to sidestep the flames. He will also rain down magical fire attacks. Watch the floor to see where these are going to land and move out of the way. Use your Bishamon Sword's powerful magic attacks to beat the serpent into submission. Watch out for his powerful claws - if he grabs you he will slowly choke the life from you. Repeatedly press attack/block to try and break free before you die. Use your medicine and herbs wisely and hopefully you still have the Talisman that will restore you to full health in the event of your untimely death. Good luck and enjoy the ending movie...
CONGRATULATIONS!! You have defeated the evil powers, saved the princess and the small boy, but at what cost... You will have to wait for the exciting sequel to have those questions answered.
Dark Realm Arena
Your reward for completing this challenge are Flourites #18-20. I'm listing these three Flourites last in the numbering sequence since I don't know when you are going to visit the Dark Realm, and I want to keep the other Flourite numbers consistent.
If you complete all 20 levels and return to the surface safely you should have enough Soul Energy stored up to enhance any remaining Swords and Orbs to their maximum levels and still have some to spare to upgrade your arrows, bullets, and herbs.
Your final prize waits for you on Level 20 of the Dark Realm. A chest holds the Bishamon Ocarina, a magical flute that will grant you access to the most powerful weapon in the game.
Below is a level-by-level guide for the Dark Realm including who you will fight and what you will find on each level:
Level Monsters Treasure 1 Peasant Zombies None 2 Blue 3-Eyed Ninja None 3 Peasant Zombies/Red Undead Samurai None 4 Red Undead Samurai None 5 3-Eyed Ninja/Red Undead Samurai None 6 Spiked Demons Flourite #18 7 Insect Warriors None 8 Spiked Demons/Soul Suckers None 9 Spiked Demons/Bull Ogres Medicine 10 Bull Ogres/Soul Suckers Flourite #19 11 Tentacle Creatures Soul Absorber 12 Tentacle Creatures/Soul Suckers None 13 Tentacle Creatures/Insect Warriors Talisman 14 Cloaked Ninja Herb 15 Cloaked Ninja/Tentacle Creatures Flourite #20 16 Black 3-Eyed Ninja Herb 17 Blue Undead Samurai/Red Undead Samurai None 18 Black 3-Eyed Ninja/Cloaked Ninja Herb 19 Blue Undead Samurai/Black 3-Eyed Ninja None 20 Bull Ogres/Cloaked Ninja Bishamon Ocarina
Hidden Flourite Index
Here is a linked index for all 20 pieces of Flourite hidden throughout Onimusha Warlords.
 Flourite 1
Flourite 2
Flourite 3
Flourite 4
Flourite 5
Flourite 6
Flourite 7
Flourite 8
Flourite 9
Flourite 10
Flourite 11
Flourite 12
Flourite 13
Flourite 14
Flourite 15
Flourite 16
Flourite 17
Flourite 18
Flourite 19
Flourite 20