
Introduction

Welcome to Sinjin's guide for Sanity: Aiken's Artifact. The following walkthrough will show you how to complete each of the 21 levels in this game as well as provide you with tips for how to use the many Talents you will acquire. I'll even give you stats on the enemies you will encounter so you will have that extra edge in combat.
 The levels in Sanity are large and you are free to explore them however you see fit. There are always certain objectives you must complete so
the game does have a path you must follow eventually. This walkthrough will outline the best way to finish each level while getting the most
enjoyment from the game. As always, feel free to explore and play the game the way YOU want to. I'm not here to tell you how to play, but rather help you when you get stuck.
The levels in Sanity are large and you are free to explore them however you see fit. There are always certain objectives you must complete so
the game does have a path you must follow eventually. This walkthrough will outline the best way to finish each level while getting the most
enjoyment from the game. As always, feel free to explore and play the game the way YOU want to. I'm not here to tell you how to play, but rather help you when you get stuck.There are also many secret (or bonus) areas and items you can find throughout the game. While finding these is not required to win the game I will still show you everything I have found in my travels through the world of Sanity. Many of these items will make it much easier for Cain to defeat the more powerful enemies later in the game.
Battle Tips
Many of these tips may be obvious but I will tell you about them anyway.
Tip 1: Keep moving. Many psionic attacks cannot be redirected once they are fired so you can dodge the "effect".
Tip 2: Save Power-ups. Don't use those red and blue power-ups until you really need them and they can give you the best value.
Tip 3: Use the level design in combat. Hide behind corners or objects whenever possible and jump out just long enough to attack.
Tip 4: Use "splash" attacks when outnumbered. If you find yourself surrounded by multiple enemies and they are close, use an attack that can damage them all at once.
Tip 5: Target the right guy. If you encounter 3 guys and one has a gun and the others have bats, take out the guy with the gun first.
Tip 6: Defense can be an offense. Use your shield talents to reflect incoming fire and break down enemy shields as soon as possible.
Tip 7: Kill them one at a time. When you can use "splash attacks" concentrate your fire on one enemy until he is gone then move on.
Tip 8: Use the right talents. Don't try using talents you found in the first few levels in the later levels. Always use your best talents.
Tip 9: SAVE OFTEN. Save each time you start a new level (using a unique save file) and quicksave throughout the level. Death lurks around every corner.
Talents
Even though Cain carries a gun your primary attacks are carried out through special psionic talents that you acquire throughout the game. There are over 80 talents divided into Totems (or themes) such as Fire, Sun, Illusion, etc. Across these totems you will see talents that duplicate, but they will always have their own unique abilities. Remember that the later in the game you gain a talent, the more powerful it probably is.
 You will quickly collect more talents than you can access. Cain only has the ability to learn 10 talents at a time and you must manage these
using the Master Deck and by creating Talent Groups. Creating a powerful yet varied group of talents is essential to winning the game. Always
make sure to include some talents from each of the main categories; attack, defense, skills, etc. While you can easily modify the deck at any
time, trying to learn a Laser Talent in the middle of combat is not recommended.
You will quickly collect more talents than you can access. Cain only has the ability to learn 10 talents at a time and you must manage these
using the Master Deck and by creating Talent Groups. Creating a powerful yet varied group of talents is essential to winning the game. Always
make sure to include some talents from each of the main categories; attack, defense, skills, etc. While you can easily modify the deck at any
time, trying to learn a Laser Talent in the middle of combat is not recommended.Throughout the course of this walkthrough I will tell you which talents I used to defeat the enemies I encountered. These are just the talents I found to work best. Feel free to try your own attack and defense talents as you play the game. Additional talents will be made available through several outlets. There are already new totems appearing on bonus disks in magazines and in some stores. You can collect and trade these with others on the Internet.
Know Your Enemy
The following table provide valuable information on all the enemies you will encounter in the game. It is based on the default skill level, "Mentally Stable", and provides attack and defense statistics as well as any invulnerabilities. Remember that most enemies are immune to the Talents you are probably acquiring in that level so don't try using Sun Attacks on the Egyptian guards, etc. Enemies are listed in the order you will most likely encounter them.
| Enemy | Attack Damage | Hit Points | Invulnerability |
| Redneck (bat) | 10 | 40 | |
| Redneck (rifle) | 10 | 40 | |
| Anubis Guard (blue) | 20 | 60 | Sun Totem |
| Anubis Guard (red) | 20 | 60 | Sun Totem |
| Anubis Guard (purple) | 20 | 80 | Sun Totem |
| Psionic Prisoner 1 | 30 | 80 | |
| Psionic Prisoner 2 | 30 | 80 | |
| Gang Member (rifle) | 40 | 120 | |
| Gang Member (bat) | 40 | 120 | |
| Showgirl (purple) | 40 | 120 | Illusion Totem |
| Showgirl (pink) | 40 | 160 | Illusion Totem |
| Showgirl (red) | 40 | 180 | Illusion Totem |
| Droid (red) | 60/100 | N/A | Science Totem |
| Droid (green) | 60 | 180 | Science Totem |
| Droid (blue) | 60 | 240 | Science Totem |
| Mutant | 60 | 200 | Science Totem |
| Devil (red) | 80 | 240 | Demonology Totem |
| Devil (blue) | 80 | 320 | Demonology Totem |
| Winged Demon (purple) | 80/150 | 180 | Demonology Totem |
| Winged Demon (green) | 80/150 | 180 | Demonology Totem |
| Winged Demon (red) | 80/150 | 180 | Demonology Totem |
| Zombie (green) | 80 | 300 | Death Totem |
| Zombie (purple) | 80 | 400 | Death Totem |
| Zombie (brown) | 80 | 400 | Death Totem |
| Zombie (red) | 80 | 500 | Death Totem |
| Zombie Master | 80 | 500 | Death Totem |
| Butcher Bull (white) | 100 | 360 | Death Totem |
| Butcher Bull (gray) | 100 | 480 | Demonolgy Totem |
| Butcher Bull (blue) | 100 | 600 | Death/Demonology Totem |
Cheat Codes
So far I have only found these cheat codes. Here they are with a brief explanation of what they do:
mptedthehead - This toggles the "god mode". Cain will not take damage or use Sanity points when using psionics. You can still die by falling so don't forget to save your game even if you are invincible.
mpshipit - This unlocks all the single player levels in Sanity. Once unlocked, you can select any chapter and level via the game menu.
mpjuiceme - This code restores all Health and Sanity points to their current maximum. WARNING! You will lose many special talents if you use this cheat - they will just disappear from your master deck.
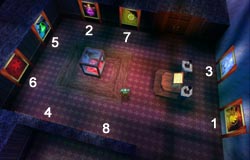
DNPC Headquarters
We hook-up with Cain as he is just coming off a previous suspension for killing some innocent civilians. After Cain wakes up and walks to the center of the room you have control over him. Head to the left and pick up your DNCP Badge. You will use this at various points throughout the game to identify yourself. To use the badge click on the badge icon or tap the "B" key.
 Return to the fan and head left to a computer terminal where you can access the DNPC Database. This is optional, but reading the information
contained in the database will give you a good background for the game and the story. Head to the remaining area and pick up your
Cell Phone. Talk to the chief to get your first objective. Throughout the game you will constantly be talking with
your "controller" using the phone. If you ever need to make a call just click the phone icon or tap the "P" key.
Return to the fan and head left to a computer terminal where you can access the DNPC Database. This is optional, but reading the information
contained in the database will give you a good background for the game and the story. Head to the remaining area and pick up your
Cell Phone. Talk to the chief to get your first objective. Throughout the game you will constantly be talking with
your "controller" using the phone. If you ever need to make a call just click the phone icon or tap the "P" key.You can check out the rest of your room. Look for items where your cursor turns into a magnifying glass like the photo, calendar, and newspaper clipping. Click to examine these items then click again to regain control of Cain. Exit to the main corridor and turn left. Talk to the guard who will open the door. The guard in the next area will ask for ID so show him your badge and he will let you into the next long passage where you will meet up with Agent Stassburgh. After a friendly chat you can continue to the main lobby.
Check out the map display to learn where everything is then head left. Your phone rings and Jim in the Armory tells you to come pick up your gun. Head downstairs and turn left again until you see the armory entrance. Enter and talk with Jim then get your weapon and head for the Firing Range. Talk with the range boss then fire a few times into the targets. Now move on to the Psi-Chamber to test your psionic abilities. Inside is your first Talent Card, a Fireball Talent. You can arm talents by clicking on the icon or tapping the number for each talent.
Enter the test chamber and pull the lever to being the series of three tests. Each round gets harder forcing you to fire faster and at more targets. Don't forget to drink the Sanity Serum between each round. When you have successfully finished your test you can then head back upstairs. Turn right at the top and enter the chief's office. Chief Royce will brief you on your new assignment then you can take your Mission Orders from the table and head to the controller bay to meet your new controller.
The bays are located directly opposite the chief's office. Enter and take the first left to meet Kiki Frost, your new controller. She will brief you on the Aggression Control chip you had implanted. Basically you can only kill people who attack first easily indicated by a red circle around the target rather than the normal blue. Accidentally killing an innocent (even with splash damage) means you get to reload a saved game. When you are done, head upstairs to the helipad. Show the guard your orders then proceed through the door to board the chopper.
Pharaoh Village Trailer Park
Head toward the road and follow the direction that blue truck is going as it nearly runs you over. Talk with the man passing by for some info then continue to the end of the road where three rednecks are waiting for you. Ready your Fireball talent but don't attack until they attack you. Take out the guy with the gun first then deal with the guys with bats. When they are dead collect any vials of Sanity Serum or Health and follow the path as it U-Turns to the right. You will almost always get sanity and health power-ups after battles. These items don't vanish so save them until you need them.
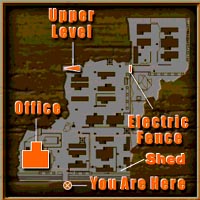 Head to the trailer park gate and check out the map of the place then head for the manager's office to the left as you enter the park. The
manager isn't too helpful until you flash your badge then he gives you some directions to the Psychic Link gate. Exit the office and head left
until you see the windmill and the entrance to Phase 2. Skip this for now and head up the ramp and turn right. Follow the path past a couple
guys working on their truck. Continue until you reach the shed in the back corner and blow it up. Inside is a
Fists of Fire Talent. Return to the Phase 2 entrance and check out the map.
Head to the trailer park gate and check out the map of the place then head for the manager's office to the left as you enter the park. The
manager isn't too helpful until you flash your badge then he gives you some directions to the Psychic Link gate. Exit the office and head left
until you see the windmill and the entrance to Phase 2. Skip this for now and head up the ramp and turn right. Follow the path past a couple
guys working on their truck. Continue until you reach the shed in the back corner and blow it up. Inside is a
Fists of Fire Talent. Return to the Phase 2 entrance and check out the map.Go through the archway and follow the road to the back then turn right and continue until you reach the electrified gate. Turn and head in the opposite direction and deal with the rednecks you encounter along the way. Head up the slope to Phase 3 where a guy is working on a car with flames painted on the hood. Follow the road around until you are on the other side of the lot with guy working on his car. You should see and hear a dog barking in a yard. A man stands outside the door to his trailer. Talk to him and threaten to "muzzle his dog" to get results. He will go try to quiet his pet and you can enter his trailer and get the Psychic Link Coded Memo and read the flyer in the other room.
Talk with Frost who calls about now and she will instruct you to fax the document so she can crack the code. The nearest fax machine is back at the manager's office so make your way back to his building taking care of any thugs who get in your way. The front door is locked so head around the pool and enter the back door. Use the fax machine and the manager will come in and catch you. He runs off to get the cops but drops a key. Exit out the back door and go around to the front and enter to get the Storage Shed Key.
Exit the office and turn left and a man will run up to you asking for help. He is selling Talents and some guys are after him. Offer to help and he will give you the Inferno Talent. Get this talent ready as three thugs are approaching. If they all stick close by you can use the Inferno talent to kill them all at once, otherwise just use your Fireball attack. Now head all the way back to the guy with the barking dog. Across from his trailer is the shed that your new key unlocks. Inside is a propane tank which blows up nicely when you shoot a fireball at it. The resulting explosion sends the car with the flames rolling down the hill and crashing through the electrified gate. Follow the path the car took and you are on your way to the next level.
Psychic Link Headquarters
The first guys you meet are easily scared off but as you make your way around to the bridge you will encounter at least three unfriendly people you will need to deal with. Make sure not to kill the gatekeeper during the battle. Talk with the gatekeeper and show him your badge (or threaten his life) and he will lower the bridge. Cross the bridge and enter the huge stone entrance to the Psychic Link pyramid, or as Cain puts it, "The Nicest Trailer on Earth".
Continue past the pillars and up the stairs to the sealed doors and talk to the guard on duty. He says you need the employee password to get in. Head back toward the bridge and you will see a small girl run off to the left. Follow her and talk with her to get the Mind's Eye Talent. Before heading back to the guard you will want to go to the far right end of this area and approach the wall to reveal a secret door. Enter and locate another secret door leading to a Sanity Booster Serum that fills your sanity and increases your total capacity.
Now return to the guard and use your new talent to read his mind and learn the password is "Divine". Repeat the password back to him and you can now enter. Talk with Frost briefly and she will outline some objectives. Approach the receptionist who is very uncooperative until you flash your gun. Follow her down the hall and talk to her when she stops. Now would be a good time to save. The doors open and you meet the first of many Anubis Guards in the next hall.
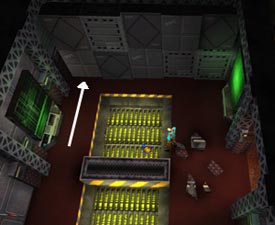
Use your Fireball attack to kill him quickly. You can also intercept his Starburst attacks if your two attacks collide. Follow the red carpet until you reach the intersection then more guards will appear. Remember that your Inferno will kill multiple targets if they are close enough. Kill them and head right down the hall all the way to the Power Relay Station doors. Enter the room and examine the maze before you. The grid consists of several paths, each blocked with dual energy beams. The trick is to only go through the beams where the first beam is opening before the second one. Knowing this you could probably solve the puzzle on your own but here is how I did it. Safe Often!
Head right from the door and go to the corner and turn left. Go through the first beams and continue forward until you reach the next. Turn left and go through the next two sets of beams then turn right and go through the final set of beams to arrive just to the left of the exit. Enter the next area and follow the catwalk around until you read the sign and "get an idea". Talk with the employee nearby who will offer to quote you the employee handbook from memory. While this may seem a waste of time you may get a valuable clue from page 79.
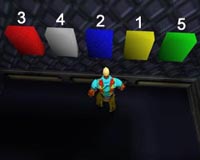
 Continue following the passages past the employees until you reach the ledge overlooking the bridge and the set of four switches on the wall.
Using the information you learned from page 79 you can connect the symbols and get the code "2143" which is the order you pull the levers (as
numbered from left to right). The bridge will extend into the energy beam and the resulting explosion will bring down the entire power grid.
Continue following the passages past the employees until you reach the ledge overlooking the bridge and the set of four switches on the wall.
Using the information you learned from page 79 you can connect the symbols and get the code "2143" which is the order you pull the levers (as
numbered from left to right). The bridge will extend into the energy beam and the resulting explosion will bring down the entire power grid.Talk with Frost who instructs you to locate a computer with outside access. Make your way back the way you came fighting multiple guards along the way. When you kill the guard just before entering the Power Relay Room he will leave behind a Star Blast Talent. Enter the Power Relay Room which is now deactivated. As you head across the maze five guards will appear. Retreat to either back corner and wait for them to group together. There is also Sanity Serum and Health in the back corners of the maze. Use the blocks to hide from the guards. When they are grouped together run up and repeatedly use the Inferno talent to kill them. Finish up anyone else with a Fireball and you are on your way.
Follow the red carpet back to the intersection where more guards will appear. Quickly duck out onto the balcony to the right and snipe the guards one at a time with your fireballs. Continue down the unexplored hall and two more guards will pop in surrounding you. If you are fast you can alternate your fire between the two of them or use your Fists of Fire to hit them both at once and take them down before they can even hit you. Follow the carpet around until you reach the Phone Center.
Ignore the door on the right for now and talk to the maintenance man working on the floor panel. He mentions a crowbar which you will need shortly. Enter the next area and turn right to enter Station 1. Flash your badge at the woman and she opens Station 2. Inside Station 2 is another woman who will open Station 3 after you flash your pistol. The woman inside Station 3 wants proof that you are a psychic and wants you to guess her favorite number. After you guess wrong the first time use your Mind's Eye talent to read her mind then have her ask you again. When you answer "900" she will open Station 4.
Station 4 is unoccupied and the control panel is under a floor grate. Hmmmm... Return to the previous hall and borrow the Crowbar which easily lifts the grate and allows you to open the door to Station 5. Station 5 looks more like NASA than a Psychic Hotline. Talk to the women for some amusing conversation then head up the stairs to talk with the manager. Demand to use the computer and you can get the information from Frost that you need to proceed. She sends you four images that are the code to enter the sealed door back down the previous hall.
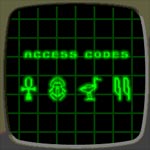 Return to that door now. You will get a phone call from a mysterious man (obviously government from his black suit and sunglasses) ordering your
to kill Priscilla Divine then he hangs up. Use the touch pad and enter the symbols (ankh, beetle, bird, reeds) in the proper order to open the
door. Inside you will meet Priscilla Divine for a semi-final battle. She summons her captain of the guards and three regular guards. Watch out
for the captain as he has some nasty talents at his disposal not to mention he can heal himself and cast a shield to protect him from your attacks.
Sanity Serum and Health vials are located to the sides of each pyramid. Use your Inferno to
take out the three regular guards then start moving to avoid the captain's attacks. Finish him off with fireballs and claim your reward, the
Shield of Sun Talent. Climb the stairs and step on the green platform to transport to the rooftop for the final
encounter with Priscilla.
Return to that door now. You will get a phone call from a mysterious man (obviously government from his black suit and sunglasses) ordering your
to kill Priscilla Divine then he hangs up. Use the touch pad and enter the symbols (ankh, beetle, bird, reeds) in the proper order to open the
door. Inside you will meet Priscilla Divine for a semi-final battle. She summons her captain of the guards and three regular guards. Watch out
for the captain as he has some nasty talents at his disposal not to mention he can heal himself and cast a shield to protect him from your attacks.
Sanity Serum and Health vials are located to the sides of each pyramid. Use your Inferno to
take out the three regular guards then start moving to avoid the captain's attacks. Finish him off with fireballs and claim your reward, the
Shield of Sun Talent. Climb the stairs and step on the green platform to transport to the rooftop for the final
encounter with Priscilla.Priscilla Divine (Boss Level)
You arrive on the first of two tiers leading to the top of the pyramid. Each of these platforms has Priscilla standing on a pedestal protected by a yellow psionic shield which is being generated by an urn protected by a glass wall. The glass is immune to everything in your current arsenal except the Inferno which will destroy the urn (and Priscilla's shield) in a single hit. The only trick is you have to get past Priscilla and her guards and cast the talent right next to the window.
 The first thing to do is cast that new Shield of the Sun talent you acquired moments ago. This will protect you from Priscilla while you battle
her thugs. Use Inferno on these guys as they tend to cluster around you. Scoop up any power-ups they leave behind. Watch out for the Eye of Ra
attack that Priscilla enjoys using. When you see the trio of lights appear quickly move out of the blast radius. Now destroy that urn and take
a few shots at Ms. Divine and she will flee to the next level.
The first thing to do is cast that new Shield of the Sun talent you acquired moments ago. This will protect you from Priscilla while you battle
her thugs. Use Inferno on these guys as they tend to cluster around you. Scoop up any power-ups they leave behind. Watch out for the Eye of Ra
attack that Priscilla enjoys using. When you see the trio of lights appear quickly move out of the blast radius. Now destroy that urn and take
a few shots at Ms. Divine and she will flee to the next level.Repeat the previous steps to kill three more guards and destroy the next urn. Use the shield talent when necessary. Now head to the roof for the final encounter. Here there are three platforms and plenty of guards. Take care of the guards and the urns following Priscilla as she moves to each pedestal until you destroy the final one. With no place left to run you can finally finish off the "Hotline Queen" and get your reward. Collect the Star Shower Talent, Eyes of Ra Talent, and Heal Talent, plus power-ups to increase your maximum sanity and health. Head to the center of the roof area and Frost will call letting you know your ride is on the way.
Back at DNPC Headquarters
It seems the guys at HQ want to check out all those new talents you just picked up. Enter the Psi-Chamber and follow their instructions to put on a good show. About this time an alarm sounds indicating a security breach in the detention area. The alarm (or perhaps the explosion downstairs) triggers an error in the training program activating Training Level 999. Since you've only trained up to Level 3 at this point casting that Shield talent may be a good idea about now.
Several turrets raise up instead of targets and begin shooting. Your shield will protect you but you need to start shooting fireballs at the guns until they are all destroyed. I guess 999 wasn't so hard after all. Exit the chamber and talk to the range boss who informs you about the break-in and lockdown. He warns you not to go there since security is using special grenades that would negate your abilities but you're too macho to listen. Exit the firing range and talk to the guy in the hall who says one guy is responsible. Uh oh!
Head down the stairs and go through the door on the right then take more stairs down to the lobby and go through the metal detector. A guard is trapped under a beam. Use a fireball to shoot the beam off of him. Aim for the far right part of the beam so you don't hit the guard. He gives you his security access card and asks you to assist upstairs in the detention wing. Head back up the first flight of stairs and go left where you will run into Strassburgh. Continue in that direction and head up the steps to level 2.
Go through the door and head left down the hall and take a right at the end. Go up some more stairs and talk to the DNPC guard who tells you they have everything "under control". Yeah, right. About this time an inmate runs by <>i>very fast but not faster than the guards weapon. When the inmate vanishes he leaves only a Haste Talent behind. The Access Card Reader is painfully obvious so use your card to enter the next area.
More inmates are on the loose in this area and they seem to have no respect for the guards or you. Protect yourself with a shield then get close to the inmates and use a couple of Inferno talents to finish them off. Now locate the Emergency Override switch that also opens the upper door behind you but only for a few short seconds. Use your Haste talent and flip the switch again and make a dash for the door. You must make a flawless run and even then the doors will be closing as you squeak through.
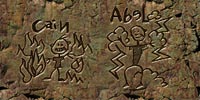
 Inside are a couple more guards protecting a small boy. This is Bobby, another one of the Children of Tomorrow (like the girl from the pyramid).
He appears to be the object of all this chaos and about now your worst fears are confirmed. Abel, your foster brother appears and easily dispatches
the guards and asks for the boy. Naturally you refuse and a short battle ensues. Well, not much of a battle since you have nothing that can even
damage this guy. Throw up a shield and run around the room dodging his attacks while Bobby works on back door. When he calls you, quickly enter the
storage area while Abel is left to fight a new set of guards.
Inside are a couple more guards protecting a small boy. This is Bobby, another one of the Children of Tomorrow (like the girl from the pyramid).
He appears to be the object of all this chaos and about now your worst fears are confirmed. Abel, your foster brother appears and easily dispatches
the guards and asks for the boy. Naturally you refuse and a short battle ensues. Well, not much of a battle since you have nothing that can even
damage this guy. Throw up a shield and run around the room dodging his attacks while Bobby works on back door. When he calls you, quickly enter the
storage area while Abel is left to fight a new set of guards.Bobby displays a cool new ability that you embarrassingly don't have...yet. Bobby takes off through the ventilation shaft and tells you to meet him at the chopper pad. He also leaves you the Push Talent which you can now use to move the boxes around to get out to the pad. Note that you cannot push a box once it is up against another so you may have to move some boxes to the side. Head up the stairs and out to the chopper pad where Bobby and Abel are both waiting.
 As you begin another battle with your evil brother Bobby warns that the electric fence is still on. HINT! Use your Push talent to force Abel into
the fence which is the only way to damage him. Abel attacks the same way but you are smarter than he is. Get up against either the gate or one of
the columns. Even if Abel does a Push talent on you it won't hurt. Wait for him to get close then quickly circle around so he is between you and
the fence and fire away. By now I was very low on Psi-energy so I had to use this method as my power slowly built back up to 30. After his
third trip into the fence a bunch of guards finally arrive and shoot their psi-suppressant grenades. Abel takes a dive off the roof and the guards
take Bobby away.
As you begin another battle with your evil brother Bobby warns that the electric fence is still on. HINT! Use your Push talent to force Abel into
the fence which is the only way to damage him. Abel attacks the same way but you are smarter than he is. Get up against either the gate or one of
the columns. Even if Abel does a Push talent on you it won't hurt. Wait for him to get close then quickly circle around so he is between you and
the fence and fire away. By now I was very low on Psi-energy so I had to use this method as my power slowly built back up to 30. After his
third trip into the fence a bunch of guards finally arrive and shoot their psi-suppressant grenades. Abel takes a dive off the roof and the guards
take Bobby away.Frost appears with your new mission - no rest for you. It appears that Aiken Pharmaceuticals was broken into recently and Adrian Starr, renowned magician, is a chief suspect. She gives you a new Shield of Fire Talent and tells you to report to the car waiting down at the street.
The Grand Theater
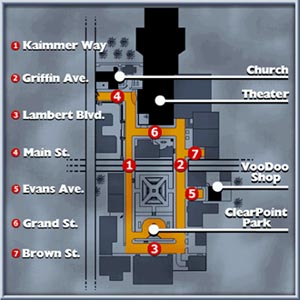 You are given some background info on the ride into town. Apparently Adrian Starr isn't a magician after all, but rather a very powerful psionic
and formed test subject of Joan Aiken. You get dropped off just outside the city park (Area 3 on map) and Frost calls to chat. You learn the
theater will be closed until show time, so you will need to find an alternate way into the theater to question Adrian Starr. This gives you some time
to explore the city and talk to the citizens. You are free to visit the locations in any order you choose, but I will be describing them in the
optimal path for solving the puzzles.
You are given some background info on the ride into town. Apparently Adrian Starr isn't a magician after all, but rather a very powerful psionic
and formed test subject of Joan Aiken. You get dropped off just outside the city park (Area 3 on map) and Frost calls to chat. You learn the
theater will be closed until show time, so you will need to find an alternate way into the theater to question Adrian Starr. This gives you some time
to explore the city and talk to the citizens. You are free to visit the locations in any order you choose, but I will be describing them in the
optimal path for solving the puzzles.The map has a few key locations shown and there are a few others you will visit as well. For now head over to the Voodoo Shop on Evans Ave. You will likely encounter a group of three gang members who will offers to "teach you some respect". You never were a good student so use your favorite talent to teach them some respect then enter the shop to have a chat with the owner. The only thing he is willing to part with is the talent spinning on the counter. You can click on the "Claw" video game for some humorous info on another Monolith game from several years ago. The owner offers to trade the talent for a "holy relic" that can be found in the church.
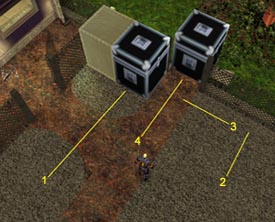 Exit the shop and enter the park across the street. Cut through to the opposite side and talk with the people if you want then exit onto Kaimmer
Way. Directly across the street and to the right is a fenced in yard. Enter this area and note the two boxes and the energy field across the back
gate. Use your Push talent to move the boxes in such a way that you can push one box through the gate and disrupt the energy field. This can be
done in four easy steps.
Exit the shop and enter the park across the street. Cut through to the opposite side and talk with the people if you want then exit onto Kaimmer
Way. Directly across the street and to the right is a fenced in yard. Enter this area and note the two boxes and the energy field across the back
gate. Use your Push talent to move the boxes in such a way that you can push one box through the gate and disrupt the energy field. This can be
done in four easy steps.When the gate short circuits the other gate will open allowing you to obtain the Reveal Talent. Exit the fenced lot and head left down Kaimmer. You will cross over a highway below. Start talking to people you meet along the street. Some don't have much to say but others offer valuable clues to upcoming puzzles. Up ahead on the left is a man standing next to a crossing gate. Talk to him and learn he plays the bells at church but the 5th bell seems to be missing. Continue up the street and approach the construction site. You will see a man exit the cemetery. Inside the cemetery is a sealed crypt, several tombstones, and a locked back door. Head to the church and discover that the front doors are also locked.
Head back to the intersection of Kaimmer and Grand (near the guy who plays the bells) and locate the older gentleman with the bible. He only appears here after you try the locked church doors and will be gone after you get inside. Ask him about the church and you will get a cryptic riddle/clue that his father used to tell him. "You gotta make sure the womenfolk are sitting up straight and the men are laid back". With that information you can now return to the cemetery and use your Push talent to knock over the headstones of all the men. Just read each one and look for either HE or SHE in the inscription.
When all the male headstones are knocked over the crypt will open and you can enter and get the Church Key. Head to the front doors and enter the church. Inside are some Sanity Serum and Health vials and four bells on the altar. Use your new Reveal talent to make the fifth bell appear then head back to talk with the guy who knows how to play the song. He will give you some fancy explanation but all you need to do is listen for the numbers, 1-5-4-3-2. Return to the church and play the bells in that order (numbered left to right) and watch the cross outside move revealing the "holy relic" you seek. Use your Haste talent and play the bells again then run to the cross and get the relic before it closes.
Now you can head back to the Voodoo Shop. Head back down Kaimmer but this time turn left onto Grand and pass the theater. Talk with the guy outside the box office and he will give you some info on how to spoil a magician's card trick. Across the street is a gas station. Shoot the yellow car until it explodes allowing you to enter the garage and obtain the Sand Pit Talent. Head back down Griffin to the Voodoo Shop but expect trouble when you near Brown Street. More thugs will attack. Deal with them and complete your trip to the shop. Trade the relic for the Wall of Bones Talent.
The store owner thinks you should meet a friend of his over in the parking lot just south of the park. Leave the shop and turn left to reach the parking lot. A cloaked figure rises out of the flowers and introduces himself as Golgotham. He invites you to assist him in world domination and when you refuse he summons a trio of Anubis guards. Cast a Shield talent then deal with the guards swiftly. When they are dead the gates will open and you can exit onto Kaimmer again. Talk to Frost then head north toward the theater and you will get a call from the mysterious government agent who requests a meeting at the Used Tire Shop located at the southern most end of Kaimmer.
Return to the corner of Kaimmer and Lambert and talk to the main in the black suit. It seems he only wants to thank you for killing Priscilla Divine and offers you a Levitate Talent as a token of his thanks. Then he and his guards hop in the sedan and drive off. There are two place to use your new talent. Return to the Voodoo Shop which is now closed. To the left is an open gate with a hole. Use the Levitate talent to glide over the hole then enter the shop through the back door and get the Health Container. Exit the shop and levitate back across.
Now head to the construction area near the gate to the cemetery. As you approach a short movie shows you the OPEN sign on the door. Levitate across the pit and enter the Magic Shop. Talk to the clerk who is impressed that you even got in. He offers to show you a magic trick. Using the information you got from the guy at the box office you should be able to mess up his trick. Just make sure to first "pick the bottom card" then have him cut the deck "six times" then have him "cut the deck once more". The clerk gets upset and offers you the "defective" deck of cards. Head through the door and enter the lobby of the Grand Theater.
Check out the bathroom to find the Men's Room is "out of order". Enter the theater and make your way to the stage and talk with Adrian Star. He summons some of his showgirls to "entertain" you. These girls are nasty and not only go invisible but have a large assortment of attacks at their disposal. Keep on the move and dodge their deadly blade and card attacks. Kill all four then head back toward the lobby and get a call from Frost. A large security guy is blocking the backstage door and won't let you through no matter what you say or do. A locked gate opposite this door leads to the Deathtrap Exhibit and perhaps an alternate way to reach Starr.
Head back to the Men's Room and talk with the janitor. Ask to borrow his bolt cutters and offer to show him a card trick which you totally mess up. Use the bolt cutters on the gate and enter the Deathtrap Exhibit and the next level...
Deathtrap
Enter the new area and approach the attendant. He's not going to let you in no matter what you say. You have a couple of options at this point.
Option 1: Pull out your gun and threaten him. Several showgirls will appear and after you kill them he will finally open the door for you.
Option 2: Use your Mind's Eye talent to read his mind. Knowing he is expecting a call, tell him his agent is on the phone. He will leave and you can pull the lever and enter the door.
This next room is just one of many deadly traps you will encounter on the long road backstage. It consists of a giant spinning floor section that you must levitate over to. Then you need to shoot a fireball at the four targets in each of the corners while dodging the giant blades that come out of the walls. When all four targets have been hit the floor stops spinning and the door opens on the far side of the room. HINT: Stand on the edge of the entry area and rotate the camera until you can see each of the far targets. Shoot each one with a fireball. Then when you levitate out to the disc you can easily shoot the remaining two targets before your levitate wears off.
The next room has a large cage with several tigers and a man trapped inside. He asks that you get the key from the next room to open the cage and let him out then he will get you backstage. Sounds easy enough. He gives you an Ace of Spades card and a door opens. Enter the next room which serves as a hub for three other rooms, each with their own deadly traps and their own card you must retrieve to put in the card slots in this room. Also, each return trip to this room spawns a new set of showgirls that you must battle, much like the ones you are facing right now.
The showgirls aren't too hard as long as you stay on the upper level and use bombing attacks like Star Shower or Eye of Ra. Keep an eye on the girls if they go invisible. You can still make out a slight transparent image of the girl. If you have to mix it up on the main floor use a standard fireball and rapid fire them at the girls until they are dead. Repeat this process on your return visits to this room.
Insert the card into the proper slot and three other doors open, each with an Ace on the door of a different suit that corresponds to the three Aces you need for the remaining slots. You can do the rooms in any order you choose. They get progressively harder as you go clockwise around the room so I will start with the easiest room behind the Ace of Clubs door.
The Ace of Clubs is located in the back of this room which has a pair of giant balls rolling around the path you need to take. There are also giant blades that stick out of the walls at regular intervals. Study the pattern and timing of the balls and blades then make your move. HINT: Watch the path of the camera during the movie - that is the path you need to take. Ignore the ball to the right (moving counter-clockwise) and wait for the other ball to come at you then turn left. Follow it and stop when necessary to avoid the blades. When you reach the back of the room the other ball will be approach the card. Wait for it to roll over it and turn right then get the Ace of Clubs card and follow that ball. The other ball will be coming up behind you but you should have plenty of time. Make sure to stop for the final blade that sticks out into the middle path. Run forward and up the steps. Return to the hub room, fight the girls and insert the card.
 The Ace of Diamonds is located in one of the two giant boxes in the next checkered room - can you guess which one? This puzzle is very similar to
the puzzle back in the city where you got the Reveal talent except you have to move the boxes around a lot more. I've got the pattern narrowed
down to six steps.
The Ace of Diamonds is located in one of the two giant boxes in the next checkered room - can you guess which one? This puzzle is very similar to
the puzzle back in the city where you got the Reveal talent except you have to move the boxes around a lot more. I've got the pattern narrowed
down to six steps.Push the Diamond Box along the yellow path.
Now push the Star Box along the green path to the back wall.
Finally push the Diamond Box back against the Star Box then into the spinning blade.
If you miss the blade just go to the other side and push it back until you hit it. Get the Ace of Diamonds card and return to the hub.
The Ace of Hearts is located in the third and final room and things get a bit tricky. The wooden catwalk is going to start crumbling away as you run across it. This means you have to keep moving and dodge the blades at the same time. You can pause for about a second at the second blade if necessary but you need to time the start of your run so you can run past the first one without pausing. Get the Ace of Hearts card then get ready for the return trip. Now is a good time to save. A series of four platforms have risen up along the left wall. You need to levitate across to these platforms to get to the other side. The trick is to go two platforms at a time so get the timing of the blades down then float out past the first blade and time your landing on the second platform just as the blade is retracting. Quickly use another Levitate talent and move on to the forth platform. Once more Levitate talent and you will reach the other side. The timing on this is very critical and you may have to try a few times before you make it across.
Back in the hub you get to fight a few more showgirls before inserting the final card. Now you can get the Cage Key and return to the room with the trapped man. Use the key to open the cage and quickly kill the three tigers before they eat the trainer. He will give you a Lesser Shield of Reflect Talent and a clue that you should use it on Adrian Starr. He then takes you to the door leading backstage. Follow the hall and kill another pair of showgirls who leave behind a Shield of Illusion Talent. Go through the door and more showgirls appear but they leave without attacking. Head over to the stairs and go up to talk to the stage manager. It seems you are going to be an unwilling contestant on the "Trivia Insanity" game show.
Adrian Starr (Boss Level)
Most of this level consists of a game show where you are asked trivia questions and one wrong answer means you die! The questions aren't hard if you have been a good detective and have been paying attention. I'll give you the answers and where they are located in the game.
1. Kenna - you get this name from the trainer during your first conversation.
2. The Eye of Ra - you learn this during your first mission briefing.
3. In utero injection of Psionic Booster Serum - You learn this in the opening movie.
4. Clear Point Park - this is on the sign where you met Golgotham.
5. Department of National Psionic Control - Opening movie and the DNPC database.
6. The Children of Tomorrow - learned from little girl who gave you Mind's Eye talent.
 Once you win the trivia game you get to help Adrian with his magic trick. This basically consists of you fighting more showgirls as you make your
way to each side of the stage to shoot the pair of targets at each end. When all four targets are hit the glass box will break and you then face
Adrian Starr. Get your Shield of Lesser Reflect ready. Adrian has two attacks, a Fan of Blades and a Rain of Swords. You can only dodge the swords
but when he fires the blades at you wait until they almost hit you then cast the shield talent to reflect one of the blades back at him. Repeat this
until he falls into the pit again.
Once you win the trivia game you get to help Adrian with his magic trick. This basically consists of you fighting more showgirls as you make your
way to each side of the stage to shoot the pair of targets at each end. When all four targets are hit the glass box will break and you then face
Adrian Starr. Get your Shield of Lesser Reflect ready. Adrian has two attacks, a Fan of Blades and a Rain of Swords. You can only dodge the swords
but when he fires the blades at you wait until they almost hit you then cast the shield talent to reflect one of the blades back at him. Repeat this
until he falls into the pit again.He will rise up and thank you for helping him with his show. He's awfully polite for just trying to kill you. Talk with him and he will deny any involvement with the break-in. He does suggest that Abel was responsible for the break-in and that you should search the actual crime scene. He then makes a magician's exit leaving you to talk with Frost who calls to confirm Adrian's theory. Before leaving you will want to stock up on the talents Adrian left behind. Collect the Fan of Blades Talent, Deck of Death Talent, and the Rain of Swords Talent. Get the Sanity and Health containers to bump up your maximum levels then head off to the next level.
Aiken Pharmaceuticals
Head across the parking lot and Golgotham makes another appearance. This time he summons enemies from your past two missions, something even Frost thought was impossible. When the Anubis guards and showgirls are dead you can head up the stairs. You will pass some guard running to check out the commotion leaving the front door wide open.
Enter the lobby and blend in with the tour group. Talk to the people while you wait for the tour to begin. Follow the guy to the bathroom and take his clothes and tour pass so you can blend in easier then join the tour already in progress. Give the guard your pass and merge back with the group. The tour is optional but rather fun and interesting the first time you play. You can always break away from the group and head up the stairs, but if you do this outside of the regular tour you will have to dodge some security systems at the top of the stairs.
When the group finally reaches the elevators Cain decides it's time for a more personal tour. Head back to the security checkpoint that leads to the labs. Wait for the guard to walk away then dodge into the elevator lobby to the left. When the guard passes the other way run out into the hall and up the stairs at the end. If you get caught by any of the guards in this area they just restart you back at the last checkpoint. At the top of the stairs Frost calls again. She tells you to try to get to the labs on the lower level.
This next area features eight labs in two groups of four. Guards patrol the halls but they are easily avoided, usually by ducking into one of the labs. You can visit the labs in any order and hear lots of complaints from almost all the employees and read their minds for even more humorous information, but when you are ready to solve the intricate set of puzzles you need to go to each lab in a certain order. Here we go...
 Start at Station 5. Talk to the scientist and bluff your way into getting a new talent. He gives you the
Shield of Science Talent and takes some readings while you use it. Now head to Station 6 to get the data from the
technician there. Take the data disk over to Station 7 and give it to the technician there. Now head to Station 8
and wait for Dr. Beakerman to move away from the beaker. Take the beaker across the hall to Station 1 and the scientist
will use it to generate the printouts in Station 2.
Start at Station 5. Talk to the scientist and bluff your way into getting a new talent. He gives you the
Shield of Science Talent and takes some readings while you use it. Now head to Station 6 to get the data from the
technician there. Take the data disk over to Station 7 and give it to the technician there. Now head to Station 8
and wait for Dr. Beakerman to move away from the beaker. Take the beaker across the hall to Station 1 and the scientist
will use it to generate the printouts in Station 2.Now head to Station 2 and get the printouts and take them to the scientists in Station 3. You will get a procedure list and some verbal modifications you need to remember. Run the list over to Station 4 and give them to the scientist. He asks about "special instructions" and you can tell him to "Reverse Steps 4 and 8 and skip 5". He disagrees and ends up blowing up a piece of equipment forcing an evacuation of Station 4. Quickly run through the door that just got blown open and get the Wall of Flame Talent.
Head across the hall to Station 8 and Dr. Beakerman will ask you to return the beaker you "borrowed". Head across the hall to Station 1 and talk to the scientists. Tell them about the evacuation and they will leave too. Get the beaker and return to Station 8. SAVE YOUR GAME before talking to Beakerman. Things are going to get intense real fast. Return the beaker and he will ask who you are. He isn't as trusting as everyone else and goes to "check out your story". Actually he is getting the pair of guards from the elevator lobby leading to the lower levels.
You must act quickly. Use your Haste talent and enter the green door on the far wall. Inside is a Fire Protection Talent and a Suppress Fire Talent. You will probably see Beakerman and the guards running by the side window about this time. Run like mad out of the lab and down the hall and duck into Station 1. You must do this perfectly and without any hesitation or you will get caught. Now that the lobby leading to the lower level elevators is unguarded you can make your way there and ride down to the next level.
Aiken Research Level
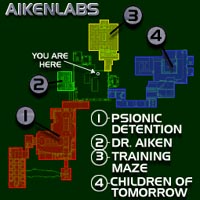 Exit the elevator and talk to Frost. Check out the map on the wall to get a layout for this level then head to the Training Maze at Area 3. Go through
the entry chamber and through the second door to enter the maze. A small boy will call out for help from the other side. Not only do you need to cross
the maze filled with deadly robots, you also need to flip several levers to open the four doors blocking your way to the boy. There is a lever in each
corner of the maze and a special fifth lever in the middle of the maze that opens a door leading to a secret talent.
Exit the elevator and talk to Frost. Check out the map on the wall to get a layout for this level then head to the Training Maze at Area 3. Go through
the entry chamber and through the second door to enter the maze. A small boy will call out for help from the other side. Not only do you need to cross
the maze filled with deadly robots, you also need to flip several levers to open the four doors blocking your way to the boy. There is a lever in each
corner of the maze and a special fifth lever in the middle of the maze that opens a door leading to a secret talent.The droids attack on a line-of-sight so as long as you can stay out of their path they won't fire on you. You can throw up a shield if you want or perhaps use a Haste talent to get through the area quicker. When you have pulled all the levers go into the area with the boy and talk with him. His name is Anthony and he will give you some information then throw up his own shield and follow you back to the other side of the maze. Stay close or he will run to the center of the maze and hide until you return. He will deactivate any remaining robots then activate the lift taking you by to the entry chamber. Talk some more and he will offer future assistance.
Now head to the corner of the entry area (right of the maze door if facing it) and a secret door will open. Follow the passage around and enter the door you unlocked with the lever. Shoot out the glass window (this is the first time you really use your gun since training) then use the Levitate talent to glide across the maze. Your objective is the opposite alcove to the right on the far wall. You will need to keep using the talent every couple of wall sections otherwise you will fall into the maze and have to start over. When you reach the last wall section shoot out the glass and glide into the alcove to get the Summon Suicide Droid Talent. Drop back into the maze and exit.
Head past Anthony and back out into the main area with the glass floor. Several assorted droids will appear and you must defeat them before you can enter any other doors. Get used to this as it will happen every time you return from any of the other areas. Use shields and keep moving until the droids are all destroyed. In case you missed the part of the tour in the previous level, here is how the droids work:
Red Suicide Droids fly into you doing lots of damage. Shields are your only defense.
Green Attack Droids fire lasers and can disable your shields. They also fire Psi-suppressant grenades which can disable your talents temporarily. Use a Reflect Shield to defeat them.
Blue Psionic Droids are heavily shielded and learn any talents you use and fire them back at you. Use the boxes in the center of the room for cover and use a Reflect Shield to defeat them.
The first set of attack droids consist of 3 Suicide Droids and a Green Attack Droid. Defeat them and you will obtain a Laser Beam Talent. Head across the room to Dr. Aiken's office. Her receptionist is not very helpful so use your gun to get her to open the door. Search the doctor's office and locate a card key and a note with the numbers "4995" written on it. You can also locate the secret passage behind the left bookcase, but you cannot go further than the entry room. Check out the stuff on the walls if you want then head back out to the main room.
This time 4 Suicide Droids appear. Throw up and shield and let them run into you and blow up then head over to the locked door leading to the Records Area. Enter the 4995 code to enter the first room and talk with the worker. Head over to the two terminals on the right and read up on all the topics for lots of information about the main characters in this game. When you are finished you can head to the door across the room and use the card key to enter. Get the C of T access card and use the other computer terminal to get more information including the security code to the Children of Tomorrow area; yellow, blue, red, white, green. Head back to the main area and talk to Frost along the way.
 More robots greet you as you exit including a Blue Psionic Droid and a Green Droid who will start launching Psi-suppressant grenades at you. Keep on the
move and defeat these droids as quickly as possible. Make your way to the door leading to the Children of Tomorrow and enter. Go through the door to the
security booth and enter the code you learned from the computer. When the force field is down you can enter and use your access card to open the doors.
The next two areas are a bit tricky. Watch and learn the pattern of the sensor lights then try to get through without getting caught. If a light touches
you the doors will seal and a pair of droids will appear. Destroy the droids to open the doors.
More robots greet you as you exit including a Blue Psionic Droid and a Green Droid who will start launching Psi-suppressant grenades at you. Keep on the
move and defeat these droids as quickly as possible. Make your way to the door leading to the Children of Tomorrow and enter. Go through the door to the
security booth and enter the code you learned from the computer. When the force field is down you can enter and use your access card to open the doors.
The next two areas are a bit tricky. Watch and learn the pattern of the sensor lights then try to get through without getting caught. If a light touches
you the doors will seal and a pair of droids will appear. Destroy the droids to open the doors.Wait for the middle light to move away from you then circle around to either side to avoid all three circles. Stand in the next door and wait for two of the three lights to head to one side of the room then run along the wall they just left to reach the opposite door. Enter and talk with the receptionist. Tell her you would like to talk to "Manda". She will open the door and give you directions.
 Following her directions takes you to a large area with many children. After some discussion they will want to play a game which consists of pushing you
around the room with their Push talents. This won't hurt you so just run around for a few seconds until Manda shows up and sets them straight. She then
tells you some disturbing news and takes you to the outer hall to look at something. After looking at the disturbing carvings on the wall you can move
down the walkway to the stairs at the end. You could visit the two rooms along the right but they just have busy scientists who don't have time to talk to
you.
Following her directions takes you to a large area with many children. After some discussion they will want to play a game which consists of pushing you
around the room with their Push talents. This won't hurt you so just run around for a few seconds until Manda shows up and sets them straight. She then
tells you some disturbing news and takes you to the outer hall to look at something. After looking at the disturbing carvings on the wall you can move
down the walkway to the stairs at the end. You could visit the two rooms along the right but they just have busy scientists who don't have time to talk to
you.Go down the steps and into the second door on the right where a girl is flipping switches with her mind. Talk to her and offer to help get her toy back from the room next door. Head outside and go to the door on the left. Once inside, use your Reveal talent to light up the floor. The flashing tiles will damage you so make your way to the other side and retrieve the toy and go back walking only on the non-flashing tiles. Give Jessica her toy back and she will give you the Telekinesis Talent.
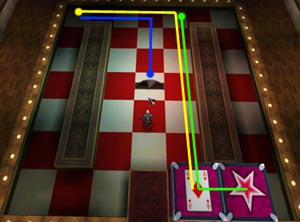
Now continue around to the right and follow the hall until you reach the door ahead and slightly to the right. Enter and talk to Nathan. He needs help with a very difficult puzzle. This is another block moving puzzle with an evil twist. There are four squares with teleporters on them. If you slide any block into a teleporter it will return to its original starting position. If you step on a teleporter you will die! If you are standing in a square that a block returns to after teleporting you will die! Even worse is that you have to use the teleporters to solve the puzzle. I've narrowed it down to these twelve moves:
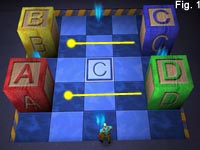 Push D into A and C into B | 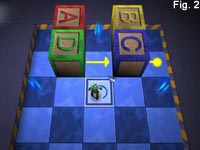 Push C to the edge and D into C |
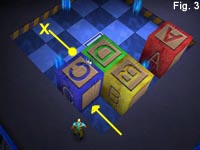 Push C into teleporter then into D | 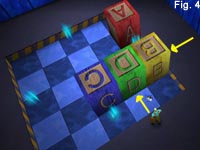 Push D to the edge then B into C then B into D (see fig. 5) for results |
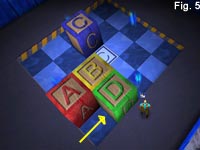 Push D into teleporter | 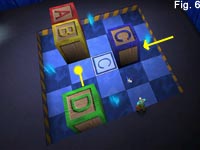 Push D into B and C into D to win! |
Use the Sanity Serum in the corner as needed. It will respawn after a few seconds. When the puzzle is complete talk to Nathan who will give you a pendant that belongs to a prisoner currently being help in the detention area. Use this pendant to identify yourself and seek his help in finding Joan Aiken. Exit the puzzle room and head up the steps and back past the receptionist. Make your way back through the two security areas in the hall and return to the main area with the glass floor.
A blue droid and a pair of green droids appear. You should know what to do by now. When they are dead you can head into the testing area right next to the door you just came out. A talent sits in a glass booth which raises only when you are standing on the pad. You can open the door using your Telekinesis on the switch but you are going to need help with the floor pad. Return to the Training Maze lobby and talk to Anthony who will follow you back and stand on the pad for you. Enter and get the Invisibility Talent which triggers a pair of security lights. These aren't moving enough for you to dodge so you are going to have to use that new talent to get past the lights. Exit this area and return to the main area where more droids await.
When the droids are destroyed you can head to the entrance to the Detention Wing. Enter and turn right to approach the guards. Talk to them then show your badge and bluff your way inside. Once inside, follow the catwalk and turn right to go across the bridge and into the next area. Enter the small room to the left and flip the switch to open the huge steel door. Enter the next area and take the ramp leading down to the row of cells. Talk to the inmates and even read their minds for some humorous thoughts. When you talk to Jarred (3rd cell on the left) you will return his pendant and he offers an access card that will take you to Dr. Aiken. All you have to do is help him escape.
He open the switch box at the end of the walkway and you can flip the switch to turn off the cell force fields. This triggers an alarm and the guards start to seal off the entire area. The prisoner opposite Jarred kill him as he tries to escape then starts to attack you. Kill him quickly to avoid his Demonstrike attack. Get the access card and enter his cell. Use a fireball to blow up the "funny looking" wall section and enter the tunnel beyond. Follow it to the end and blow up the barrels to create a hole in the wall leading to the control room.
 Inside are a pair of droids and two glowing green boxes which spawn new droids. Destroy the boxes first then take out the pair of droids. You can use bombing attacks
from the tunnel-side of the wall if you want. Push the box in the corner to reveal a secret room with a Sanity Container that will bump
your Sanity up another 100 points. Now return to the control room and get a Haste talent ready then pull the lever. This opens the main doors to the Detention Wing
but only for a second then they slowly start to close. Use your Haste and run down the catwalk and through the security lights. Do not touch the lights or the doors
will shut instantly. You should be able to just squeak through the door. If not, you can try standing further down the hall and using Telekinesis on the switch to
gain a few extra yards head start then do a Haste talent to reach the doors.
Inside are a pair of droids and two glowing green boxes which spawn new droids. Destroy the boxes first then take out the pair of droids. You can use bombing attacks
from the tunnel-side of the wall if you want. Push the box in the corner to reveal a secret room with a Sanity Container that will bump
your Sanity up another 100 points. Now return to the control room and get a Haste talent ready then pull the lever. This opens the main doors to the Detention Wing
but only for a second then they slowly start to close. Use your Haste and run down the catwalk and through the security lights. Do not touch the lights or the doors
will shut instantly. You should be able to just squeak through the door. If not, you can try standing further down the hall and using Telekinesis on the switch to
gain a few extra yards head start then do a Haste talent to reach the doors.Back in the main area you get to deal with your final set of droids for this room. Kill them then return to Dr. Aiken's office. Go through the secret bookcase and through the next door using the access card. If you need health or sanity you can take the door to the left to reach the receptionist's desk where vials of each are available. You can use Haste or Invisibility to get past the next set of security lights. Head past the first two workers and continue until you reach the lift. Ride down and talk with the scientists then proceed to the pressure pad which turns off the force field leading to the exit. Use your invisibility to get past the next two pair of security lights then stand on the lift to ride down to the next level.
Joan Aiken (Boss Level)
 From the looks of the welcome sign things aren't going to be nice down here. This first area is patrolled by three droids which must all be destroyed before you can
continue through the door to the right. Watch out for their Psi-suppressant grenades and try to kill them one at a time so they can't gang-up on you. Head through
the door and into the next area where nine glass cylinders and red energy beams create a deadly grid of death.
From the looks of the welcome sign things aren't going to be nice down here. This first area is patrolled by three droids which must all be destroyed before you can
continue through the door to the right. Watch out for their Psi-suppressant grenades and try to kill them one at a time so they can't gang-up on you. Head through
the door and into the next area where nine glass cylinders and red energy beams create a deadly grid of death.Your goal is to create a path through the area by deactivating certain red beams. To do this you have to destroy the glass cylinders which each contain a Psi-Mutant who have their own deadly attacks, mainly Lasers and Binary Grid. You can dodge their attacks but they are stuck on their pedestals making it very easy to kill them. I found the Deck of Death worked very well taking only two hits each to kill a mutant or three if you use it to smash the cylinder as well. There are plenty of Sanity Serum and Health vials that will appear after each mutant battle. When all nine mutants are dead you can make your way around to the steps leading out of here.
You will get another call from Frost who is working on your escape route. The next area has large tanks with giant brains floating in them. Guards block the door leading to the right but you can create a distraction by using a fireball on that flammable pipe on the back wall. When the guards come running to investigate you can circle around and sneak down the hall to get through the door. Inside is Dr. Aiken who doesn't seem surprised to see you. After a short discussion the battle begins.
 The first part of this encounter has you fighting several summoned Anubis guards. Make your way to the far side of the room so once they are defeated you can shoot
fireballs into the giant brain. When the force field comes back on get ready to fight more guards. When they are dead fire into the brain some more. Repeat this
three more times until the brain is destroyed at which time Dr. Aiken will come down from her pedestal to fight you herself. She has some nasty attacks so make sure
to always keep a shield on yourself. She will summon suicide droids, fire lasers, and even clone herself. Your best weapon is the Fan of Blades which not only does
good damage but also prevents her from summoning droids.
The first part of this encounter has you fighting several summoned Anubis guards. Make your way to the far side of the room so once they are defeated you can shoot
fireballs into the giant brain. When the force field comes back on get ready to fight more guards. When they are dead fire into the brain some more. Repeat this
three more times until the brain is destroyed at which time Dr. Aiken will come down from her pedestal to fight you herself. She has some nasty attacks so make sure
to always keep a shield on yourself. She will summon suicide droids, fire lasers, and even clone herself. Your best weapon is the Fan of Blades which not only does
good damage but also prevents her from summoning droids.Unfortunately you cannot kill her just yet. When you do enough damage she will summon her guards and you are forced to flee out the back door. Flip the switch on the wall to the right to open a pair of doors ahead which contain new talents and Sanity and Health containers to increase your maximum points. Before you leave this hall you should have added these talents to your deck; Shield Break Talent, Clone Talent, Binary Grid Talent, and the Mummy's Revenge Talent.
Go through the next door and talk to Frost who gives you direction to reach the parking lot where a car is waiting. Head right at the first intersection, go straight through the next and turn left at the third and go through the doors.
Professor Krebspawn's House
This level is very similar to the guided tour at Aiken Pharmaceuticals. You will do a lot of walking and listening, but there are a few things stashed around the house including some pretty tough puzzles and secret talents. Head to the front door and ring the bell. You will need to do this three times before you can pick the option with the name "Elijah Krebspawn" in it. You can then enter the foyer and maybe even notice a demon running around in the next hall. If you miss him you will spot another outside soon enough. Look at both paintings then head to the closed doors to meet the professor.
 Talk to the professor then follow him into the next room. Talk some more and he will head off down the hall (1). You may want to get a
couple glyphs before following him. First head into the library (2) and locate the obvious misplaced book to the left of the ladder.
Push it to open a secret room back in the hall. Return and get the Inferno Glyph then head to the plant to the left of the door where
you first entered this area. Push the switch (3) to cause a glyph to appear on the table (4) in the foyer.
Get the Star Shower Glyph then head down the hall after the professor.
Talk to the professor then follow him into the next room. Talk some more and he will head off down the hall (1). You may want to get a
couple glyphs before following him. First head into the library (2) and locate the obvious misplaced book to the left of the ladder.
Push it to open a secret room back in the hall. Return and get the Inferno Glyph then head to the plant to the left of the door where
you first entered this area. Push the switch (3) to cause a glyph to appear on the table (4) in the foyer.
Get the Star Shower Glyph then head down the hall after the professor.Note: Glyphs are talents that you can place on the floor that trigger only when walked on. They are like invisible psionic landmines. Be careful because you can trigger them yourself. If you forget where you placed one of these glyphs you can always use your Reveal talent to find them.
 Follow the professor and talk some more. Check out his scary paintings - hey, isn't that Caleb? Enter the ballroom and admire the grand piano then continue to follow
the professor down the next long hall. You may spot another demon running around outside. More walking and talking until you finally reach a room with some
glass cases at which time the professor is called away to the phone. Time to explore on our own. Head to the only available exit and note the piece of music lying
next to the statue to the right of the exit. Rats! The professor locked the door leading back to the piano. Guess this clue will have to wait.
Follow the professor and talk some more. Check out his scary paintings - hey, isn't that Caleb? Enter the ballroom and admire the grand piano then continue to follow
the professor down the next long hall. You may spot another demon running around outside. More walking and talking until you finally reach a room with some
glass cases at which time the professor is called away to the phone. Time to explore on our own. Head to the only available exit and note the piece of music lying
next to the statue to the right of the exit. Rats! The professor locked the door leading back to the piano. Guess this clue will have to wait.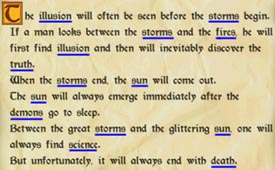 Enter the next room and check out the paintings on the wall (but don't touch yet). Read the paper and notice the keywords (which I have underlined). This is a word
arrangement puzzle that you need to decipher in order to know which order to close the curtains over the totem paintings. It's not too hard to figure out if you read
it carefully and write the words down. If you can't figure it out I will show you the order to close the curtains in the next image.
Enter the next room and check out the paintings on the wall (but don't touch yet). Read the paper and notice the keywords (which I have underlined). This is a word
arrangement puzzle that you need to decipher in order to know which order to close the curtains over the totem paintings. It's not too hard to figure out if you read
it carefully and write the words down. If you can't figure it out I will show you the order to close the curtains in the next image.Close the curtains on the totem paintings in the following order:
 1 - Fire
2 - Illusion
3 - Truth
4 - Storm
5 - Science
6 - Demonology
7 - Sun
8 - Death
The glass case is removed and you can now get the Fists of Lightning Talent before returning to the previous room. As you enter the professor returns and continues talking. He will invite you to step outside. Let him go as you need to head back to the piano through the now-open doors. Make your way all the way back to the checkered ballroom and approach the piano to get a close-up view of the keys.
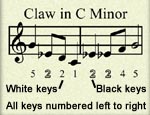
 Refer to your sheet music and play the notes in the appropriate order. In case your mom didn't make you take piano lessons like mine did here are the notes:
G, E-flat, D, C, E-flat, E-flat, F, G. If you don't care then just play the keys as numbered in the image above. Even trickier is the fact that you have to play the notes a certain duration based on their beat. Without getting into details here is how long to play each note:
Long, short, short, long, long, short, short, extra long. Make sure to hold down the mouse button on that last note as long as it took to play the previous three notes. When you get it right the music will play back and a Health Container will rise up into the center of the room. Boost your health then return to the professor who now waits in a torch lit passage.
Keep walking and talking as you make your way up to the roof. For some reason Cain doesn't realize he is standing on a pretty obvious trapdoor just before he starts threatening the professors. Krebspawn offers to show Cain a new part of the house and pulls the lever sending Cain into the dungeon far below.
Catacombs
You had it easy that last level with no combat, but you can get ready to fight all sorts of nasty demons and devils in this area. You start in a large room with a pentagram in the middle and four exits, each marked with a unique symbol which I will use to identify the following paragraphs. You can do the rooms in any order you choose. I will be describing them in the order I found easiest.
 Head through the door behind this symbol and talk to Frost as you enter an area with bubbling lava and an creepy red glow. Fight your first demons along this route.
I highly recommend the Laser talent but the Fists of Lightning works well if you are surround by multiple demons. Kill the demons and enter the lift at the end. Press
the button to ascend to the top level and head right as you exit. Talk to the prisoner in the cell and offer to help him escape. The levers at the end of this hall
open the cell doors but you need the order first.
Head through the door behind this symbol and talk to Frost as you enter an area with bubbling lava and an creepy red glow. Fight your first demons along this route.
I highly recommend the Laser talent but the Fists of Lightning works well if you are surround by multiple demons. Kill the demons and enter the lift at the end. Press
the button to ascend to the top level and head right as you exit. Talk to the prisoner in the cell and offer to help him escape. The levers at the end of this hall
open the cell doors but you need the order first.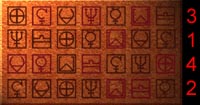 Head back to the lift and continue down the unexplored path. You will have to fight some more demons along the way. Continue out onto the catwalk and around to the
platform with the strange symbols. This puzzle isn't too hard to figure out. You have four switches and their are four rows of symbols and each row has a certain
number of red symbols. Count these to get the code or the order you need to pull the switches. Note: The bottom row of symbols corresponds
to the far left switch, etc..
Head back to the lift and continue down the unexplored path. You will have to fight some more demons along the way. Continue out onto the catwalk and around to the
platform with the strange symbols. This puzzle isn't too hard to figure out. You have four switches and their are four rows of symbols and each row has a certain
number of red symbols. Count these to get the code or the order you need to pull the switches. Note: The bottom row of symbols corresponds
to the far left switch, etc..Return to the bank of switches and flip them in the proper order to open the cell and free the prisoner. Talk a bit then send him on his way. Now you can enter any of the cells and exit out the back door into another large room. The cell doors shut and multiple demons teleport in. Kill them all then take the first of five Demon Stones you need to complete the pentagram in the main room. Return to the main room killing any demons who pop in along the way. When you enter the room you will automatically place the stone in the proper location.
 This path starts off with an easy trip to the second Demon Stone. Three Devils warp in and start attacking. The Blue Devil is casting a
Demonic Rift and the Red Devils start laying down Demonstrike Glyphs. Watch where these go and try not to walk on them or you will get smacked by a large demon. You
can run through these and avoid taking damage, but it's best just to avoid them.
This path starts off with an easy trip to the second Demon Stone. Three Devils warp in and start attacking. The Blue Devil is casting a
Demonic Rift and the Red Devils start laying down Demonstrike Glyphs. Watch where these go and try not to walk on them or you will get smacked by a large demon. You
can run through these and avoid taking damage, but it's best just to avoid them.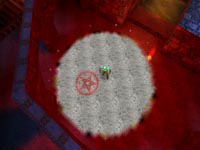 Head back to the main room and fight more demons and devils along the way. More glyphs will get laid down in your path and these will still be active for a short while
even after the devils are dead. You can use your Reveal talent to locate this "landmines" if you are low on health and can't afford to get smacked by a summoned demon.
When you finally return to the main room you can place your new Demon Stone and head for the next room.
Head back to the main room and fight more demons and devils along the way. More glyphs will get laid down in your path and these will still be active for a short while
even after the devils are dead. You can use your Reveal talent to locate this "landmines" if you are low on health and can't afford to get smacked by a summoned demon.
When you finally return to the main room you can place your new Demon Stone and head for the next room. The area beyond this door is quite deadly so save your game then proceed with caution. You will need to get down the first two halls without taking too much damage
from the alternating fire jets coming out of the walls and the floor. There is a "safe zone" between each of the jets and it's best to take it slow and safe rather
than trying to run through them all. Continue into the next large area with a lava pit and a pair of stairs.
The area beyond this door is quite deadly so save your game then proceed with caution. You will need to get down the first two halls without taking too much damage
from the alternating fire jets coming out of the walls and the floor. There is a "safe zone" between each of the jets and it's best to take it slow and safe rather
than trying to run through them all. Continue into the next large area with a lava pit and a pair of stairs.Flip the switch between the stairs to open the door on the other side of the lava pit. Inside is the third Demon Stone. Now head up either of the stairs and flip the switch in the middle of the cells to open all four doors. Kill the demon and devil that are in two of the cells then flip all four switches (one in each cell) to activate a series of bridges connecting the spinning disks in the lava pit. Repeat this procedure for the cells on the other side of the pit then begin to make your way across the pit. There are a few tricks to getting across. Always make sure to line your camera up so the next bridge is facing UP on the screen. This makes it easier to walk/run off the disk onto the next bridge. If you find it is too hard getting off the disk you can always use a Levitate to glide from bridge to bridge and skip over the disks entirely. This will cost you a lot of sanity as there are many disks to cross.
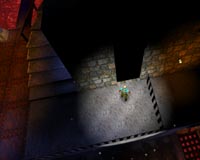 On the other side you can get the third Demon Stone and grab those Sanity and Health
vials. Now you can easily make your way back across the non-spinning disks and bridges. More devils and demons await you as you exit the bridge on the other side.
Kill them then make a quick trip to the left into the dark corner. Use your Reveal talent to illuminate a dark section of wall then push this wall to access a secret
room with a Summon Fire Efreet Talent. You will love this talent but save it for later as it doesn't do anything against the demons and
devils on this level.
On the other side you can get the third Demon Stone and grab those Sanity and Health
vials. Now you can easily make your way back across the non-spinning disks and bridges. More devils and demons await you as you exit the bridge on the other side.
Kill them then make a quick trip to the left into the dark corner. Use your Reveal talent to illuminate a dark section of wall then push this wall to access a secret
room with a Summon Fire Efreet Talent. You will love this talent but save it for later as it doesn't do anything against the demons and
devils on this level.Now return to the main room, carefully making your way past the two halls of fire jets. Put the Demon Stone in its proper place then head through the remaining door.
 Talk to Frost as you enter this area then fight the demon hovering over the first of a series of platforms. When he is dead you can use your Levitate talent to glide
from ledge to ledge as you cross the lava. Don't try to go too far on one charge or you may fall into the lava. When you get to the other side make a U-turn to the
right and head out to the large square platform then head back to the left around the cage. Fight another demon and continue gliding into the passage beyond. Follow
this passage back and around to the right dodging the fire jets and fighting more demons along the way. You will get the
Sphere of the Demon Talent from the Devil/Demon combo in this hall.
Talk to Frost as you enter this area then fight the demon hovering over the first of a series of platforms. When he is dead you can use your Levitate talent to glide
from ledge to ledge as you cross the lava. Don't try to go too far on one charge or you may fall into the lava. When you get to the other side make a U-turn to the
right and head out to the large square platform then head back to the left around the cage. Fight another demon and continue gliding into the passage beyond. Follow
this passage back and around to the right dodging the fire jets and fighting more demons along the way. You will get the
Sphere of the Demon Talent from the Devil/Demon combo in this hall.Ride the lift up to the next area and enter the large room where a colorful assortment of demons and devils warp in to greet you. Kill them all then head up the stairs and out the side door to the left of where you entered. You are now entering the maze. Since a picture is worth 1000 words here is a map of the maze and a color-coded route. Your goal is to flip the switches in all four corners to open the exit door.
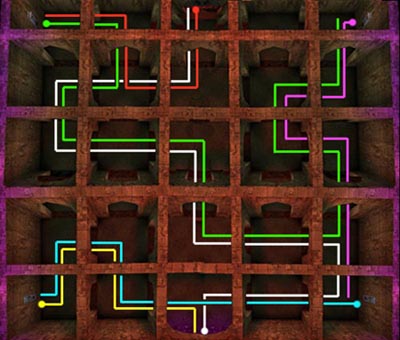
1. Follow this path to the 1st switch and flip it.
2. Follow this path from the 1st switch to the 2nd switch and flip it.
3. Follow this path from the 2nd switch to the 3rd switch and flip it.
4. Follow this path from the 3rd switch to the 4th switch and flip it.
5. Follow this path from the 4th switch to the exit.
6. Follow this path to make your way back through the maze.
Once you reach the other side of the maze you need to kill the demon and devil and head up the stairs to get the fourth Demon Stone. This triggers three more devils that you will need to kill before you can head back through the maze. Make sure to grab the Primordial Ooze Talent one of the devils leaves behind.
Once back through the maze you will need to kill more demons and devils as you make your way back to the lava lake. Glide back across the ledges until you are back in the main room where you can place the fourth stone. Hmmm...seems like one is still missing. About now the prisoner you freed should be calling to you. Follow the direction the camera took and find him on the upper area of the second area you explored (if you followed my walkthrough). It looks like he found a key but before he can give it to you a demon appears and kills him. Finish off the demon and get the Demon Key then return to the main room and head back to the last door you explored (the one with the maze).
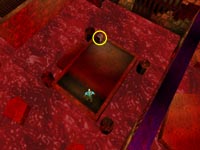 Your goal now is to glide back to the central platform in this area and use the key in the key box. This causes a set of stairs to appear leading up to the ledge with
the fifth and final Demon Stone. This causes a trio of demons to appear at the bottom of the stairs. They don't move much so you can easily
kill them before making your way back to the main room.
Your goal now is to glide back to the central platform in this area and use the key in the key box. This causes a set of stairs to appear leading up to the ledge with
the fifth and final Demon Stone. This causes a trio of demons to appear at the bottom of the stairs. They don't move much so you can easily
kill them before making your way back to the main room.Golgotham appears as you enter and wants to test your new abilities. He summons an assortment of creatures from all the previous levels which you should be able to defeat without too much trouble. When they are gone you can place the final stone in its place and a secret door opens. Head through the door and talk to Frost before climbing the stairs leading out of the catacombs.
Elijah Krebspawn (Boss Level)
You are now back in the main house. Head through the kitchen and into the dining room and turn right. Locate and move the painting to reveal a secret passage leading to a room with a teleporter in the corner. Step in and warp to one of the hardest puzzles yet.
The Glyph Block puzzle is almost hard enough to make you return this game, but fortunately Sinjin is here with the ultimate solution. Here are the rules. Your ultimate goal is to get the Moon and Lightning blocks on their matching squares. There are also four additional blocks that can be moved around to assist you in placing these two symbols. Any block pushed off the edge (at the corners only) will return to its original starting location. Note: These images were taken at the best angle to show the most moves in a single image. Make sure you are pushing the correct blocks. Ready...set...go!
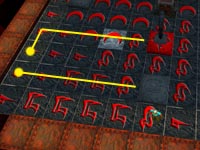 Push spacer block to edge then push Lightning block to same edge then into spacer. | 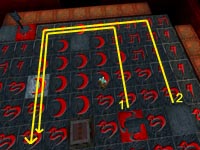 Push Moon block into same edge then into Lightning block then to opposite side. Repeat with spacer block. |
 Push spacer into same edge then into Lightning block then to opposite side. | 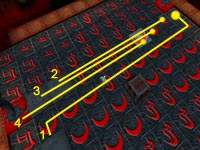 Push all 3 spacers as shown then push the Moon block into place. |
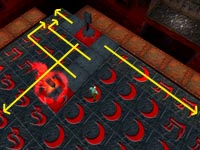 Push all spacers off corners as shown. Push Lightning block to opposite side. | 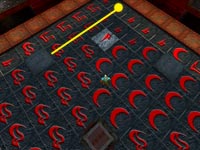 Push spacer to same edge as Lightning block. |
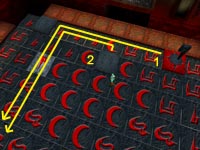 Push Lightning block to previous spacer then push to opposite side. Repeat with spacer 2. | 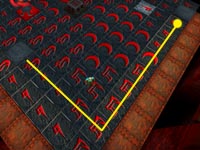 Push spacer to edge then into other spacer. Push spacer and Lightning block into their final places. |
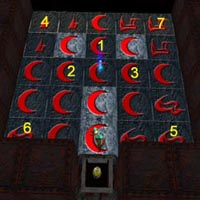 The central pedestal opens revealing the artifact you've been seeking. Prepare yourself for one of the most humorous encounters in the game. Unfortunately Krebspawn
appears to spoil your fun. He offers you the artifact if you can pass a "small test". He prepares the tile floor and asks you to turn all the tiles ON by firing a
psionic attack at them. This will alternate the OFF/ON status of the tile you hit and the four connected to it. Rotate your camera so you have the same angle as my
photo then shoot a fireball into the tiles in the order they are numbered.
The central pedestal opens revealing the artifact you've been seeking. Prepare yourself for one of the most humorous encounters in the game. Unfortunately Krebspawn
appears to spoil your fun. He offers you the artifact if you can pass a "small test". He prepares the tile floor and asks you to turn all the tiles ON by firing a
psionic attack at them. This will alternate the OFF/ON status of the tile you hit and the four connected to it. Rotate your camera so you have the same angle as my
photo then shoot a fireball into the tiles in the order they are numbered.
Naturally Krebspawn backs out of his deal and you are forced to fight him. He's much tougher than he looks. Your best defense is a steady offense of lasers. Stick to the center of the area so you can see which outer ledge he teleports to then attack quickly before he can summon any demons or devils. He also causes large sections of floor to vanish beneath you. Watch out for flashing sections of tile and get off as quickly as possible. They will return shortly but if you fall you die. The key to success is rapid fire and anticipating where he is going next. I was able to keep him under constant fire so he was only able to summon one set of demons and make the floor vanish once. After he switches ledges about eight times he will finally die.
 The professor leaves behind quite a good collection of items. In addition to the Sanity and Health containers,
you will also add the Summon Lesser Winged Demon Talent, Demon Strike Talent,
Demon Rift Talent, and the Shield of Demonology Talent to your deck of tricks. Move toward the artifact to
enjoy some more humorous conversation then you will exit the house and start the closing movie sequence for this chapter.
The professor leaves behind quite a good collection of items. In addition to the Sanity and Health containers,
you will also add the Summon Lesser Winged Demon Talent, Demon Strike Talent,
Demon Rift Talent, and the Shield of Demonology Talent to your deck of tricks. Move toward the artifact to
enjoy some more humorous conversation then you will exit the house and start the closing movie sequence for this chapter.Dead City
After your ambush outside the professor's house you wake up to find yourself in an alley with all of you possession missing. At least you have all your talents and now maybe you can get some work done without Frost calling you every sixty seconds. Follow the alley to the right then left then right again. You can talk to the person in the corner if you wish. When you enter the street in front of the church you will see a pair of SWAT officers fighting off a group of zombies. Help them out and kill the attacking zombies.
Note: Your best offense in fighting zombies is the Laser talent and the Lightning Strike. The latter works great when you are surrounded as you can often take out multiple zombies in one attack. Watch out for the Purple Zombies who throw Death Head attacks at you. Your best offense for these guys is a good defense, so have your Lesser Shield of Reflect ready to bounce those heads right back at them. You will spend 15 sanity and do 132 damage. Zombies normally take three laser hits or two Death Head hits.
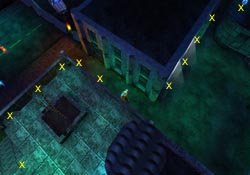 Climb the steps of the church and then turn and use your levitate to float to the series of ledges along the outer wall. You will need to recast the Levitate talent
every two or three ledges as you make your way along the path indicated by the X's in the picture. When you reach the final ledge of the church float across the
alley and make your way along the next four then float over to the large ledge and get the Sanity Container to bump that maximum up. You
can then either levitate all the way back to the church or just drop to the street and take a few points of damage from the fall.
Climb the steps of the church and then turn and use your levitate to float to the series of ledges along the outer wall. You will need to recast the Levitate talent
every two or three ledges as you make your way along the path indicated by the X's in the picture. When you reach the final ledge of the church float across the
alley and make your way along the next four then float over to the large ledge and get the Sanity Container to bump that maximum up. You
can then either levitate all the way back to the church or just drop to the street and take a few points of damage from the fall.Back on the street, head to the other side of the church and take the alley leading between the building. When you come to the street in the back turn left and talk with the wounded officer. You will need to initiate an additional conversation to offer your help. He will ask for a medkit that he dropped nearby. Head away from the officer down the opposite road and turn left at the intersection to find a group of zombies limping around a medkit. Kill the zombies and get the Medkit then return to the officer. He thanks you by giving you a key to the gate at the top of the nearby stairs.
Head back in the direction of the medkit location but this time head right at the intersection and kill some more zombies before going up the stairs at the end of the road. Follow the upper walkway going through more gates and killing several groups of zombies. At the end you can go down some steps and talk with the man who is asking for you help. Head to the left and kill a group of zombies then return and talk with him. He will offer you the Deck of Death Glyph which you are more than happy to take.
 Follow the walkway around past the glass elevator shaft and out onto the next street where more zombies stumble around. Kill them all then approach the large
crevice in the street. Levitate across the gap and talk to the officers standing in the doorway to the right. They want some ID but yours is missing so give
them "Chief Royce's" name and offer a description to prove your identity. Your lack of a badge will become a greater pain shortly. One of the officers will give
you a key to the skybridge elevator.
Follow the walkway around past the glass elevator shaft and out onto the next street where more zombies stumble around. Kill them all then approach the large
crevice in the street. Levitate across the gap and talk to the officers standing in the doorway to the right. They want some ID but yours is missing so give
them "Chief Royce's" name and offer a description to prove your identity. Your lack of a badge will become a greater pain shortly. One of the officers will give
you a key to the skybridge elevator. Levitate back across the crevice and kill more zombies who replaced the ones you just killed. Head down the street and turn right to reach the glass elevator shaft
and use your new key. Ride the lift to the elevated section of road above and head left where you will meet up with a gang of street thugs. After a brief
discussion you can kick their butts with your favorite talent and continue down the road.
Levitate back across the crevice and kill more zombies who replaced the ones you just killed. Head down the street and turn right to reach the glass elevator shaft
and use your new key. Ride the lift to the elevated section of road above and head left where you will meet up with a gang of street thugs. After a brief
discussion you can kick their butts with your favorite talent and continue down the road. Locate the section of broken guardrail and levitate across to the grate with the Sanity power-up Watch out for two purple zombies on
the ground and another on the opposite roof who will start tossing Death Heads at you. Use your reflect shield to kill them all. You may have to get close to the
edge of the roof to take out the ones on the ground. Levitate across to the next roof then locate the stack of yellow boxes in the alley. Levitate out and around
the railing and quickly make a U-turn to land on the top box. Rotate your camera around to spot your first Red Zombie. This guy casts the deadly Hands of the Dead
talent which causes all these creepy hands to come out of the ground and smack you. Fire your laser at him from the top of the box and you won't even take a hit.
Make your way to the ground and collect the Death's Head Talent he leaves behind.
Locate the section of broken guardrail and levitate across to the grate with the Sanity power-up Watch out for two purple zombies on
the ground and another on the opposite roof who will start tossing Death Heads at you. Use your reflect shield to kill them all. You may have to get close to the
edge of the roof to take out the ones on the ground. Levitate across to the next roof then locate the stack of yellow boxes in the alley. Levitate out and around
the railing and quickly make a U-turn to land on the top box. Rotate your camera around to spot your first Red Zombie. This guy casts the deadly Hands of the Dead
talent which causes all these creepy hands to come out of the ground and smack you. Fire your laser at him from the top of the box and you won't even take a hit.
Make your way to the ground and collect the Death's Head Talent he leaves behind.Head out the open gate to enter the large courtyard where Golgotham makes another appearance. After a brief conversation he takes off but not without leaving several enemies for you to battle. These battles become increasingly difficult, as many of the monsters are immune to weapons that others are not. Your best attack in this situation is the Lightning Strike. Try to get in the middle of several targets before firing and you can probably get several creatures at once. You also need to avoid the puddles of Primordial Ooze. When they are all dead the gate opens and you can exit to the street.
 Kill the zombies waiting outside the courtyard and continue around to the left. A large outdoor temple-like structure with a zombie spawner is in the large area to
the left. Kill the zombies and destroy the spawner, again the Lighting Strike works great for this, then continue across this area and head to the left between
some building to reach the next street. Turn right and approach the roadblock and talk to the officers. Your lack of ID proves to be a problem until somebody
recognizes you and they let you pass. Talk to the cops by the van then head down the street toward the waterfront entrance to assist Agent Strassburgh with his
raid on the river barge.
Kill the zombies waiting outside the courtyard and continue around to the left. A large outdoor temple-like structure with a zombie spawner is in the large area to
the left. Kill the zombies and destroy the spawner, again the Lighting Strike works great for this, then continue across this area and head to the left between
some building to reach the next street. Turn right and approach the roadblock and talk to the officers. Your lack of ID proves to be a problem until somebody
recognizes you and they let you pass. Talk to the cops by the van then head down the street toward the waterfront entrance to assist Agent Strassburgh with his
raid on the river barge.Waterfront
Head up the step on the other side of the gate and fight over a half-dozen gang member with bats and guns. A single laser takes any of them out. Then climb up the steps to the wooden walkway and follow it around until you enter a courtyard and meet your first Zombie Master. This guy is pretty nasty. Not only does he summon an endless supply of zombie assistants, he can also paralyze you and create a Pit of Venom which is very deadly. You need to get rid of him first ignoring the zombies he summons. When he is gone you can finish them off. Lightning Strike works great because you can hit him and maybe some of his helpers. When you have kill him and his army you can collect the Shield of Death Talent.
Head over to the building with the sign that says "Ring Buzzer for Assistance". Inside is your cell phone. Press the buzzer and talk to the rude person inside. Press it two more times to trigger the movie of a zombie walking into the electric fence and blowing it up. We'll come back for the phone later. For now, head down the path with the broken glass and enter a circular courtyard where another Zombie Master challenges you. You must defeat him and his army before the gates will open.
Continue out the opposite gate and assist the man being bullied by the thugs. Two blasts of your laser and they are dead and he is safe and very grateful. He take off the way you came and if you are interested in collecting a "reward" you can follow him all the way back to the beginning of this level. When he finally stops you can talk to him and he will give you a Health Container. That was worth the trip. Now make your way all the way back to where you originally rescued him and continue around to the right. Make a note of the two square alcoves in the wall to the left. Zombie spawners will be here later.
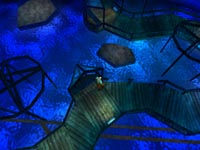 Cross the wooden bridge and make a note of the section of missing railing. Exit the bridge and go right and talk to the guard who won't let you pass without an ID.
Go talk to the worker standing by the drain. Eventually he asks you to help him get the key out of the drain by operating the valves, assuming you can "walk on
water". Return to the bridge and levitate through the gap in the railing across the stone ledges as you make your way to the opposite side of the lake. There is a
locked door and a keypad. Enter the code 1522 given to you by the worker and some valve wheels will rise up.
Cross the wooden bridge and make a note of the section of missing railing. Exit the bridge and go right and talk to the guard who won't let you pass without an ID.
Go talk to the worker standing by the drain. Eventually he asks you to help him get the key out of the drain by operating the valves, assuming you can "walk on
water". Return to the bridge and levitate through the gap in the railing across the stone ledges as you make your way to the opposite side of the lake. There is a
locked door and a keypad. Enter the code 1522 given to you by the worker and some valve wheels will rise up.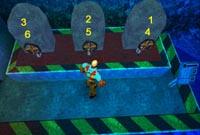 Turn the valves in the order shown to free the key from the drain and raise it to the surface. Now you can levitate back to the bridge and return to the drain
where you can retrieve the key. Now make your way back to the shack with your cell phone. You will encounter large numbers of zombies
and those spawners I told you about. When you get back to the shack you will automatically use the key and enter. After an intimidating lesson in manners the
worker lets you take the cell phone. Check your messages. Yes, five of the eight are from Frost! When you are done with your voice mail
you can call Frost to get an update.
Turn the valves in the order shown to free the key from the drain and raise it to the surface. Now you can levitate back to the bridge and return to the drain
where you can retrieve the key. Now make your way back to the shack with your cell phone. You will encounter large numbers of zombies
and those spawners I told you about. When you get back to the shack you will automatically use the key and enter. After an intimidating lesson in manners the
worker lets you take the cell phone. Check your messages. Yes, five of the eight are from Frost! When you are done with your voice mail
you can call Frost to get an update.Now make your way back to the bridge and go across it. Once again, many zombies will try to prevent this. When you exit the bridge go right and talk to the guard at the gate. He finally accepts your DNPC cell phone as proof and opens the gate for you. Inside the first area is another Zombie Master and his army of zombies. Kill them all then enter the playground where a pair of civilians are under attack. You can either throw up a Bone Wall in front of them or become a human shield and get between them and the attacking zombies. Remember that reflect shield for those Death Heads. You get no reward for saving these people so don't feel too bad if they die.
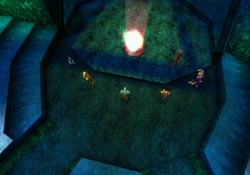 Exit out the far gate and assist the SWAT guys in their battle with the zombies. Talk with them and he will end up giving you a big Health
power-up. Note the spinning talent to the right then enter the amphitheater to the left. The phone rings and its that mystery government agent again. Talk with
him then head to the bottom of the stairs where Golgotham make another exciting entrance. This is the toughest battle yet but the enemies spawn in at opposite
sides making your Lightning Strike very effective. Watch out for quicksand and other deadly traps and attacks. Naturally Golgotham doesn't stick around so when
you kill his welcoming party you can exit out the back door of the stage.
Exit out the far gate and assist the SWAT guys in their battle with the zombies. Talk with them and he will end up giving you a big Health
power-up. Note the spinning talent to the right then enter the amphitheater to the left. The phone rings and its that mystery government agent again. Talk with
him then head to the bottom of the stairs where Golgotham make another exciting entrance. This is the toughest battle yet but the enemies spawn in at opposite
sides making your Lightning Strike very effective. Watch out for quicksand and other deadly traps and attacks. Naturally Golgotham doesn't stick around so when
you kill his welcoming party you can exit out the back door of the stage.Talk to Frost then head right and up some stairs and follow the path back to the street. Talk to the guard at the gate who won't let you pass without an ID. Head back down the street and locate the zombie in the dead-end alley that is guarding your badge. Kill him and retrieve your badge. If you need some health there is also a Health vial in another dead-end alley just above the valves you were turning earlier. When you are ready, head back to the gate and proudly present your badge to get through the gate.
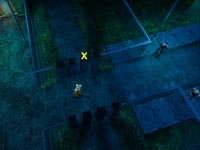 Head down the street and talk with the next pair of guards who don't even ask for ID - figures. Once past them notice the wood posts on either side of you. Turn
to the right and shoot a fireball at the third one from the left. It will vanish and you can head down the road to access that secret talent you saw back by the
amphitheater. Get the Demonstrike Glyph then return to the main road and turn right to meet up with Strassburgh and his team. Talk with
them then follow them to the drawbridge.
Head down the street and talk with the next pair of guards who don't even ask for ID - figures. Once past them notice the wood posts on either side of you. Turn
to the right and shoot a fireball at the third one from the left. It will vanish and you can head down the road to access that secret talent you saw back by the
amphitheater. Get the Demonstrike Glyph then return to the main road and turn right to meet up with Strassburgh and his team. Talk with
them then follow them to the drawbridge.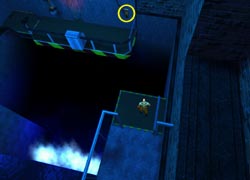 They ask you to lower the bridge and Strassburgh gives you the Bridge Access Card. Head down the alley to the right killing several
zombies along the way. When you reach the waterfall area you need to use your telekinesis on the switch to bring the platform over to you. Get on the platform
and flip the switch with your mind once more to get to the control catwalk. Use the access card to lower the bridge then continue to the other side and levitate
across the gap to the next section and continue up to the warehouse area.
They ask you to lower the bridge and Strassburgh gives you the Bridge Access Card. Head down the alley to the right killing several
zombies along the way. When you reach the waterfall area you need to use your telekinesis on the switch to bring the platform over to you. Get on the platform
and flip the switch with your mind once more to get to the control catwalk. Use the access card to lower the bridge then continue to the other side and levitate
across the gap to the next section and continue up to the warehouse area.When you reach the locked gate three Zombie Masters warp in and suppress all your psionics leaving you helpless. Just when it looks like you might die, Strassburgh and his team come in from the rear and attack. Unfortunately they are overmatched and slaughtered as you watch helplessly. The Zombie Masters head off ignoring you for now. Return to the catwalk and levitate back across. Get to the platform and use the switch, but it blows the fuse. Make your way back up to the gate where Strassburgh and his men died and check out the building opposite the gate. Inside is a fuse but when you take it the door locks and zombies start spawning. Kill the zombies and destroy the spawner and the door will unlock.
Return to the catwalk and insert the fuse into the slot and get on the platform. Use telekinesis to flip the switch and get across. Make your way back around to the drawbridge fighting several more zombies along the way. Cross the bridge and head to the warehouse area. Grab the Lightning Bolt Talent and get ready to use it on the Zombie Masters who are just inside the area with the crates. Kill them quickly before they can summon any assistance then proceed into the storage area. As you head through the maze of boxes and crates you will encounter a couple of thugs who want to start something. They are easy kills compared to the Zombie Masters. Kill them and the nearby gate open.
Head through this gate and follow the path until you reach the ramp leading up to the large ship. The Bone Priest himself is walking up the ramp. Challenge him and he will summon more thugs that you must fight. When they are all dead you can go up the ramp and collect your gun along the way. Get ready for the final battle.
Bone Priest (Boss Level)
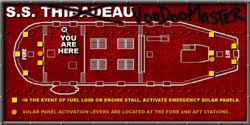 When you board the ship study the map to learn about the location of the solar panels and the switches that activate them. You can explore the ship but there is
nothing you can see or do at this time. When you are ready for the final battle head to the rear (aft) of the ship where Adjani is inside the control room. Talk
to him and he will get mad and decide to "deal with you himself". He teleports out of the cabin and onto a grate in the middle of the aft section of the ship.
When you board the ship study the map to learn about the location of the solar panels and the switches that activate them. You can explore the ship but there is
nothing you can see or do at this time. When you are ready for the final battle head to the rear (aft) of the ship where Adjani is inside the control room. Talk
to him and he will get mad and decide to "deal with you himself". He teleports out of the cabin and onto a grate in the middle of the aft section of the ship.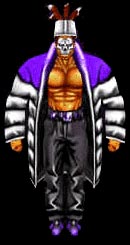 Defeating Adjani is easy when you know the secret. The first thing you need to do is get yourself properly armed. You will be using Lasers, Lightning Bolt,
Star Shower, Telekinesis, and whatever shield talent you like best, so make sure these are all part of your active deck. Adjani first appears in the center of the
aft section. There is a switch you need to flip to raise the solar panels. Use Telekinesis to do this otherwise Adjani will pound you if you try to manually flip
it. Now cast a shield then switch to Star Shower. Aim for each of the five solar panels and get them "hot". You have to act fast so all five are lit and aimed at
Adjani. If you take too long the first one will cool down. Be fast and accurate.
Defeating Adjani is easy when you know the secret. The first thing you need to do is get yourself properly armed. You will be using Lasers, Lightning Bolt,
Star Shower, Telekinesis, and whatever shield talent you like best, so make sure these are all part of your active deck. Adjani first appears in the center of the
aft section. There is a switch you need to flip to raise the solar panels. Use Telekinesis to do this otherwise Adjani will pound you if you try to manually flip
it. Now cast a shield then switch to Star Shower. Aim for each of the five solar panels and get them "hot". You have to act fast so all five are lit and aimed at
Adjani. If you take too long the first one will cool down. Be fast and accurate.When all five beams strike him his defenses will be lowered for a very short time. Move in and start firing Lightning Bolts until he vanishes. Clear out any zombies he may have summoned then follow him to the opposite side of the ship. Repeat the Telekinesis on the switch here to raise the solar panels then shield yourself and start firing Star Showers until you lower his defenses again. Fire more Lightning Bolts until he vanishes again. Follow him one more time to the aft section of the ship. This time the panels are already up so go directly to Star Shower followed by Lightning attacks until he dies a pretty horrible death.
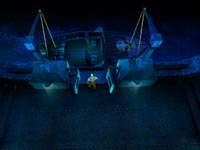 Collect the prizes for defeating another boss. The Sanity and Health containers will bump your maximum stats
and you can add the Hands of the Dead Talent, Summon Zombie Talent, and the
Pit of Venom Talent to your growing collection. Head to the speedboat hanging from the side of the ship. Talk to Frost then get on
and you will lower down and ride over to the Power Station.
Collect the prizes for defeating another boss. The Sanity and Health containers will bump your maximum stats
and you can add the Hands of the Dead Talent, Summon Zombie Talent, and the
Pit of Venom Talent to your growing collection. Head to the speedboat hanging from the side of the ship. Talk to Frost then get on
and you will lower down and ride over to the Power Station.Power Station
Exit the speedboat and down the pier and up the step to meet Golgotham. He summons "everything but the kitchen sink" and leaves you to battle the small army. When they are dead you can start to search for an entrance to the power station. The front door is damaged so head to the left through the side gate and around until you reach the broken bridge.
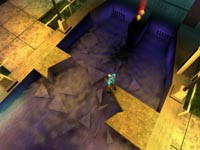 Levitate across the bridge and enter the door to the right. Go right and then head left past the reception desk and into the hall to the left. Talk with the
worker who ID's Abel as the culprit responsible for all this damage. Apparently he was chasing a small boy. Continue down the hall and talk to the other injured
workers if you wish. The four offices are all unlocked, but they are also empty of any items. Head to the end of the hall near the soda machines and turn right.
Go through the door into the next area.
Levitate across the bridge and enter the door to the right. Go right and then head left past the reception desk and into the hall to the left. Talk with the
worker who ID's Abel as the culprit responsible for all this damage. Apparently he was chasing a small boy. Continue down the hall and talk to the other injured
workers if you wish. The four offices are all unlocked, but they are also empty of any items. Head to the end of the hall near the soda machines and turn right.
Go through the door into the next area. Walk out onto the catwalk until you reach the broken section. Spin your camera around until you can see the switch located in the far corner (make sure you are
zoomed all the way out) and use your Telekinesis to flip the switch. Alternately you could levitate across the gap and flip the switch then levitate back but why
spend 40 sanity when you only need to spend 5. This switch opens a door back by the first man you talked with in the previous hall. Return to that area and head
through the new door.
Walk out onto the catwalk until you reach the broken section. Spin your camera around until you can see the switch located in the far corner (make sure you are
zoomed all the way out) and use your Telekinesis to flip the switch. Alternately you could levitate across the gap and flip the switch then levitate back but why
spend 40 sanity when you only need to spend 5. This switch opens a door back by the first man you talked with in the previous hall. Return to that area and head
through the new door.Enter and go left to take some stairs to the lower level. Talk with Frost as you make your way to the walkway leading out of here. Go through the door into a new room with a new catwalk and have a chat with Abel who appears on the upper balcony. He ends the "family reunion" by blowing the catwalk out from under you sending you into a room below. A few movies take place showing Bobby and the artifact hiding in a storage room then back to Cain who seems to have fallen into a room where the walls are slowly starting to move in to crush him.
When we rejoin Bobby you are actually playing as Bobby for most of the rest of this level. Zigzag out of this room and take a left after you go through the door. Follow the passage around until you reach a large room filled with acid. Step out to the yellow piece of floor sticking out into the acid and use your Reveal talent to illuminate an invisible platform that floats around the acid.
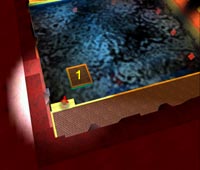
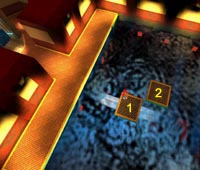
Step onto the first platform and ride it out to the middle of the pool then use another Reveal talent to illuminate a second moving platform. When the two meet in the middle switch platforms and ride it to the other side and exit this room.
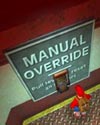 Ready for another maze? This one is pretty easy and I will walk you through it with the following six screenshots. Remember that the camera angles I use may vary
from yours so double-check when moving around or you may get lost. If you do get lost or push (psionic push) the wrong wall section you can always return to the
start and press the "Manual Override" switch to reset the entire maze and try again. Your goal is to get to four pressure plates and step on them to lower the four
energy fields down the middle hall. Note the wall sections and slots in the floor indicating which way they can be moved.
Ready for another maze? This one is pretty easy and I will walk you through it with the following six screenshots. Remember that the camera angles I use may vary
from yours so double-check when moving around or you may get lost. If you do get lost or push (psionic push) the wrong wall section you can always return to the
start and press the "Manual Override" switch to reset the entire maze and try again. Your goal is to get to four pressure plates and step on them to lower the four
energy fields down the middle hall. Note the wall sections and slots in the floor indicating which way they can be moved.
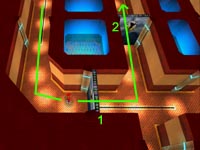 Head right as you enter the maze and follow path pushing the first two walls. | 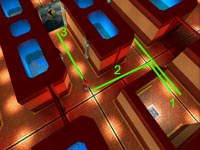 Step on plate (1) to lower door (2). Follow path and push wall (3). |
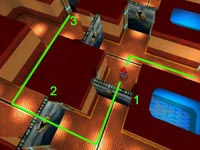 Follow path and push the 3 indicated wall sections. Continue forward to find next button on the left. |  Step on plate (1) to lower door then follow path and head straight across maze. Turn left at T-intersection. |
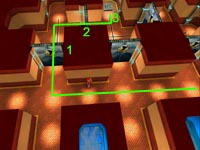 Go to the second passage on right and push walls (1) and (2). Step on plate (3) then retrace path to center passage and turn left. | 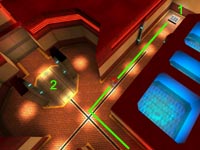 Continue toward exit then turn right to step on plate (1) to open final red barrier. Return to start and push wall section down middle hall into area (2). |
Once you have pushed the wall section next to the "Manual Override" lever to the opposite side of the maze, the exit door will open and you can continue. Have a nice chat with the artifact who you end up naming "Ted" much to his dismay. Then continue down the hall and into the next room.
This puzzle isn't too bad. Step forward and use your Reveal talent to illuminate several invisible platforms floating all around this area. Several are dead-ends and others connect to other corner floor sections. Your goal is to get to the floor section directly to your right as you enter. You best path is shown below. Take the platforms to reach area 1, 2 and then 3. You will need to recast the Reveal talent to light up more platforms along the way. Start by getting on platform (1) coming in at an angle then follow the path shown.

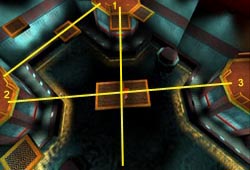
Flip the switch located on section (3) to open the door then head down the stairs to the cooling room. Ignore the worker and head up the stairs directly in front of you. A section is missing at the top but there is narrow piece you can use to make a right turn and continue. You may recognize this as the area Cain was in earlier in this level.
 Turn left and approach the crushers which Ted indicates is probably in violation of several safety codes. Time to go for the Repulsion talent. Activate it and
you can easily walk down this hall with no problems. The crushes slam back into the wall and stay there. You can then flip the switch on the other side to open a
door back in the cooling room next to the worker. Return through the crushers which are no longer working and turn right then left down the stairs. Head past the
worker and into the next passage.
Turn left and approach the crushers which Ted indicates is probably in violation of several safety codes. Time to go for the Repulsion talent. Activate it and
you can easily walk down this hall with no problems. The crushes slam back into the wall and stay there. You can then flip the switch on the other side to open a
door back in the cooling room next to the worker. Return through the crushers which are no longer working and turn right then left down the stairs. Head past the
worker and into the next passage.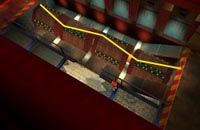 Continue until you reach the room with the rotating cylinders. The catwalk is broken (naturally) so you will need to run across the spinning cylinders to reach the
other side. This isn't nearly as hard as you think. The trick is to angle your run toward the direction each section is spinning. I've indicated the appropriate
angles in the image. When you reach the other side you can turn left and head down the hall to the next intersection. Turn left again and continue forward.
Continue until you reach the room with the rotating cylinders. The catwalk is broken (naturally) so you will need to run across the spinning cylinders to reach the
other side. This isn't nearly as hard as you think. The trick is to angle your run toward the direction each section is spinning. I've indicated the appropriate
angles in the image. When you reach the other side you can turn left and head down the hall to the next intersection. Turn left again and continue forward.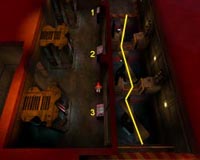 When you reach the fans you can argue with Ted about how to get across. Finally go into the control room and flip the three switches (in any order) to stop the
fans. The trick is to stop them so they form a "bridge" to the other side. It takes about one second for the fan to stop spinning so give yourself a bit of a
lead when watching the fans and flipping the switch. If you mess up you can always turn the fans back on and try again. You do not need to be perfect (as shown
by my zigzag path). Just make sure you can get from fan to fan.
When you reach the fans you can argue with Ted about how to get across. Finally go into the control room and flip the three switches (in any order) to stop the
fans. The trick is to stop them so they form a "bridge" to the other side. It takes about one second for the fan to stop spinning so give yourself a bit of a
lead when watching the fans and flipping the switch. If you mess up you can always turn the fans back on and try again. You do not need to be perfect (as shown
by my zigzag path). Just make sure you can get from fan to fan.When you reach the other side you can use your Telekinesis to flip the switch which turns off a force field back down the hall from where you came. Also note the spinning talent. You cannot get this talent but Cain will be able to return for it later in the level. For now, head back across the fans and return to the junction in the hall. Continue straight and enter the Steam Vent room.
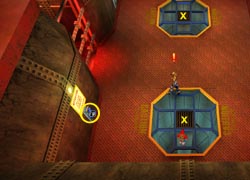 You will hear Cain through the door but are unable to rescue him at the moment. Abel shows up and you must fight him. You are unable to damage Abel with your
talents directly so the trick is to lure him onto the steam vents (indicated by X's) then use Telekinesis to flip the switch to turn on the steam and burn Abel.
Abel will never step onto the vent unless you antagonize him. Position yourself so one of the vents is between you and Abel and you are standing next to the
vent - but not on it. Then use a Push talent to smack Abel around. He gets mad and rushes toward you stopping on the vent. Quickly use your Telekinesis to
flip the switch and damage him. Alternately, you can also use your Repulsion talent to push him onto the vent then flip the switch.
You will hear Cain through the door but are unable to rescue him at the moment. Abel shows up and you must fight him. You are unable to damage Abel with your
talents directly so the trick is to lure him onto the steam vents (indicated by X's) then use Telekinesis to flip the switch to turn on the steam and burn Abel.
Abel will never step onto the vent unless you antagonize him. Position yourself so one of the vents is between you and Abel and you are standing next to the
vent - but not on it. Then use a Push talent to smack Abel around. He gets mad and rushes toward you stopping on the vent. Quickly use your Telekinesis to
flip the switch and damage him. Alternately, you can also use your Repulsion talent to push him onto the vent then flip the switch.Make sure to keep dodging his lightning attacks. They are easy to avoid as you can see them starting to form several seconds before they strike. When you have damaged Abel enough (about 6 to 8 vent attacks) he will get really mad and start shooting lightning bolts. Cain offers a clue and you need to run over and stand in front of the control panel. When Abel fires quickly step aside and the control panel will be destroyed and Cain is freed.
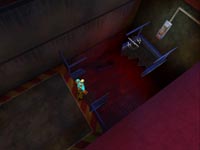 Abel immediately shoves Cain back into the room and flees with Bobby and Ted. Exit back into the steam room and watch the walls finally slam shut behind you. Before
you run off after Abel head back down the hall to the area with the fans. Walk across the fans just like Bobby did and then Levitate across the broken catwalk to
get the Wave of Repulsion Glyph. Levitate back across and make your way back over the fans and return to the steam room. Take the hall
that Abel and the boy used to leave this room.
Abel immediately shoves Cain back into the room and flees with Bobby and Ted. Exit back into the steam room and watch the walls finally slam shut behind you. Before
you run off after Abel head back down the hall to the area with the fans. Walk across the fans just like Bobby did and then Levitate across the broken catwalk to
get the Wave of Repulsion Glyph. Levitate back across and make your way back over the fans and return to the steam room. Take the hall
that Abel and the boy used to leave this room.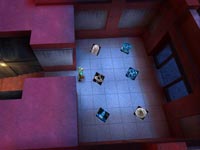 Head down the hall and into the next room where you can grab a six-pack...of talents that is. Your master deck starts to get really large when you add
Wave of Repulsion Talent, Shield of Truth Talent, Dispel Talent,
Electrical Storm Talent, Lightning Strike Talent, and Electrical Storm Glyph to
it. Talk with Frost then head out the door and you are off to the Prime Slice Meatpacking Plant.
Head down the hall and into the next room where you can grab a six-pack...of talents that is. Your master deck starts to get really large when you add
Wave of Repulsion Talent, Shield of Truth Talent, Dispel Talent,
Electrical Storm Talent, Lightning Strike Talent, and Electrical Storm Glyph to
it. Talk with Frost then head out the door and you are off to the Prime Slice Meatpacking Plant.Meat Plant
Head straight across the path toward the corrals. Talk with Frost then enter the gate to the right and make your way down and around the bales of hay and enter the barn. Go through the barn and out the large doors to the top-left. Head over and talk with the two guards who aren't going to let you pass without special orders from Sergeant Blaine. Head toward the police car and then over to the SWAT van. Blaine is behind the table and the movie will take over as you get close. When he asks if you are the best say "Damn Straight!" to impress him. He will then send you back with an officer to get you inside the Meat Plant.
Watch the SWAT team take out the psycho axe-wielding bull who smashes down the front door. Apparently Golgotham can reanimate the slaughtered sides of beef. Tell the SWAT guys that you aren't afraid of a "side of beef" then enter the plant. Head across the lobby and up the stairs. You will look through the glass at many dead cows hanging from a rail.
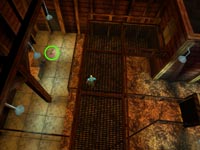 Kill the zombie who is snacking on the fallen SWAT guy in the corner then head around the corner and then take a left through the next door and onto the catwalk.
Follow the catwalk and look down and to the left to spot a dead cop and a key. There is also a switch on the wall, but you will deal with that in a few minutes.
Continue forward and to the door on the right. Kill another pair of zombies as you enter the next area.
Kill the zombie who is snacking on the fallen SWAT guy in the corner then head around the corner and then take a left through the next door and onto the catwalk.
Follow the catwalk and look down and to the left to spot a dead cop and a key. There is also a switch on the wall, but you will deal with that in a few minutes.
Continue forward and to the door on the right. Kill another pair of zombies as you enter the next area.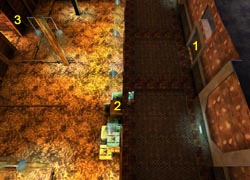 Walk around the catwalk and note the locked door (1) that can be opened with the key you just saw. Head to the break in the railing and drop to the top box (2)
then make your way down the boxes to the ground. Head up and around to the door (3) and enter the next area. You are now below the catwalk area from before. Walk
up to the railing and use Telekinesis on the switch to open the cattle chute door. Head back and go through that door to get to the guard and take the
key. Return through the chute and back into the previous room.
Walk around the catwalk and note the locked door (1) that can be opened with the key you just saw. Head to the break in the railing and drop to the top box (2)
then make your way down the boxes to the ground. Head up and around to the door (3) and enter the next area. You are now below the catwalk area from before. Walk
up to the railing and use Telekinesis on the switch to open the cattle chute door. Head back and go through that door to get to the guard and take the
key. Return through the chute and back into the previous room.As you enter the stable area the door behind you shuts and the door on the other wall open and three Butcher Bulls enter. These guys carry giant meat cleavers and can cast over a half-dozen different talents from several totems. Even worse is that each color of bull is immune to a different totem and some can cast a psi-suppressant to make you powerless for a short duration. Your best bet is lasers or lightning attacks and keep moving at all times. When you have turned the bulls into ground beef collect the Imprison Talent then head through the door they entered.
Follow the hall around and through the next door to enter the room where you saw the hanging cattle. Hmmm...they are all missing. Continue out the other side and back into the hall. Turn right then left and you will be back out on the catwalk. Follow it around to the stable area and use your key on the door I mentioned earlier and enter.
Step on the pressure plate and watch what happens but don't go down the hall yet. Make a note of the security lights and the beeps. You have 16 beeps before the doors shut. Your first time down the hall you are heading for the left door. Cast your Haste talent and step on the plate then make your way to the left door dodging the lights. If a light touches you the doors will shut and a Butcher Bull will appear. You will have to kill him then start over.
This next sickening room has vats full of cow parts that are being used to spawn the Butcher Bulls. You need to destroy the spawners and any bulls that come out of them while you are doing so. Lightning seems to destroy the yellow spawners the quickest. After the explosions head through the center and down the stairs to the next area where you now face a pair of spawners. Repeat the previous destruction then continue down into the next area.
A pair of zombies stagger around the conveyor ramp. Remember that your reflect shield works great against their Death Head attacks. When they are dead head through the door in the corner and into the meat packaging room. This is really a fun puzzle even though it may take you a few tries to get it. Even though I am going to explicitly show you where to go and what to do I still recommend going to the bottom of this area before starting. A zombie lurks near the bottom and he will cause trouble if you don't kill him first.
When you are ready to start the puzzle step on the first pressure plate. This causes a chunk of meat to slide down the chute. You must now run around to all the other pressure plates and step on them at just the right time to connect the chute and keep the meat moving. Timing is critical. If you are too late on any of the switches the meat will fall to the floor and you have to start over. Too soon and the chutes will close and re-open with the same results. It is also possible to cause the meat to stall or even go backwards if the meat hits the connectors as they are closing. If this happens and the meat doesn't regain its momentum you will have to send a new piece down the chute. The meat travels at a slow pace and you can probably keep up just by running, but you may want to have your Haste ready just in case. There are two places I even recommend using it.
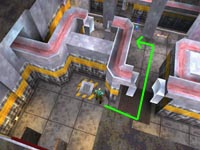 Step on first plate to start meat. Run around to next plate. | 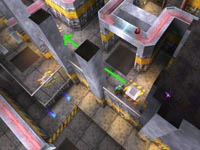 Close first connector and head to next plate. |
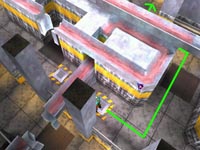 Close connector then run (haste) to the next plate. | 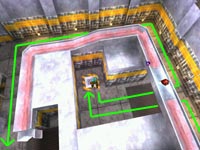 Step on plate then run (haste) around to the next location. |
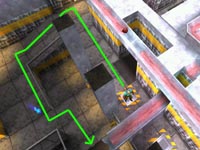 Close connector then run (haste) down ramp and zigzag into next location. | 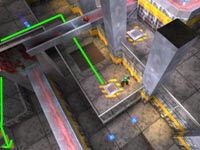 Wait for meat to drop onto chute. Close connector and run to steps. |
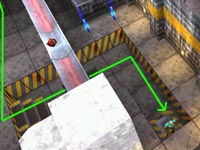 Use Haste if necessary to reach last plate in time. Close connector. |
The meat enters the machine and comes out as hotdogs that roll down the conveyor. The door opens allow you to exit along with the hotdogs into the next room. A pair of zombies attack as soon as you enter the next room. Reflect the Death Heads and destroy the undead creatures then follow the hall leading out of here. Watch out for another zombie hiding around the corner. When you reach the steps you will get a call from the government agent. When you are done talking head down the steps and into the hall where more zombies wait around the corner. Kill them all and approach the doorway. Notice that talent above the door.
Return to the top of the stairs and turn around. Notice the vents on either side of the hall. They stick out just far enough to form a very tiny ledge that Cain can levitate to. I've shown you the first two. Make your way around the corner and down the hall levitating from vent to vent.
When you reach the last vent you just need to levitate across to the top of the door and collect the Summon Glyph Devil Talent. You now have the options to drop to the floor and take 50 damage or levitate all the way back to the stairs using 160 sanity points. There should be plenty of Sanity vials in the hall from the previous zombie slaughter. I recommend taking the damage then heal yourself with your Heal talent. Top off your sanity with any power-ups then enter the next room.
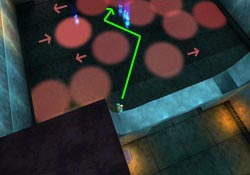 When you step on the pressure plate the door opens across the room and four rows of security lights start sweeping the floor. Get Cain into the position shown in
my image then watch the pattern of lights until they match my image. Follow the path indicated adjusting for the movement of the lights. Do NOT use Haste or you
will move too fast. Your normal run is perfect. When you get to where the arrowhead is in my image a small gap between the far row of four lights should be ready
for you to step into. Move with this gap to the left and run into the room to get the key. The security system shuts down and you can
exit.
When you step on the pressure plate the door opens across the room and four rows of security lights start sweeping the floor. Get Cain into the position shown in
my image then watch the pattern of lights until they match my image. Follow the path indicated adjusting for the movement of the lights. Do NOT use Haste or you
will move too fast. Your normal run is perfect. When you get to where the arrowhead is in my image a small gap between the far row of four lights should be ready
for you to step into. Move with this gap to the left and run into the room to get the key. The security system shuts down and you can
exit.You now have some serious backtracking to do. Run back through the hall and up the steps. Return through the meat package area and kill the zombie at the top. Return through the shipping area and kill another pair of zombies and talk to Frost as you enter the spawner area. Kill the zombies in this area and head up the stairs and back into the T-shaped hall. Head right and go back to the pressure plate in the corner. Ready your Haste and step on it once more. This time make a dash for the door to the right and enter.
Hey! Who turned out the lights? This next maze consists of narrow walkways concealed in total darkness. You have to use your Reveal talent to see them but when the talent wears off you are back in the dark. Your goal is to get to the exit across the darkness, but you can also pick up a hidden talent along the way. My maps only show the intersections and the way to turn at each of them. When you see yellow dotted lines just keep moving straight and follow the path until you reach the next intersection. Note: All images were captured from the same angle.
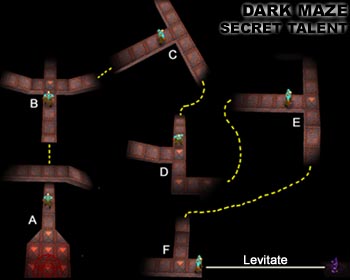
A. Head straight under the overpass.
B. Turn right at the 4-way intersection.
C. Turn right at the T-intersection.
D. Ignore right path and turn left. Ignore another right and turn left again.
E. Zigzag around to this T-intersection then turn right and go down ramp.
F. Turn left and levitate to the Imprison Glyph Talent. SAVE!
Levitating back is tricky as you have to judge your distance in the dark since you can't levitate and reveal at the same time. When you are back on the main path retrace your route back to the Junction D. It's time to head to the exit and you are already well on your way.
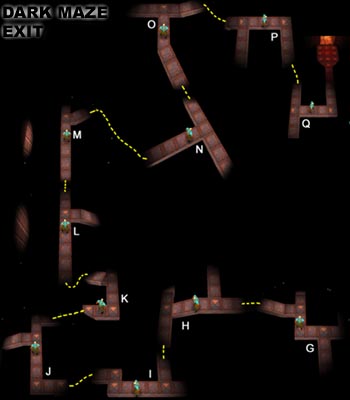
G. Same as Junction D above. Turn left and head across overpass (shown in A above).
H. Ignore right turn and turn left at the T-intersection.
I. Turn right at next T-intersection and follow zigzag path.
J. Turn right at corner and ignore branch to left. Turn right at next turn.
K. Turn left then turn left at the first diagonal path.
L. Continue forward ignoring first branch to right.
M. Take the next branch leading off at a right angle.
N. Turn left at this T-intersection.
O. Turn right at this T-intersection and head up slope. You are getting close.
P. Ignore first right and turn right at the corner.
Q. Take the first left and follow the U-turn as it leads to the exit.
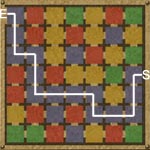 The cattle pens form a deadly maze unless you know the path. Stepping into the wrong pen will summon a dreaded Butcher Bull but with your handy color-coded map
there is no reason to stray from the path to the exit. As you enter the first stall (S) you can read the map to the left of the door. The blue color indicates the
safe route through the maze but I've drawn a line on my map just in case. When you reach the final stall (E) go through the door to end this level.
The cattle pens form a deadly maze unless you know the path. Stepping into the wrong pen will summon a dreaded Butcher Bull but with your handy color-coded map
there is no reason to stray from the path to the exit. As you enter the first stall (S) you can read the map to the left of the door. The blue color indicates the
safe route through the maze but I've drawn a line on my map just in case. When you reach the final stall (E) go through the door to end this level.Golgotham (Boss Level)
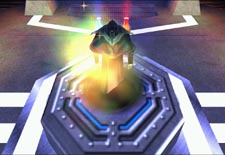 It all boils down to this. The battle for the planet Earth, right here in the basement of the...er...meat packing plant? Continue forward into the large room with
the Brain Circuit and talk with Joan Aiken. She reveals horrible secrets, or at least starts to until Golgotham makes his usual flashy appearance and sends Joan
plunging to her death. Prepare for the final battle...
It all boils down to this. The battle for the planet Earth, right here in the basement of the...er...meat packing plant? Continue forward into the large room with
the Brain Circuit and talk with Joan Aiken. She reveals horrible secrets, or at least starts to until Golgotham makes his usual flashy appearance and sends Joan
plunging to her death. Prepare for the final battle...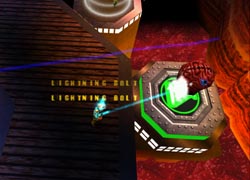 Golgotham attacks by summoning three waves of three enemies from each of the brains surrounding him. When you kill each wave of enemies the shield around that
brain will go down and you can fire at the brain until the shield goes back up and more enemies arrive. After your third attack on each unprotected brain it will
explode and you can move on to the next brain and new set of enemies. Remember that whichever brain Golgotham is summoning from, those enemies are immune to any
attacks from that totem. For the purpose of this battle the Butcher Bulls are associated with the Truth Totem. Naturally your best attacks are Storm and Fire totems
since Golgotham doesn't have those brains. Once you have destroyed the Science Brain you can start using Lasers and the Binary Grid to attack all 18 waves (or 54
enemies).
Golgotham attacks by summoning three waves of three enemies from each of the brains surrounding him. When you kill each wave of enemies the shield around that
brain will go down and you can fire at the brain until the shield goes back up and more enemies arrive. After your third attack on each unprotected brain it will
explode and you can move on to the next brain and new set of enemies. Remember that whichever brain Golgotham is summoning from, those enemies are immune to any
attacks from that totem. For the purpose of this battle the Butcher Bulls are associated with the Truth Totem. Naturally your best attacks are Storm and Fire totems
since Golgotham doesn't have those brains. Once you have destroyed the Science Brain you can start using Lasers and the Binary Grid to attack all 18 waves (or 54
enemies).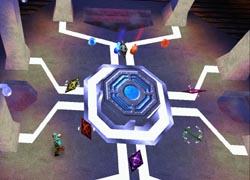 When you have destroyed the final brain Golgotham explodes and vanishes in a spectacular lightshow leaving behind all sorts of goodies. Head to the central area
and collect the Sanity and Health containers to bump your stats. Gather the protection talents which include;
Sun Protection Talent, Illusion Protection Talent, Science Protection Talent,
Truth Protection Talent, Death Protection Talent, and Demonology Protection Talent.
When you have destroyed the final brain Golgotham explodes and vanishes in a spectacular lightshow leaving behind all sorts of goodies. Head to the central area
and collect the Sanity and Health containers to bump your stats. Gather the protection talents which include;
Sun Protection Talent, Illusion Protection Talent, Science Protection Talent,
Truth Protection Talent, Death Protection Talent, and Demonology Protection Talent.Now head over between the Illusion and Truth brain platforms and look for a moving shadow. When the shadow appears between the pedestals use your Reveal talent to illuminate the moving platform and step on.
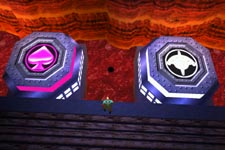
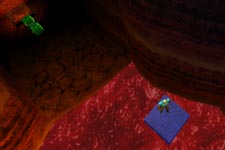
Ride around the entire perimeter of the cavern and when you reach the final turn spot the dark ledge below and levitate over to it to get the Psi-Suppressant Talent and the Psi-Suppressant Glyph. Step into the handy teleporter to return to the central platform and go talk to Bobby and Ted.
It appears you were a bit hasty in your victory celebration. After a spectacular series of explosions and destruction of all the brain pedestals you find yourself back on the central platform about to face the REAL Golgotham. Don't worry - he's not as bad as he looks. You need to keep moving and avoid the shockwaves his pounding attacks send out. Make sure not to fall into the lava now that the glass is broken from all those floor areas. Fire your laser or lightning attacks into the red chunks of meat hanging from his ribs (see left image). When they are all gone you can spot a gray brain inside the rib cage (see right image). Destroy the brain to send Golgotham back into the lava.
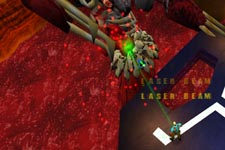
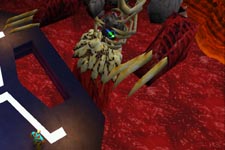
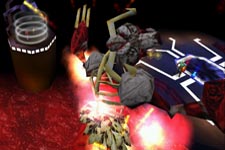
But wait...there's more! He reappears on the other side of the platform. Repeat the process to send him back into the lava FOUR more times. Finally he will explode and sink back into the lava once and for all. Finally!
Run around the central platform one more time and collect the Suppress Sun Talent, Suppress Illusion Talent, Suppress Science Talent, Suppress Truth Talent, Suppress Death Talent, and Suppress Demonology Talent. Levitate over to Bobby and Ted and talk to them to end this level.
Aftermath
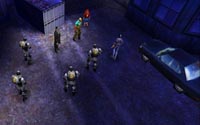 As you exit the building you are greeted by some SWAT guys and the mysterious government agent. Frost shows up and everything seems to be one big happy ending.
Then Bobby is sent to the car and the agent order the SWAT team to kill you. Just about then Abel (you didn't forget about Abel - did you?) appears and kills everyone
except for you and Bobby (and of course Ted).
As you exit the building you are greeted by some SWAT guys and the mysterious government agent. Frost shows up and everything seems to be one big happy ending.
Then Bobby is sent to the car and the agent order the SWAT team to kill you. Just about then Abel (you didn't forget about Abel - did you?) appears and kills everyone
except for you and Bobby (and of course Ted). Pack up those Storm talents. Abel is immune to those attacks so make sure to keep moving to dodge his electrical attacks. You can also use your shield to reflect
some damage back at him. Your best attack for this first round is the Death Head attack which does a good amount of damage. Continue the hit and run strategy until
you have hit him several times. At this time Bobby will use his Telekinesis to open a nearby gate giving Cain and idea.
Pack up those Storm talents. Abel is immune to those attacks so make sure to keep moving to dodge his electrical attacks. You can also use your shield to reflect
some damage back at him. Your best attack for this first round is the Death Head attack which does a good amount of damage. Continue the hit and run strategy until
you have hit him several times. At this time Bobby will use his Telekinesis to open a nearby gate giving Cain and idea. You will walk out onto the ledge and taunt Abel until he joins you for the final battle. Yes - this is REALLY the final battle. I promise. He shuts the gates and
you need to move around to get Abel between you and the edge of the platform. Start using your Push talent to send him back and over the edge where he plummets to a
spectacular death complete with crackling electricity.
You will walk out onto the ledge and taunt Abel until he joins you for the final battle. Yes - this is REALLY the final battle. I promise. He shuts the gates and
you need to move around to get Abel between you and the edge of the platform. Start using your Push talent to send him back and over the edge where he plummets to a
spectacular death complete with crackling electricity.
When Abel dies you collect all of his Storm talents including; Lightning Strike, Wave of Force, Storm Protection, Electrical Storm, Storm Suppression, Shield of Storm, Summon Storm Dijinns, and Electrical Storm Glyph. All those talents and nobody left to kill.
Head outside and join Bobby and Ted for the game finale and closing credits. That's it. You've won the game. CONGRATULATIONS! You can now move on to intense multiplayer action which should keep you busy until Cain gets his next assignment.
Thanks for playing and using Sinjin's Ultimate Online Guide.