Mission 1: Break into the Waterloo Block
The game start with you inside the storage room.
Q: What is the password to access my PDA?
A: Raven.
Q: Is there anything to take from this storage room?
A: Pull out the brown box on the shelf. Get the
WD40 spray, the lighter and
the yellow lamp.
Q: Where is key to unlock the locked gate under the
stair?
A: You could open it in two ways. You could lit
the torch with your lighter and burn the lock (but because of the nature of your
mission --- don't leave any track, I wouldn't recommend this way. If you do this
then you'll facing Ending One). The safest
way is to find the key. It is hidden in the Queen House.
Q: Where could I find the back pack?
A: It is placed in the sewer below this area.
You could find the entrance to the sewer system inside the exhibition room to
the right of the storage room door. It is a locked well on the ground near the
left wall.
Q: How could I unlock the grate of the well?
A: There is a worker cart outside the storage
room. It is near the red rope. Look inside and you'll see a yellow trunk. Open
it. Pick up the bolt cutter and the hammer. Go back to
the well. Use the bolt cutter on the padlock of the grate. Go down to the well.
Q: It's dark down here. How could I see things?
A: Use the yellow lamp and you will be able to
see in the dark.
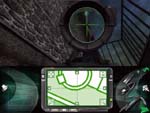
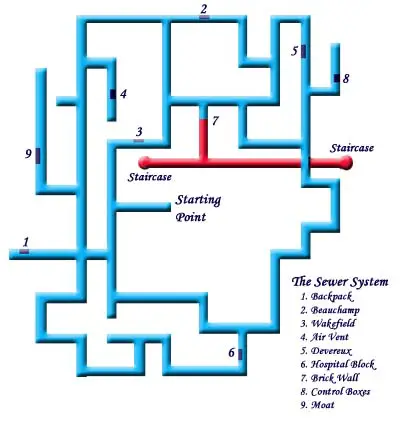
Q: Where is the dropping location?
A: Look at the map
and go to 1. You'll see your backpack on the right wall.
It contains the replicas, a sewer key, and all of your extra tools (like
grappling hook, picklock, etc). You'll see a locked gate on the way there.
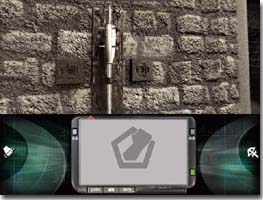
Q: How could I unlock this gate?
A: Be careful. This one is protected with an
alarm. There is a green box on above the gate. Use the Multi-tool. Choose
screwdriver. Use it to unscrew the box. Use the chewing gum between the contacts
to prevent the alarm working. Now you could open the gate by pressing the green
button on the box on the left wall. Continue your way and pick up the backpack.
Q: Where is the entrance to Waterloo Block?
A: You could reach the entrance through two
exits, Beauchamp (exit 2) and Devereux (exit 3). Either way, you need to take a
picture of a strange graffiti on Beauchamp wall.
Beauchamp: You'll show up in the west
area of Tower of London. There are two guards on the top of the staircase. Don't
go there! Exit through the door in front of the staircase. You will see a
strange graffiti on
the left wall. Take a picture of it. Open the gate and go through the passage.
Open the door to your north. You will see a door on the far east and a stair.
Open the door. Get out to 4 and climb down the staircase. Go forward to the
opening. The big double door is the entrance to the Waterloo Block. Too bad it
is locked.
Devereux: You'll show up at 4. Go through
the archway to the opening. You'll see the double door to Waterloo Block. Too
bad it is locked.
 Q:
What should I do now? The door to the Waterloo Block is locked. Q:
What should I do now? The door to the Waterloo Block is locked.
A: Find another way to enter the block. Go back
to the sewer and head straight to 5. You'll see an air vent on the left wall.
Open it and climb in. Climb up the ring ladder. You'll see two windows above
you. One of them is your ticket to reach the other entrance to Waterloo Block.
 Q:
How could I enter through that window? Q:
How could I enter through that window?
A: Use the crossbow and then attach the grapple
hook on it. Aim to the window on the right and shoot. Use the rope lift from
your backpack on the rope. Climb up and enter the window to the Governor's
Quarter in the Queen's House.
QUEEN'S HOUSE
FIRST ROOM
Q: Where is the exit?
A: Explore a little bit and try to discover
things. There are three exits from this room. One is through the door (A) in
front of the window, one is through the door to you right (B) and the other is
through a 'secret' exit. If you go through the door in front of you, you'll see
on the right there is a staircase leading to both upstairs and downstairs. There
is a locked door to your left. If you go downstairs, you'll will trigger the
hidden alarm on the steps and get caught. There are two doors upstairs. One is
locked with a keypad beside it and the other is not locked. You need to pick up
several things which are scattered upstairs before you leave through door B.
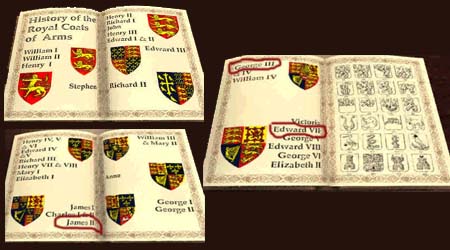
Note: There is a book
about British Royal Emblem lying on the table. You will need this
information to solve one of the safe puzzle later on. You could find a Jade
Key hidden inside this book also.
Q: Where is the secret exit?
A: Push the grandfather clock on. It will open
a secret door. You could explore the whole are but it is a dead end for now.
Q: How can unlock the door?
A: Use the Keycode Analyzer Card on the slot of
the lock. Activate the Decoder in your PDA system. It will try to break
the code. After a while, it will read 1418. Punch the number on the lock. Enter
the room.
DINING ROOM
Q: What should I find inside this room?
A: There is a hidden safe. If you look closely
at the picture just to the left of the fireplace, you will see that the Rose
insignias below it could be pushed. Push the Rose insignia in this order: top
left, top right, and finally bottom. You will hear a "click" sound
from your right. Look at the painting above the fireplace to the right of it.
Press the small lever which shows up on the left side of the painting. A strange
safe with three wheel pointers will appear.
Q: What should I do to unlock this strange safe?
A: There is a keyhole above the wheels. First,
you need to find a key that will match that keyhole shape. Open the flat cabinet
on the far right corner of the room. You will see a bronze
key, a parchment
(take a picture of it) and a strange yellow
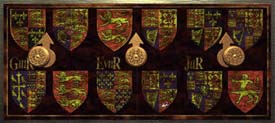
cylinder key. Get all of them. Go back to the safe. Look closely at the
writings beside each wheel. You need to match the emblem with the correct name
for each wheel. Look back to the information from the shield
book. Turn the wheel so they point to the correct Royal Emblem. Look at the
image below to help you. Insert the bronze key. You
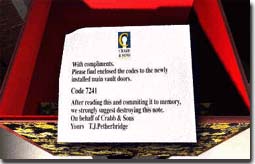
will be able to open this hidden safe. Pick up the computer
disc, Beefeater Gin, a gun, Crabb
& Sons Door Codes card and all six keys (two
keys with smooth sides, a steel key
with oval loop, a steel key with round
loop, a key with red handle, and a
metal key with oval loop).
BEDROOM
Q: Where is the key to unlock the trunk beside the
bed?
A: It is the
smallest steel key with oval loop. You will find a Chinese Puzzle Box
inside.
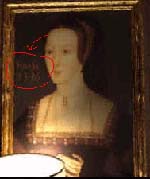
Q: How can unlock this Chinese Box?
A: The sequence number is written on the
picture of a woman on the wall. You will see her birthday date there (4th May
1536 -- 451536). You need to convert these numbers into Chinese numbers before
you could use it to unlock the box. You need some kind of conversion chart which
can be found in the other room. Go out to the staircase and enter the door to
your right. Enter the room. You will see a table with two drawers on the back.
You will find the Chinese Number
Conversion Chart in the right drawer. Inside the left drawer you'll get the blue
note with Pin Generator 0001 code on it. Go back to the bedroom (of course
you need to use the Keylock Analyzer Card again to unlock the door) and open the
trunk. Use the Jade Key to unlock the mechanism. Use the chart to help you
unlocking the box. You will find a White Security
Pass, the Code to the Main Vault
(7241), and a Pin Code Generator
--- 0001.
RALEIGH'S WALK
Q: Where should I go now?
A: Go back to the first room and enter the door
to your left. Go to the window at the far end. Slide out through the window.
Open the gate and step out. You will see the door at the other end and a patrol
guard to your left. Too bad the door is locked. Turn to your right and you will
see a open window through the opening on the other building. That is your main
destination.
Q: The guard always caught me every time I try to go
to the open window. What should I do?
A: You need to knock him down. Step back to the
gate and turn right. Use your crossbow and attach the ice dart. Aim to the back
of his neck That should knock him out for a moment. Turn around and use the
camera to take a picture of the information
board on the gate for future use. It has the information bout Sir
Walter Raleigh birthday. Go back to the opening. Prepare your crossbow and
attach the grappling hook. You will cross safely to ....
ST. THOMAS TOWER
Q: Where should I go now?
A: This room contains lots of historical
information about the Tower of London but you're not here to learn historical
stuff, aren't you? So head straight to the left opening and enter the another
hall. There is a trunk here which contains information on Sir Walter Raleigh.
You could take pictures if you're into this kind of things. If not, take the
spiral steps and head straight to .....
WAKEFIELD TOWER
Q: Are there any important information here?
A: There is a suspiciously locked trunk on the
left crevice. Use your picklock to open this trunk. Click and move it around to
picklock the trunk. Once you manage to open it, use your screwdriver from the
multi-tool to open the tapestry that cover the inside part of the lid. Take out
the Latin map
from behind it (take a picture of it). Look inside the trunk and you will find a
Ring Handle. Get it for future use. Now go the other
exit where you see a spiral steps and a gate. If you open the gate and go down,
you will head back to the sewer through Wakefield Tower exit. Go up and cross
the rampart to ......
Note: The Latin map will reveal an
information about a secret passage between Wakefield Tower and Deveraux Tower.
LANTHORN TOWER
Q: Are there any important information here?
A: Take a picture of the Recreation
Panel, then walk cross another rampart to ...
SALT TOWER
Q: What is this strange hole on the wall do?
A: Use the cross-head screwdrivers from your
multi-tool (the top one) at the panel cover to open it. Insert the yellow
cylinder key to open it. Get the parchment.
Take a picture of it.
Note: You will get an email shortly. This
parchment will tell you about a secret passage which connect the White Tower
with the Waterloo Block.
Q: Where should I go now?
A: It's time to find a way to the Waterloo
Block. Go back to Wakefield Tower. Enter the sewer through the Wakefield Tower
exit. Take a route back to the White Tower.
WHITE TOWER
Q: Where could I find the candlestick which is
mentioned in the parchment ?
A: Go to the locked gate under the stair.
Since you already have the key (the metal
key with oval loop), you could open the gate by clicking on it. Head
upstairs. Move forward until you reach the end. Turn left and enter the chapel.
Go forward and straight to the back of the altar. Pick up the candlestick
that has no candle in it.
Q: Where is the secret passage?
A: When you walk out of the altar, you'll see a
man walking. Follow him to the next room on your right. Move forward until you
reach the end. Turn right and keep on moving forward until you see a door on
your left. Open it and climb up the stair. Move forward until you stand in front
of the first opening to your right (the room with a big cannon in the middle).
Move forward and stand in front of the silver rod on the right wall. That is
King Henry VIII's walking stick. Use the candlestick
on the right hole. It will open the secret entrance. Enter.
Q: Where is the exit way to Waterloo Block?
A: Follow the passage (ignoring the brick wall
on the left opening for a moment) until you reach the end. Behind the door is
the Waterloo Block.
Q: How can I open the door. The lock is rusted?
A: Use the WD40 spray
to remove the rust. Open the enter and head to ....
|
