| |
|
THE DYSK THEATRE |
| |
| Before going anywhere you should check everything at the scene
of the devastation. Examine the rubble next to Warb's body to
recover the Falchion. If you talk to Anu-anu he mumbles something
about an inscription. The Inscription is not easy to see, but you'll
find it on the wall. It reads QUOD NESCIUNT EOS INTERFICET. Copy the
inscription to your Note-book. Now all you have to do is get it
translated. |
| |
|
 |
| |
| When you leave you'll find Coom lying next to the stage. He suspects
some of the cultists wanted the failure. |
| |
| |
| |
|
SANCTUARY |
| |
| Kondo talks about the Dark Sect wanting to destroy creation.
After killing Kondo search him to find an amulet. |
| |
| |
| |
|
VON UBERWALD
MANSION |
| |
| The Butler tells you the Count has died, but he left
instructions allowing you access to the library. Look up the
translation of the
Inscription (what they don't know will kill them) but you'll
need something to cross reference it with. If you click the
Inscription icon on
Nylonathatep, you
discover that there's a connection between the two. Look for the
book on Nylonathatep
again to learn the inscription is the motto of the Dark Sect of
Nylonathatep, whose emblem is a triple-lobed eye and who had a
sacred artefact known as the Radiant Trapezohedron. Then look for a
book about the amulet to learn that it is the three-lobed eye
emblem. |
| |
| |
| |
|
TEMPLE OF SMALL
GODS |
| |
You find Mooncalf, albeit somewhat deranged, inside the Temple.
When you show him the amulet he tells you Kondo was a traitor. A new
dialog topic (Traitors in the Cult) is triggered. Use this topic to
talk to Mooncalf and he tells you about Foid who changed his
identity and made a run for it. Did Foid use a plaster surgeon (just
like Malachite did) - and if so, who do you think it was?
Mooncalf is the next member of the cult that dies. |
| |
| |
| |
|
RHODAN'S
WORKSHOP |
| |
| You find Rhodan back in his workshop. Return the bandages to him
and he admits to being a plaster surgeon. Ask about
Foid and learn that
Rhodan worked on him opposite an abandoned shop. |
| |
| |
| |
|
DAGON STREET |
| |
After talking to Rhodan there's a door opposite the Fish Bar.
Enter the door, then talk to Foid about the amulet to learn it
belonged to Satrap. When you tell him you've got the Falchion, Foid
will admit that Mooncalf was his contact. Next use the new dialog
topic (Satrap's Contact) and Foid tells you Gelid, the porter at the
University, was Satrap's contact.
Note the Elver sign on the floor for protection against Nylonathatep.
The same ploy might come in handy later! |
| |
| |
| |
|
LEONARD'S CELL |
| |
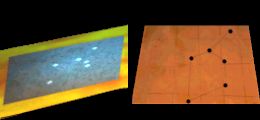
| Leonard and Two Conkers will still be working on their
flapping-wing-flying-device. When you show the Falchion to them, Two
Conkers says the indentation in the pommel is the same shape as the
gold jewel he was looking for. Next ask him about the
Radiant Trapezohedron,
which he'll recognize as the jewel. He gives you the (star) map,
saying that the stars are a clue to finding the jewel. |
| |
| |
| |
|
NEW HALL |
| |
| You want to speak to Gelid, but Mrs. Fomes won't let
you into the University and fires you. |
| |
| |
| |
|
PSEUDOPOLIS
YARD |
| |
| Tell Nobby that you need his help to get into the University by
talking to him about Gelid.
He'll eventually agree to give you a (search) warrant. Note that you
must first go to the NEW HALL and 'get fired', otherwise you won't
get this response from Nobby. |
| |
| |
| |
|
NEW HALL |
| |
Mrs. Fomes reluctantly allows you in. Although you have to act
'quickly', there are no time limits in the game.
You're too late to stop Gelid from being killed. Examine the
bloodstains on the carpet to change into wolf
mode and follow the trail of blood. It leads you to THE OBSERVATORY.
A new location at THE OBSERVATORY is activated. |
| |
| |
| |
|
THE OBSERVATORY |
| |
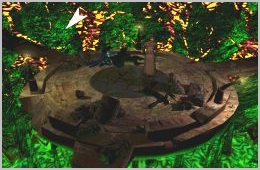
You find Satrap operating a large telescope. He'll give you some
background information, but more importantly, he tells you that he's
looking for the Radiant Trapezohedron. Your 'killing' instincts take
over yet again!
THE OBSERVATORY floor is decorated with mosaics showing the signs of
the zodiac. Hold and click the map on the 'Mosaics' and look for the
mosaic
that corresponds with the constellation on the map. When you
select the 'Small Boring Group of Faint Stars' the Golem will adjust
the telescope accordingly. By looking through the telescope you'll
discover that the Radiant Trapezohedron is in the MAUSOLEUM! |
| |
|
 |
| |
| Take the astrolabe that's lying on the floor. |
| |
| |
| |
|
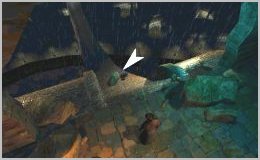
MAUSOLEUM |
| |
The roof in the MAUSOLEUM is open and you can see the sky. Set
the telescope in THE OBSERVATORY to the 'Small Boring Group of Faint
Stars' and then use the astrolabe to look at the sky and pin-point
the location of the grotesque in the entrance chamber.
Examine the grotesque, then push it to reveal the sarcophagus below.
Take note of the circular indentation with a square peg on the
sarcophagus. You should remember this design from something else!
Put the coin on the indentation to open the sarcophagus. The Zombie
inside has the Trapezohedron, and you must get it from him. Although
he talks about a riddle, it's a red herring! If you tell him you've
got the Falchion he eventually gives you the Trapezohedron. Listen
carefully to what he says, there's a clue to something you have to
do later.
When you leave you're confronted by Horst, and again get relieved of
the Falchion. |
| |
| |
| |
|
LEWTON'S OFFICE |
| |
| Did you examined the Trapezohedron (in your Inventory) before
Horst took the Falchion? If so, you'd have seen reflections of
yourself in it. Do you remember the Zombie telling you he saw you in
the jewel and also that he'd followed the sword's progress? The
'view' in the Trapezohedron therefore shows whoever has the the
Falchion. If you look at it now it shows Horst at the MAUDLIN
BRIDGE. |
| |
| |
| |
|
MAUDLIN BRIDGE |
| |
| You save Carlotta by killing Horst and then turn her over to the
Watch. During all this Carlotta tells you a portal has opened up
above the city and the only way you can prevent the destruction is
to take the Falchion through the portal. You've again recovered the
Falchion, so all you need to do is find a way up to the portal. |
| |
| |
| |
|
LEONARD'S CELL |
| |
| Leonard and Two Conkers have completed their
flapping-wing-flying-device and you volunteer to pilot it. Leonard
tells you that all they need is 'somewhere to launch it from'.
Remember the drawing that was on the wall before it was destroyed?
It was a clue that Malachite's escape route can be used as a
launching pad. However there's still another problem. Did you notice
the rubble on the ground? |
| |
|
 |
| |
Remove the rubble and tell Leonard you've got a place to launch
the flapping-wing-flying-device. As you're about to fly into the
portal Ilsa arrives to warn you that protection is needed against
Nylonathatep. Do you recall what Foid did for protection? You must
similarly trace the
Elver Sign onto the
flapping-wing-flying-device.
Now sit back and enjoy the ending - à la Casablanca! |
| |
| |
| |
|
SHOULD YOU
HAVE ANY PROBLEMS OR COMMENTS PLEASE CONTACT ME
MALCOLM SCHMIDT |
| |
|
 |
| |
| |
| |