
All images in this walkthrough are property of Ubi Soft Entertainment™
All images in this walkthrough are property of Ubi Soft
Entertainment™
Walkthrough by Bert Jamin
© October 2004
Bert Jamin (www.gamesover.com)
This walkthrough may not be sold and may not be used for any commercial
purposes. Neither is it permitted to publish this walkthrough in any way without
the written permission of the author Bert Jamin (www.gamesover.com) and his E-mail address ([email protected]) are mentioned unchanged. For the most up to date walkthroughs always visit www.gamesover.com.
If you have any suggestions
to improve this walkthrough, let me know by sending me an email: [email protected].
Click on one of the books to go to that chapter,
 Tomahna |
 Spire |
 Serenia I |
 Haven |
Serenia II |
or click on the image at the bottom of this page to go to the next chapter.
Attention: I'm writing this walkthrough while playing the game for the very first time. Maybe I'll have to update this walkthrough during the game! So check often if there are any improvements... For the last time updated on: 10.30.2004 .
Chapter 5, Serenia - Part Two
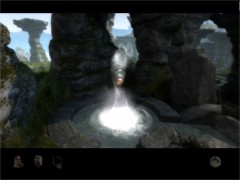
Your first goal of course is the waterwheel with the grey thing twisted around the big wheel. You can walk all the way there but it is better to use the ZIP-modus once more. Click on the circular image at the right bottom of your screen. Click on the image with the statue between the two stairs.
Climb up the left stairs. Walk on the wooden planks on your right side in the direction of the waterwheel. Zoom in on the grey thing twisted around the wheel. Now you see that it is the same kind of creature you just saw in Haven. So let's do the same trick. Strike the bottom line of the right-most twist four times from the right to the left and tap it on the head as soon as it comes alive. When it leaves, it sets free the wheel.
Turn the wheel counter clockwise. Turn around and walk down the wooden planks. Turn to the right and pull the statue's red tongue. Turn to the left and climb down the stairs. Climb down the hidden passage and notice that the Artifact Chamber is now filled with water. Climb up those ladder. Turn to the left and go forward. Notice another Protector is standing on the platform near the water. Walk toward her.

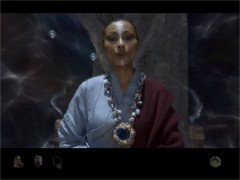
Another Protector
When she finishes speaking to you, turn around and climb up the stairs. If you want to hear her message again, zoom in on the statue with the plate. Click on the amulet. Zoom out. Walk to the stairs at the right side. Climb up the stairs. Cross the wooden bridge. Go forward and pass the arch. Go to the right on the crossing. Climb up the stairs to the Hall of Spirits and enter the hall.
One of the spirits wakes up. She tells you that have you have to go to a place called Dream. She also tells you that you must not go there without the appropriate guide. Wait until the mixture of fire, water and air comes down. Touch the mixture and see that one of the masks starts blowing soap bubbles. Another spirit wakes up and tells you that you are a Child of Water and that you have to find the Water Guide in the Stone Forest. She also tells you that you have to offer this guide an appropriate gift so that he will guide you on your journey to Dream. The last thing she tells you is that you have to return to the Memory Chamber when the Water Guide is guiding you. When she finishes talking to you, zoom in on the center of the floor. Click on the amulet. Exit the Hall of Spirits.
Becoming a Child of Water
Attention!!! In my game I always found the Water Guide on the same spot near the linking book to Tomahna. The next part describes how to find the Water Guide on that spot. If you don't find him there, you'll have to search for him to find him in one of the other pools. Hint 1: because you can only take about five steps before a soap bubble disappears, you should find him in a pool near soap bubbles. Hint 2: if you find the Water Guide far away from soap bubbles, scare him away until you see him in a pool near soap bubbles. Be careful not to scare him away again!!! Happy hunting...
Now use the ZIP-modus once more. Click on the first image to end up near the linking book to Tomahna. Turn around and cross the wooden bridge. Turn to the right and catch one of the soap bubbles. Now be careful! With a soap bubble in your hand you must not make sudden moves or it will vanish. You also can only take about five steps before it will vanish. If the soap bubble vanishes before you meet the Water Guide, go back and get another soap bubble.
So... with a soap bubble in your hand, carefully turn to the left and go forward three times. While facing the wooden bridge, carefully turn to the left and go forward one more step. The game takes over now and turns you to the Water Guide at your right. Click your left mouse button to give him the soap bubble. When you've done this correctly you'll see some firework and now the Water Guide is guiding you.
Your offer to the Water Guide
Use the ZIP-modus once more and click on the image of the Hall of Spirits. Turn to the right and go forward. Climb down the stairs. Turn to the left and climb down the stairs to the Harvester. Go to the right and enter the Memory Chamber. Save your game here! Go to the left and climb up the stairs. Zanika is waiting for you and asks you to lie down on the bed to go to Dream. So, lie down on the bed to go to Dream.

Be prepared!!!
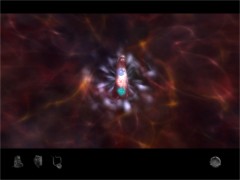
Sit tight, turn up the volume and enjoy the next part of the game. When Yeesha's memory appears in the shape of a white cloud Ancestors, the colored clouds, soon will surround it. Remember that the Water Guide told you that all Ancestors must be in close harmony. To get them into close harmony you have to change all the colored clouds to white. Every time you move your cursor over a colored cloud, the color of that cloud changes from red to purple, from purple to blue, from blue to cyan, from cyan to green, from green to yellow and finally from green to white.
Start with the white cloud. Move your cursor over the cloud that is touching the white cloud at the right side. Move your cursor over the cloud beneath that one. Move your cursor over the cloud that is touching this one at the left side. Move your cursor up over the white cloud. Then move your cursor over another square pattern until another colored cloud turns to white. Repeat this until all the clouds are white. You'll find that it isn't very hard.
When you have changed all the colored clouds to white, they will change into two white lights. After that, each white light turns into three colors, which together form the color white. These colors are red- green-blue and pink-yellow-cyan. You can see this sequence again if you wish by clicking on the amulet. When ready, look to the left and go through the exit. Climb down the stairs and exit the Memory Chamber. Walk the path to have another meeting with Anya. When she finishes speaking to you, she will go into the Memory Chamber and close the doors to keep everybody outside the chamber until this crisis is over. If you want to hear her story again, zoom in on the door of the Memory Chamber and click on the amulet.
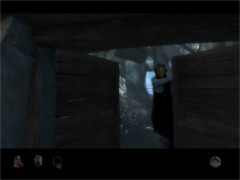
Anya closing the Memory Chamber
Turn around and walk down the path. Climb up the stairs. Turn to the right and climb up the stairs to go past the arch. Cross the square and climb up the wooden stairs. Near the soap bubbles turn to the left. Go forward three times. Turn to the right and go forward one more time. Turn to the left and go forward.
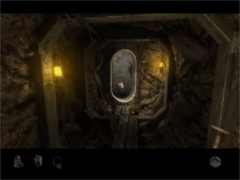
Look around to see the broken waterwheel at your right side. Turn to the left and go forward one step. Look around once more. To the right there is another wooden bridge. At your left you see a path leading down past the gap in the wall. Go down that path. Go forward and cross the little wooden drawbridge. Turn to the right and climb down the stairs to the old Memory Chamber.
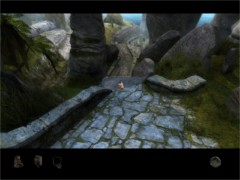
The correct path down
Walk to the right. While you are passing the front door of the old Memory Chamber, Sirrus will come out. When he finishes speaking to you, and if you wish to hear his story again, zoom in on the door and click on the amulet. When finished, zoom out and turn to the right. Cross the wooden bridge a little further.
Now you have to find a way to get into the old Memory Chamber via the hidden entrance beneath the surface. But for now the room beneath the old Harvester is filled with water so you can't enter it. Turn to the left and pull the right lever to close the hatch of the Harvester. Pull the left lever to lower the Harvester. This will drain some water out of the room beneath the Harvester into the empty waterway. Push the left lever to raise the Harvester.
Cross the wooden bridge. Turn to the left and notice the small wooden stairs leading down at the right side of the wooden platform that you are standing on. Climb down those little stairs. Go forward one step. Turn to the left and look through the window. Turn the wheel beneath the window clockwise. Notice that a hatch on the opposite side opens draining some more water out of the room beneath the Harvester. Also notice that there is still a lot of water in the basin. Look to your right to see a closed door.
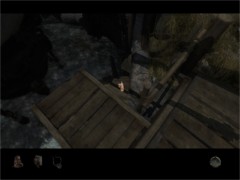
The little stairs next to the platform
Turn to the left and climb up the stairs. Turn to the right and go forward in the direction of the water. Go forward one more time to end at the controls of the Harvester. Pull the left lever to lower the Harvester and then push the left lever one more time to drain some more water. Pull the left lever one more time to lower the Harvester. Pull up the right lever to open the hatch of the Harvester while it's still below the surface. Wait a moment until the Harvester is filled with water. Then pull the right lever once more to close the hatch. Push the left lever to raise the filled Harvester.
Cross the wooden bridge and turn to the left. Climb down the little wooden stairs. Turn to the left and look through the window to see that now almost all the water has gone. Turn to the right and climb down the next stairs to go through the now open door. Turn to the right and zoom in on the circular door. Click on the amulet to get a vital clue for this door puzzle.
First it refers to the medallion you found earlier after your ride up in the elevator back at Spire. Then it shows how three different colors together form the color white. The left one shows the colors red, green and blue. The right one shows the colors magenta, yellow and cyan.
Press the button at the bottom of the door. Study the door and notice that there are many colored dots on the outer ring of the door. Also notice that there are 6 empty holes at the inner side of the door. Lets call that the inner ring. The correct order of placing the colored dots differs from game to game. That is... for the inner ring. The order for that inner ring depends on the colors you have seen on the medallion you found in Spire. Open your Journal and have a look at the picture you took of that medallion and zoom in on that picture. This is how mine looked:
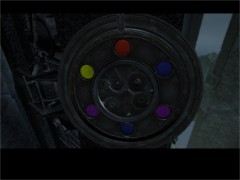
The colors on my medallion...
As you can see, the colored dots on my medallion are clockwise, red, blue, magenta, blue, magenta and yellow. You have to move the colored dots to the empty holes in the corresponding order as on the medallion. At this moment it doesn't matter how the colored dots are placed on the outer ring! So, in my case, the correct way of setting the inner ring was:
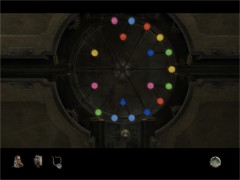
So I had to set the inner ring this way. Ignore the colored dots
on the outer ring!
Once you have set the inner ring correctly, it's time to set the outer ring. Well... that is a piece of cake actually. The only two things you have to do is 1) leave the inner ring you just set alone and 2) arrange the dots on the outer ring in that way that the color of the dot on the inner ring together with the two colored dots on the outer ring are forming the color white. Remember that there are two combinations to form the color white. One combination is red, green and blue. The other combination is magenta, yellow and cyan.
Let's start with the top part of the door. Notice that there is a red-colored dot on the inner ring that corresponds to my Spire medallion. So the only thing you have to do is to move a green-colored dot and a blue-colored dot on the outer ring to get the correct combination for the color white.
On the second part of the door (clockwise) is a blue-colored dot on the inner ring. So you only have to move a red-colored dot and a green-colored dot on the outer ring to form the correct combination for the color white.
On the third part of the door is a magenta-colored dot on the inner ring. So you only have to move a yellow-colored dot and a cyan-colored dot on the outer ring to form the correct combination for the color white.
On the fourth part of the door is a blue-colored dot on the inner ring. So, you only have to move a red-colored dot and a green-colored dot on the outer ring to form the correct combination for the color white.
On the fifth part of the door is a magenta-colored dot on the inner ring. So, you only have to move a yellow-colored dot and a cyan-colored dot on the outer ring to form the correct combination for the color white.
On the sixth part of the door is a yellow-colored dot on the inner ring. So, you only have to move a magenta-colored dot and a cyan-colored dot on the outer ring to form the correct combination for the color white.
With me, the correctly set door looked like this. Remember as I told before, if the colors on your Spire medallion are different from the colors on my Spire medallion, which will likely be the case, than you have the to move the corresponding colored dots to the empty holes on the inner ring!
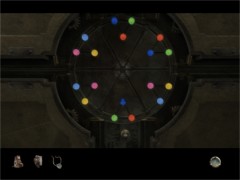
All colored dots set correctly. That is... in my case!!!
When you have set all the colored dots in the correct order, push the button on the bottom of the door. If nothing happens, you haven't placed the colored dots in the correct order. In that case... try again! Go through the opened door. Go forward and go past the oval opening. Turn to the right and zoom in on the diving suit. Click on the amulet. Zoom out and climb up the steel ladder. Turn the wheel on top of the ladder counter clockwise.
Go forward
Turn around and go forward one step. Look around to see a closed door at your left, some kind of rusty device in front of you and the heart of the old Memory Chamber at your right. Zoom in on the window. Zoom out and pull the little brown handle at the left bottom side beneath the window. Hmmm... it really looks very old. The heart of the Memory Chamber is hardly beating. Notice the wet footprints on the wooden platform. That shows that there has been somebody here a short time ago. Turn around and press the little handle at the right bottom side beneath the window.
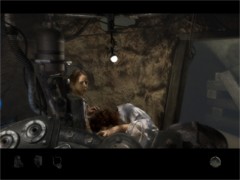
Turn to the right and walk to the rusty device. Zoom in on the little window on top of the left side of the device. Zoom out and turn to the right. Climb up the wooden stairs. Now you have finally found Yeesha! The poor child has been kept imprisoned in a chair. When she asks you to set her free, save your game!!! Turn to the left a little and go forward. At that very moment, Achenar comes stumbling in. He is still carrying the Artifact of the old Memory Chamber. Yeesha begs you to pull the silver lever and Achenar insists that you pull the amber lever. Now you three options: 1) pull the left silver lever, 2) do nothing at all and 3) pull the right amber lever. Let's do the wrong options first, just for fun!
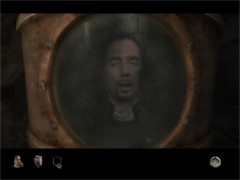
Seems pretty dead to me...
Pull the silver-colored lever on the left side. Poor innocent Yeesha! Load your saved game...
Do nothing at all. Poor innocent Yeesha again! Load your saved game...
Pull the amber-colored lever on the right side. Poor Yeesha! Then as soon as you can, go through the opened door past Yeesha. Zoom in on the little window on top of the left side of the device. Zoom out and turn to the left. Go forward one more time. Zoom in on the window of the heart of the old Memory Chamber. Zoom out and go to the left. Turn to the right and climb up the wooden stairs. Go forward and sit down in the empty chair. Look up and look at the stone tablet above you to return to Dream once more.
Look around and you'll see from the left to the right: a chessboard, the circular nara door, a book, a picture of Atrus and Catherine and a crystal figurine. Notice that there are all kinds of symbols floating above each and every object. When you move your cursor over one of the symbols you'll here a sentence spoken by Yeesha or by Sirrus. According to the conversation between Yeesha and Sirrus, Sirrus tried to persuade Yeesha to ask Atrus to give him the chess game. Your goal is to get all the sentences into the correct order and above the correct objects by moving them from one to the other.
The only problem is that although you can only pick up all the symbols from above the objects, you can only drop one symbol at a time on an object. So... you can't, for example, pick up the second symbol from above the chessboard to drop it on the door. Before you start solving this puzzle save your game. Although you can't die in the game, a wrong move is easily made with this puzzle! The correct order of the sentences is:
Yeesha:
Daddy's really good at chess
Yeesha: You should play him
Sirrus: I'd like to sis, but I don't have a chess set
Yeesha: You can make one just like you made my spirit guide
Sirrus: I could, but it's really hard to carve figurines
that small
Sirrus: They break so easily
Yeesha: Well maybe mum and dad could give you a set, as a
present
Yeesha: I'll tell them to when I link home
Sirrus: Ha, right, and I suppose you'll tell them to
make it out of the same rock as this chamber
Sirrus: That way, I'll never be able to break them
To get them in this way you have to move the symbols above the object in the next order:
Turn to the right. Pick up the symbol above the door. Turn to the left. Drop the symbol on the chessboard.
Turn to the right. Pick up the three symbols above the book. Turn to the left. Drop one symbol on the door. Turn to the right and drop one symbol on the book. Turn to the right and drop the last symbol on the picture.
Turn to the left. Pick up the symbol above the door. Turn to the left. Drop the symbol on the chessboard.
Turn to the right. Pick up the symbol above the book. Turn to the left. Drop the symbol on the door. Pick up the symbol you just dropped on the door and drop it on the chessboard.
Turn to the left. Pick up the symbol above the figurine. Turn to the right. Drop the symbol on the chessboard.
Pick up the seven symbols above the chessboard. Turn to the left and drop one symbol on the figurine. Turn to the right and drop one symbol on the chessboard. Turn to the right and drop one symbol on the door. Turn to the left and drop one symbol on the chessboard. Turn to the right and drop one symbol on the door. Turn to the left and drop one symbol on the chessboard. Turn to the right and drop the last symbol on the door.
Turn to the left. Pick up the symbol above the figurine. Turn to the left. Drop the symbol on the picture.
Turn to the right. Pick up the three symbols above the chessboard. Turn to the left and drop one symbol on the figurine. Turn to the right and drop one symbol on the chessboard. Turn to the left and drop the last symbol on the figurine.
Turn to the right. Pick up the symbol above the chessboard. Turn to the left. Drop the symbol on the figurine. Notice that white lights now surround the figurine. This means that the figurine has been set correctly! So ;eave these symbols alone!
The white lights
Turn to the right. Pick up the three symbols above the door. Turn to the left and drop one symbol on the chessboard. Turn to the right and drop one symbol on the door. Turn to the left and drop the last symbol on the chessboard.
Pick up the two symbols above the chessboard. Turn to the right and drop one symbol on the door. Turn to the left and drop the last symbol on the chessboard.
Turn to the right. Pick up the two symbols above the door. Turn to the left and drop one symbol on the chessboard. Turn to the right and drop the last symbol on the door.
Pick up the symbol above the door. Turn to the left and drop one symbol on the chessboard. Notice that this one has been set now too!
Turn to the left. Pick up the four symbols above the picture. Turn to the left and drop one symbol on the book. Turn to the left and drop one symbol on the door. Turn to the right and drop one symbol on the book. Turn to the right and drop the last symbol on the picture.
Turn to the left. Pick up the two symbols above the book. Turn to the right and drop one symbol on the picture. Turn to the left and drop the last symbol on the book.
Pick up the symbol above the book. Turn to the left and drop the symbol on the door. Notice that this one has been set now too!
Turn to the right. Pick up the two symbols above the picture. Turn to the left and drop one symbol on the book. Turn to the right and drop the final symbol on the picture.
If you have done this correctly, Yeesha and Sirrus will speak all sentences. If not, you did something wrong. In that case load your saved game and try again! Now the Water Guide will tell you that Sirrus' power over Yeesha's mind is loosening, but to completely break Sirrus' power, you have to solve another puzzle. First of all save your game! Look around and see: an open book, an empty chair, a memory and a sarcophagus. When you move the cursor over the symbols you'll recognize Sirrus' words about the chair in which Yeesha has been kept imprisoned. The correct order of the sentences is:
See this globe little sister
See how round and smooth and empty it is
When I turn the switch, the chair you are sitting in will activate
Lights will go on
And everything that is you will be sucked out of your body
Leaving behind the perfect disguise for me to step into
Father and mother will teach you the art
Never knowing that it's me who is doing the learning
Of course, I'll kill them as soon as I know how to write Ages
Then, I'll put my new memories back on my body and no one will be able to stop
me
To get them in this way you have to move the symbols above the object in the next order:
Pick up the three symbols above the chair. Turn to the right and drop one symbol on the memory. Turn to the left and drop one symbol on the chair. Turn to the left and drop the last symbol on the book.
Turn to the right. Pick up the three symbols above the memory. Turn to the right and drop one symbol on the sarcophagus. Turn to the left and drop one symbol on the memory. Turn to the right and drop the last symbol on the sarcophagus.
Turn to the left. Pick up the symbol above the memory. Turn to the left and drop the symbol on the chair.
Turn to the right. Pick up the six symbols above the sarcophagus. Turn to the left and drop one symbol on the memory. Turn to the left and drop one symbol on the chair. Turn to the right and drop one symbol on the memory. Turn to the right and drop one symbol on the sarcophagus. Turn to the right and drop one symbol on the book. Notice that this one now has been set! Turn to the right and drop the last symbol on the chair. Notice that this one has now been set too!
Turn to the right. Pick up the two symbols above the memory. Turn to the right and drop one symbol on the sarcophagus. Turn to the left and drop the last symbol on the memory.
Turn to the right. Pick up the two symbols above the sarcophagus. Turn to the left and drop one symbol on the memory. Turn to the right and drop the last symbol on the sarcophagus.
Turn to the left. Pick up the two symbols above the memory. Turn to the right and drop one symbol on the sarcophagus. Turn to the left and drop the last symbol on the memory.
Turn to the right. Pick up the two symbols above the sarcophagus. Turn to the left and drop one symbol on the memory. Turn to the right and drop the final symbol on the sarcophagus.
If you have done this correctly, Sirrus will speak all sentences. If not, you did something wrong. In that case load your saved game and try again! Step down from the chair and watch the touching ending of the story.
Poor Yeesha after all...
The End...